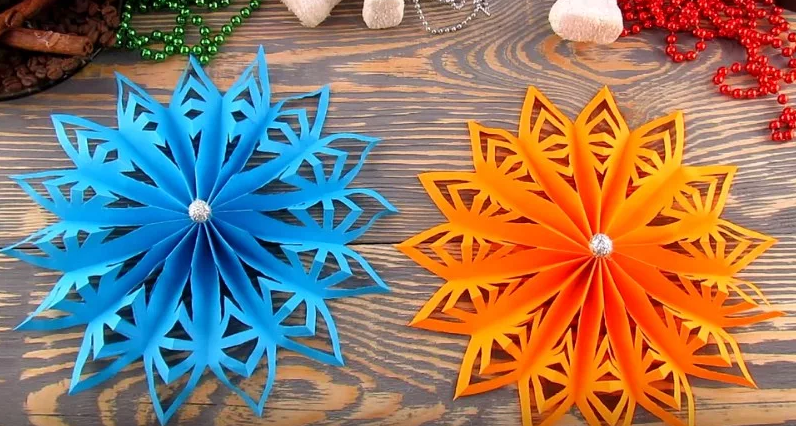
To make a voluminous snowflake of paper is simple. Look for instructions in the article, there are a lot of them.
Contents
- How to make a voluminous shiny snowflake with your own hands: instructions in stages, photo
- Volumetric space snowflake: how to make paper from paper, photo
- Volumetric two -tone snowflake - how to make: instructions in stages
- Video: Volumetric snowflake from paper
- How to make a beautiful voluminous snowflake from A4 paper: instructions in stages
- How easy it is to make a voluminous and beautiful 3D snowflake with Christmas trees: step by step
- Video: DIY snowflake
- Original volumetric and large snowflake: how to make a step from paper step?
- Volumetric and round snowflake: how to make a decoration easily in stages?
- Volumetric geometric snowflake - how to make: instruction step by step
- Volumetric and large snowflake from individual parts - how to make: instructions in stages, video
- Video: How to make a large New Year snowflake?
- Voluminous beautiful snowflake in the technique of origami - how to make: instruction step by step
- Creative volumetric snowflake - how to make from paper: instructions in stages, video
- Video: Origami, paper from paper
- Volumetric snowflake in the technique of modular origami - how to make from paper: instructions in stages, video
- Video: Snowflake from paper modules Origami step -by -step assembly for beginners
- Video: A simple snowflake from paper modules. Step -by -step assembly for beginners
What is associated with us with the New Year and fabulous atmosphere? Of course, snowflakes. They have a magical aroma of winter and a pleasant chill, which is in contact, passes throughout the body. Knight goosebumps run from such winter and New Year's sensations. Snowflakes make us smile. They help to recall some completely stupid or cheerful moment from childhood, when we rushed snowballs and lay in the snow. Surely, now each of you smiled from such memories.
There is also an article on our site that describes the stages that help fold a snowflake of paper and napkins. These are simple master classes. Therefore, you can do such crafts even with children.
Before the New Year, people decorate at home with paper snowflakes, educators hang them in kindergartens, and teachers of schools. Also, with their help, they decorate the city Christmas tree. But usually they are made inaccurately, flat and not so beautiful. When we were children, we cut them out of the napkins and, with the help of ordinary glue, was attached to the window. It looked, to put it mildly, not very, but it was very fun and festive. Now we will tell and teach you how to make different voluminous snowflakes of an unusual shape. Read further.
How to make a voluminous shiny snowflake with your own hands: instructions in stages, photo

Snowflakes are associated with a new year, holiday and fun, with love and warmth that live in every apartment. And from this the desire to decorate the apartment only increases. It's nice to wake up on a January day, lying in a warm bed, where this New Year's decor hangs everywhere.
Draw a child together drawing on the topic "Winter"And then the New Year will just burst into your house. Let the baby know that his work is also interesting for his parents.
Before this holiday, I want to decorate the room with only a sparkling decor. After all, everything should be solemn and in a festive. So, how to make a voluminous shiny snowflake with your own hands? What will be needed?
Buy such items and prepare tools:

Now we are starting to work - the instruction is step by step:
- Cut the shiny cardboard sheet with strips. We do each color 3 stripes, long 14 × 2.5 cm (perfect length - do not increase or decrease).
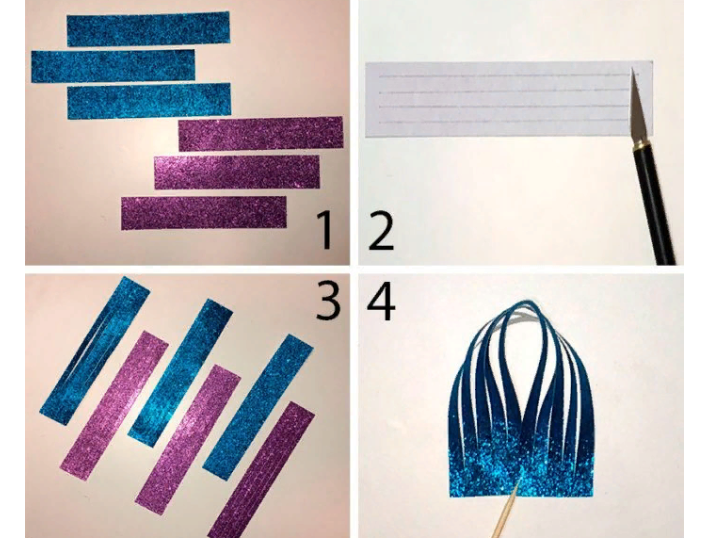
- On all reverse stripes we draw 4 even lines.
- After gently, cut through all the stripes that we drawn with a clerical knife.
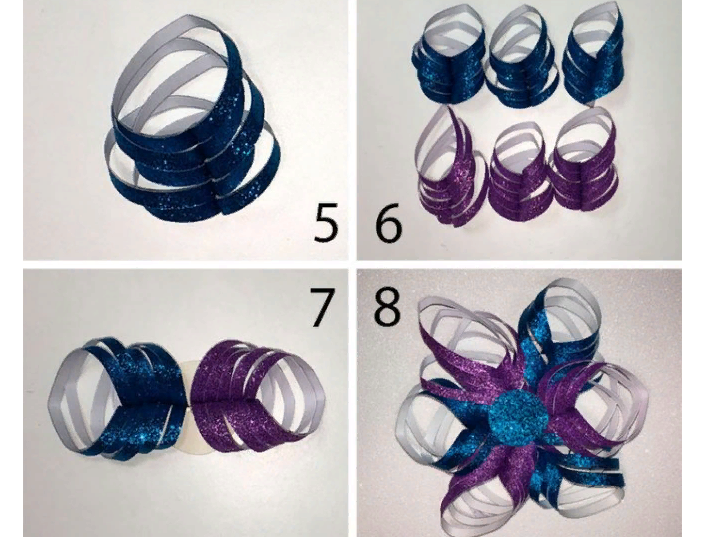
- We make a ball using a thermo-pistol and a toothpick.
- We cut a circle from cardboard (select it to the color of the strips so that the product looks harmonious).
- Alternately glue all 6 blanks per circle. For beauty, change colors, as in the photo above.
The brilliant decor is ready. It looks like a festive and original.
Volumetric space snowflake: how to make paper from paper, photo
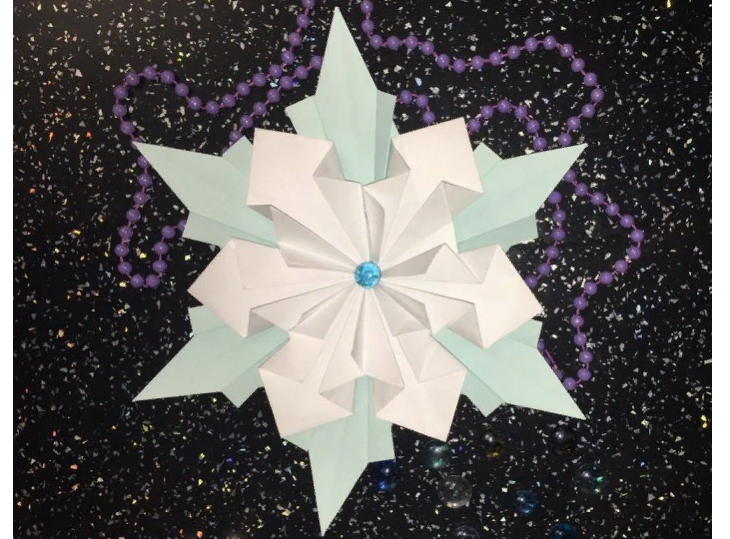
The next snowflake is called cosmic. And it justifies its name. See how it sparkles with rays. How to make a volumetric space snowflake in stages from paper? For manufacture you will need:

We start work:
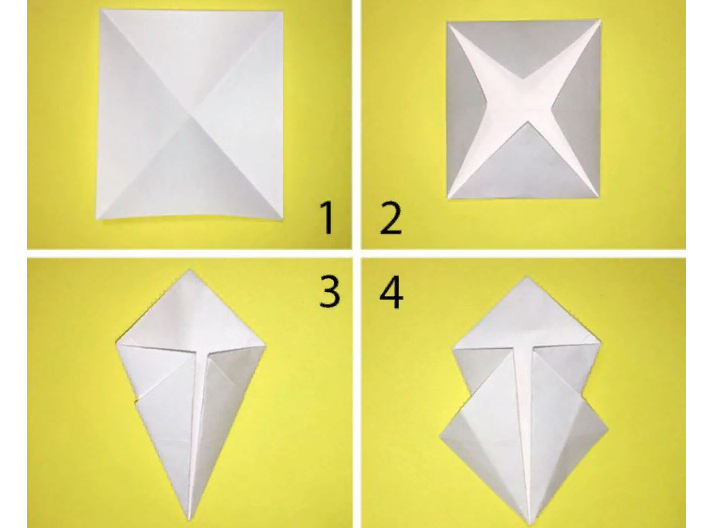
- Fold 2 p. On the diagonal line, a white sheet as in the photo above.
- We reveal the resulting square figure, then we turn the sides from the side to the bend in the center.
- We turn over what happened.
- We get the shape of the rhombic, bend the sides to the central part.
- We turn the product over again.
- On the sides we bend the upper layers.
- In the same way, you must fold others 5 white squares.
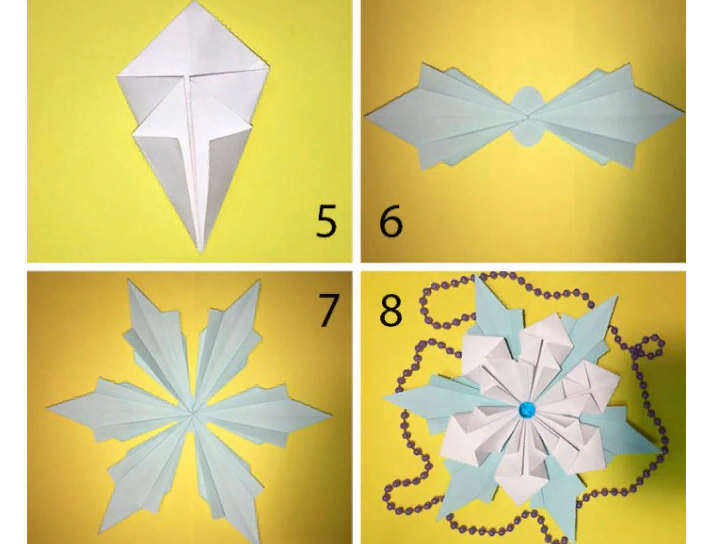
- We fold the blue sheet on both sides along the diagonal line, then turn around.
- We bend the square corners to the central point, and turn over to the side from the opposite side.
- We bend the sides on the sides to the central point.
- We add the rest of the blue squares (5 pieces) according to the above method.
- Now with glue on the circle that we cooked at the beginning, 2 modules of blue, they will be located opposite each other.
- We attach the remaining blue modular details with glue (4).
- On white folded squares, we glue blue, in a checkerboard pattern.
- We glue the rhinestone to the center for beauty. Ready.
It looks very good. Such decoration will bring comfort to the room. Close and friends will be surprised at your unusual sense of style, and “golden” hands who know how to do something very unique.
Volumetric two -tone snowflake - how to make: instructions in stages
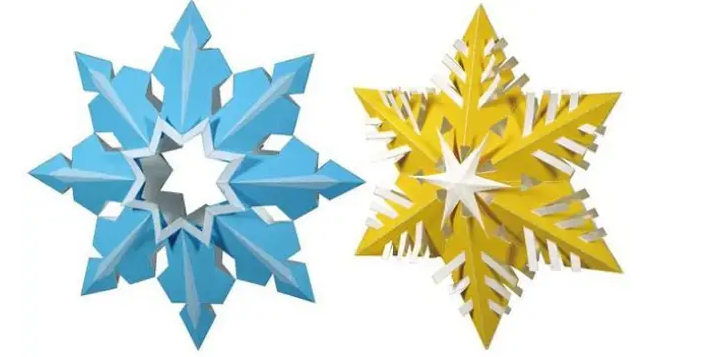
See how such a voluminous two -tone snowflake looks original. It is cut out and it folds simply, despite the intricacy of the pattern. How to make such a product? Here are the instructions in stages:
Tools and objects:
- Scissors
- Glue
- Pencil
- Ball pen
- Toothpick
- Tweezers
Clue: To make it easy for you to make bends, using a ruler, draw a thick needle or a pen without ink in a flat line in the place where the fold should be. You will get a sharp and clear line on which it will simply be folded.
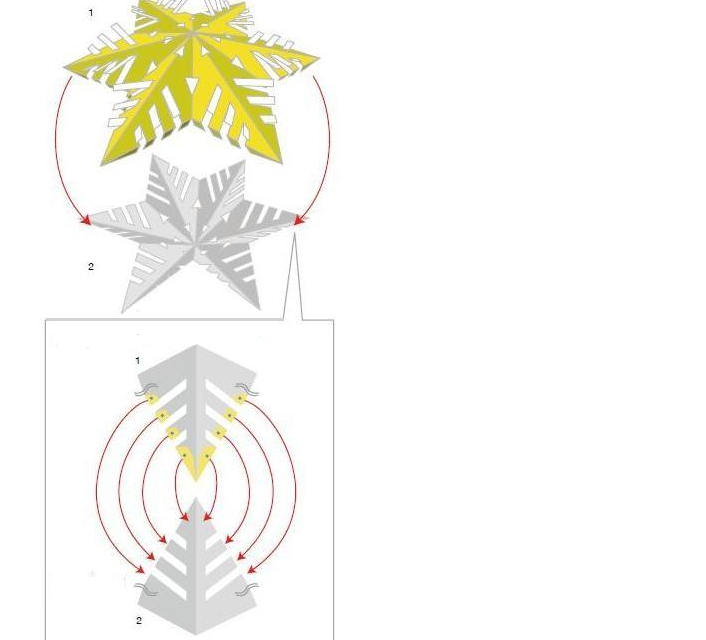
- To perform such a snowflake, first cut the “petals” according to the template below.
- Then bend them - half - inside, and the other half - out.
- Then the petals are glued and two finished parts are inserted into each other, as if collecting a puzzle. How to do this is visible in the picture below.
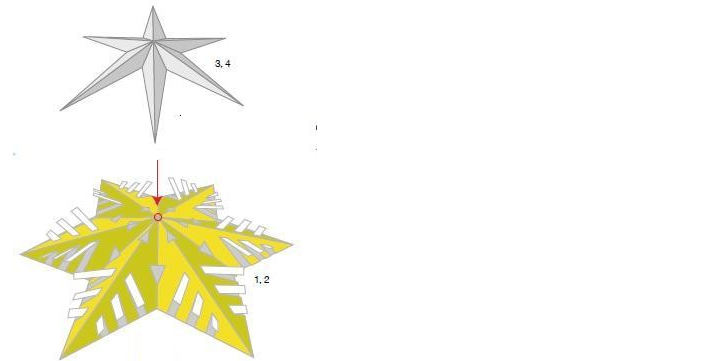
- Cut the star from contrasting paper, bend along the fold lines.
- In the center of Kapnit glue and attach this star on a snowflake. Slightly press the details glue well.
- Decor is ready. Attach the thread and you can decorate the apartment and Christmas tree with this decor.

Video: Volumetric snowflake from paper
How to make a beautiful voluminous snowflake from A4 paper: instructions in stages
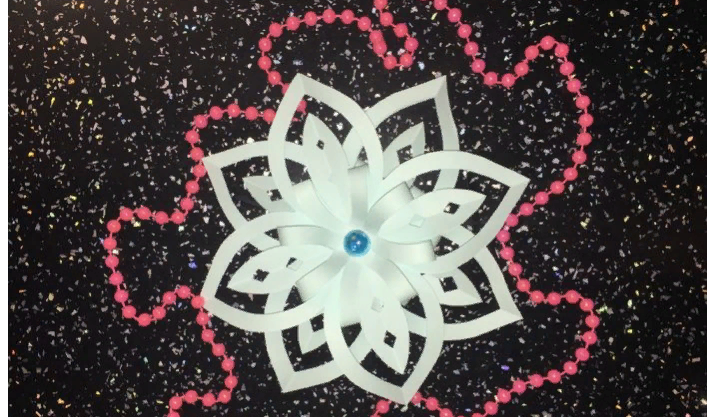
The name of the next snowflake is "beautiful." The simplest name, but the original decoration. Here are the instructions step by step, how to make a beautiful voluminous snowflake from A4 paper:
You need to buy and cook for work:

Let's start making the product:
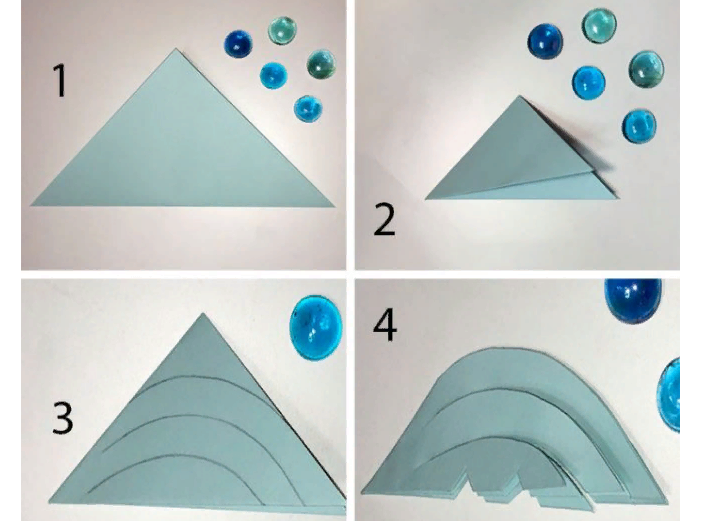
- We fold the leaf of blue or white along the diagonal line to make a triangular figure.
- Fold it twice.
- We draw the lines on which there will be cuts - 3 strips, as in the photo above.
- Do not cut at the end of the fold before the end - this is the central part of the snowflake.
- After cutting, we make small triangular recesses with the help of scissors at the bottom of the workpiece.
- We unfold what happened.
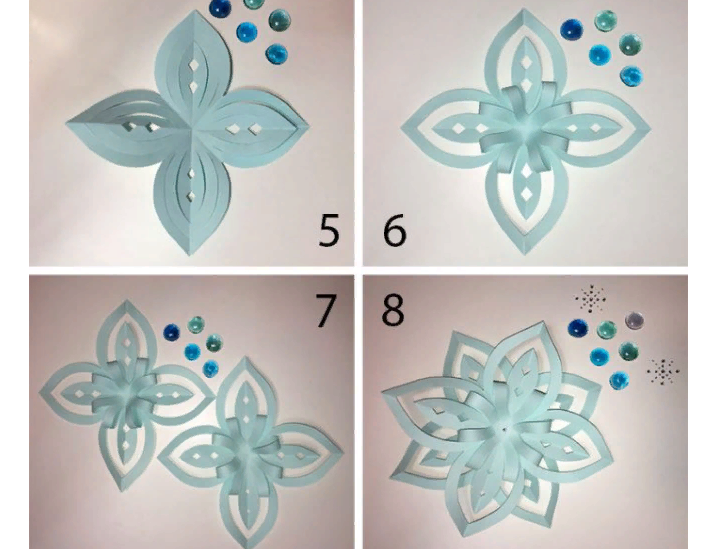
- We bent and glue the strips in the middle at the central point.
- We make another exactly the same detail in the actions described above.
- Now you need to glue two details so that the rays are in a checkerboard pattern.
- For beauty, we glue the rhinestone to the center.
It turns out a fairly original decoration that will look good in any house or apartment.
How easy it is to make a voluminous and beautiful 3D snowflake with Christmas trees: step by step
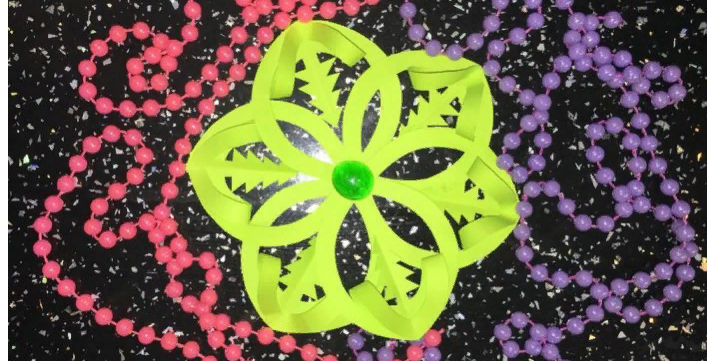
Look, what a beauty! You can make such a product yourself. Follow the stages described below in the text, and everything will come out for you. How is it easy to make a voluminous and beautiful snowflake? Here 3D snowflake with Christmas trees step by step:
You will need:

We begin to create:
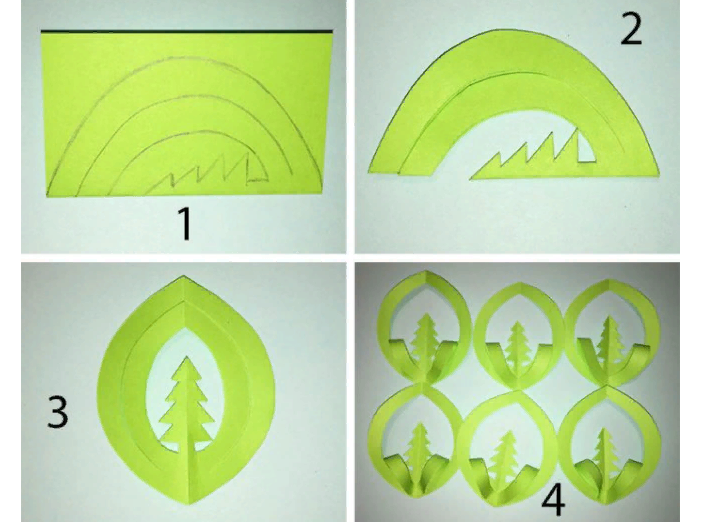
- We fold the piece of paper in half so that in the end the rectangle comes out.
- Using a pencil, draw 3 strips (in the form of a rainbow) and 1/2 Christmas tree, as shown in the photo above.
- Cut the resulting part on the indicated lines.
- We unfold what happened to us. It happened.
- We bend the middle strip on ourselves and fix it with adhesive pencil.
- We make another 5 of the same parts for the above actions.
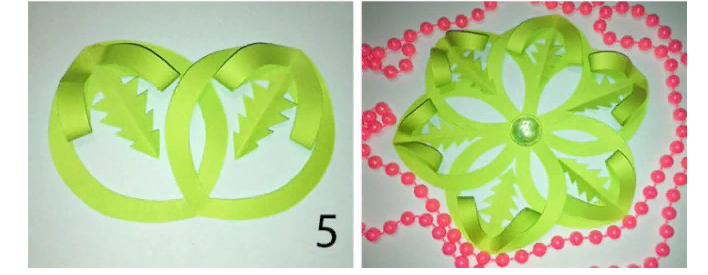
- Combine 2 parts among themselves. It will turn out like a flower petals, focus on this. Then fix everything with glue.
- We glue all 6 hours.
- As in the above instructions, we glue a beautiful final decoration in the middle of the rhinestone.
It turns out a very cute decor that will not be ashamed to hang somewhere in the apartment. You can even decorate the Christmas tree with such products, since they are small and neat.
Video: DIY snowflake
Original volumetric and large snowflake: how to make a step from paper step?
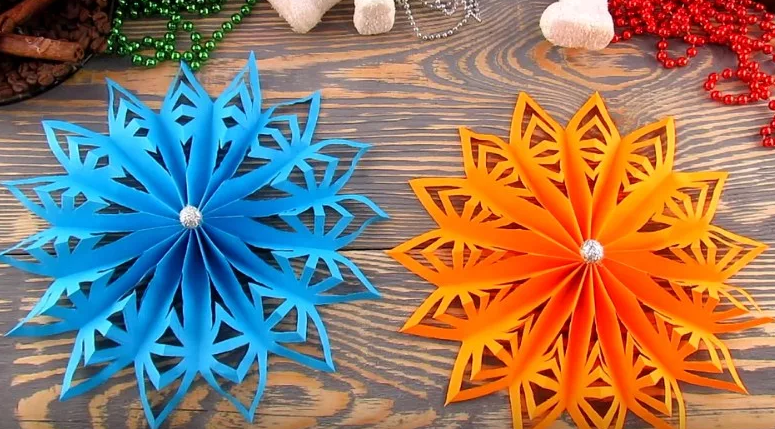
Despite the fact that this product looks unusual, it is very simple. The view of this jewelry is really unusual, all guests will be delighted with your talent and ability to creativity. How to make an original voluminous and large snowflake from paper from paper: how to make a step from paper?
So what will we need:
- Yellow paper in any format - 2 leaves
- Scissors
- Black paste
- Threads
- Glue stick
We begin to create:
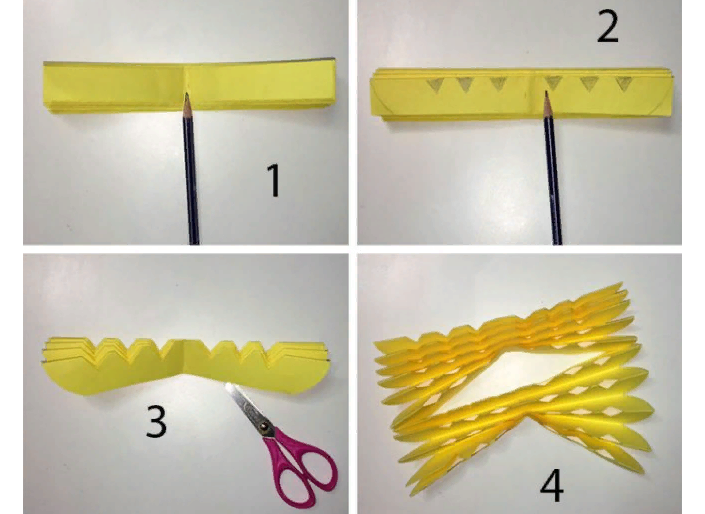
- Fold a piece of paper in the form of an accordion.
- We are looking for a center, and we denote it with a pen.
- On one side we draw three triangles, round the edges and cut out on all sheets.
- We do exactly the same actions with a 2nd leaf.
- We bind two leaves among themselves.
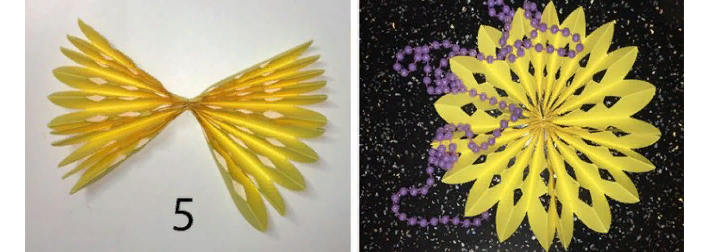
- We straighten what happened, giving the product a round shape.
- Glue each other all 4 parts.
- Be sure to attach to the middle of the rhinestone.
You can do this decor of any size. It all depends on the paper format. Such a jewelry turns out to be gentle and bright, like sunflower. But despite this, it still looks like a snowy “fluff”.
Volumetric and round snowflake: how to make a decoration easily in stages?
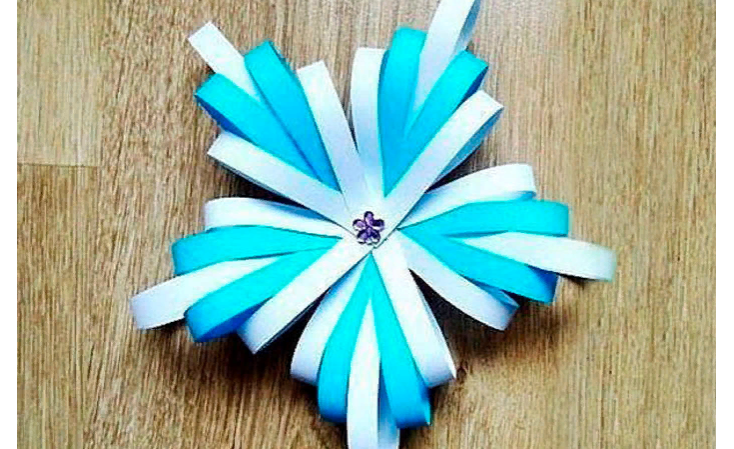
Such a voluminous and round snowflake looks like an asterisk. It will be a good decoration for the New Year. How to make it easily and in stages? Here's the instruction:
What will be needed:
- Paper (colors depend only on your preferences, but we will take white and blue)
- Scissors
- Ruler
- The adhesive base
- Jewelry in the form - beads, flowers, rhinestones, etc.
We begin our creative process:
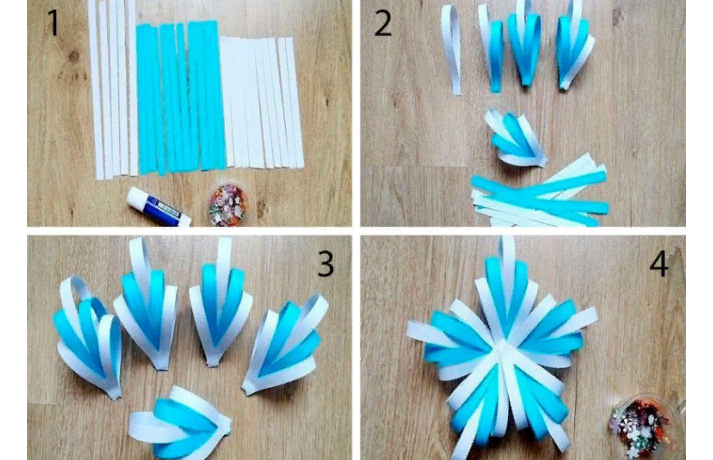
- Cut long paper tapes arbitrarily - 5 pieces.but blue - medium size ( 10 pieces.) and white sizes smaller ( 10 pieces.).
- The ends of these ribbons must be stuck with glue, as in the photo above.
- To assemble the product together, first we fold its parts from 5 strips.
- Now we collect the snowflake itself with the help of these five parts.
In the middle we glue any decoration for beauty. It can be a rhinestone or something else.
It turned out a product of an interesting shape, attractive and winter. You will not regret if you make it and want to decorate your house.
Volumetric geometric snowflake - how to make: instruction step by step

It is unlikely that you saw something like that. The volumetric geometric snowflake looks unusual and interesting. Let's figure out how to make this extraordinary product together. Here are the instructions step by step:
To do this, we will need some materials:
- Sheets col. Papers - 2 pieces
- Scissors
- Normal any glue
We proceed:
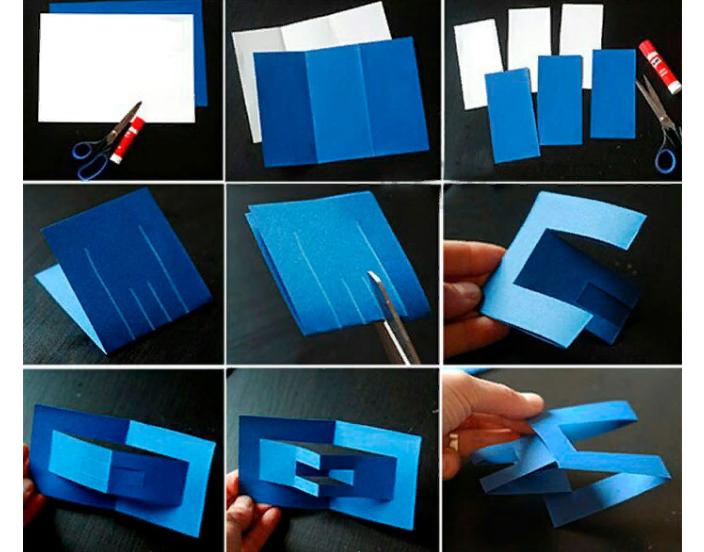
- We cut all the sheets for 3 hours. -be sure to be the same.
- We lay one part in half.
- After that we make four incisions: 2 of which short 2 - More authentic.
- We distribute the middle paper ribbons on different sides.
- We repeat exactly the same actions with the rest of the blanks.
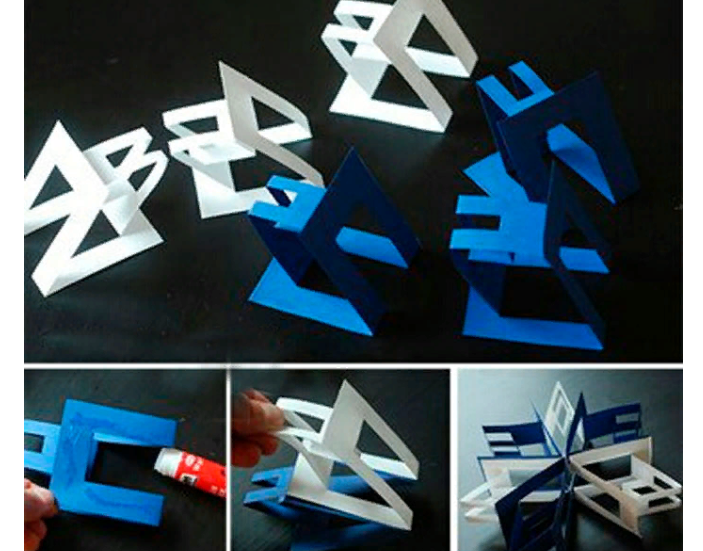
- Changing the colors, we glue the details with each other, forming an unusual geometric shape.
Such a snowflake is suitable for decorating the house to theorists, physicists, or fans of mathematics. It indicates their mathematical thinking. The product looks unusual compared to the previous ones. It looks like a real geometric figure that has turned into a snowy “fluff”.
Volumetric and large snowflake from individual parts - how to make: instructions in stages, video
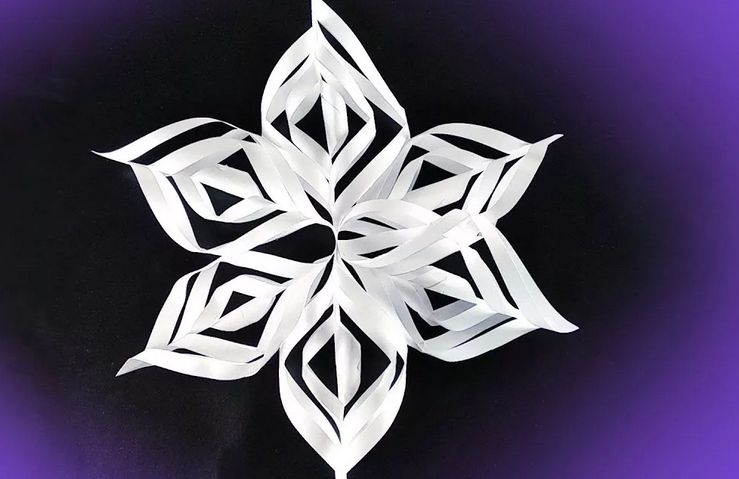
This snowflake is different from the previous ones. She looks different, unusual and very attractive. To perform such a craft is a voluminous and large snowflake from individual parts is simple. If you want, you can make it small. It all depends on your preferences. For miniature decoration, you need to prepare small paper leaves. It is worth noting that regardless of size, such decor will be simply done in any case. Here are the instructions in stages:
Prepare:
- Square leaflets of paper of large parameters - in the amount of 6 pieces
- Scissors
- The glue base is any
How to make a snowflake from this small set of materials and tools? Let's consider:
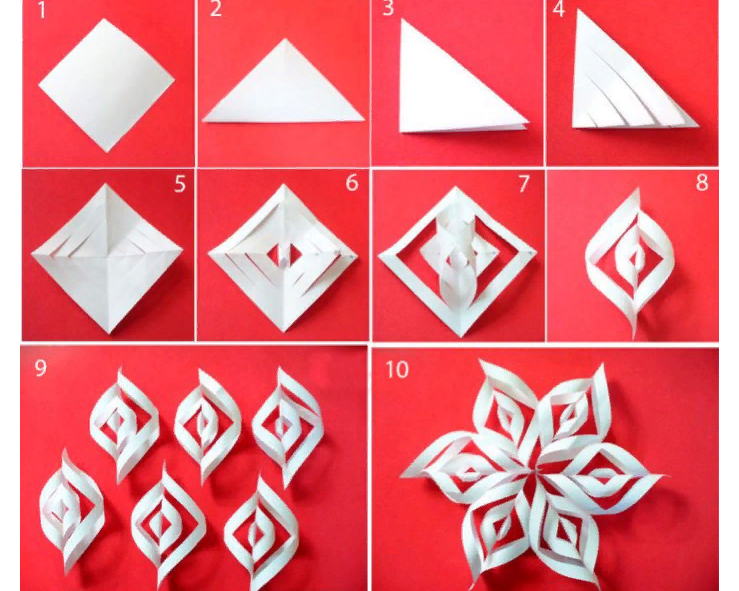
- First of all, we take a piece of paper, put it first along the diagonal line, and then in half.
- Then perform three cuts and expand the part.
- We glue the ends of the small ribbons, which are located in the middle.
- After alternately, we glue the following, alternating like that from all sides.
- We connect in exactly the same way the last ribbons from parallel sides.
- We repeat the same actions with other sheets, in the end we get a cool white snowflake.
It looks simple, but it is clear that it is made with taste. Such jewelry is now often done by children to decorate the class or assembly hall where there is a large Christmas tree. Read more the stages of execution, look in the video:
Video: How to make a large New Year snowflake?
Voluminous beautiful snowflake in the technique of origami - how to make: instruction step by step
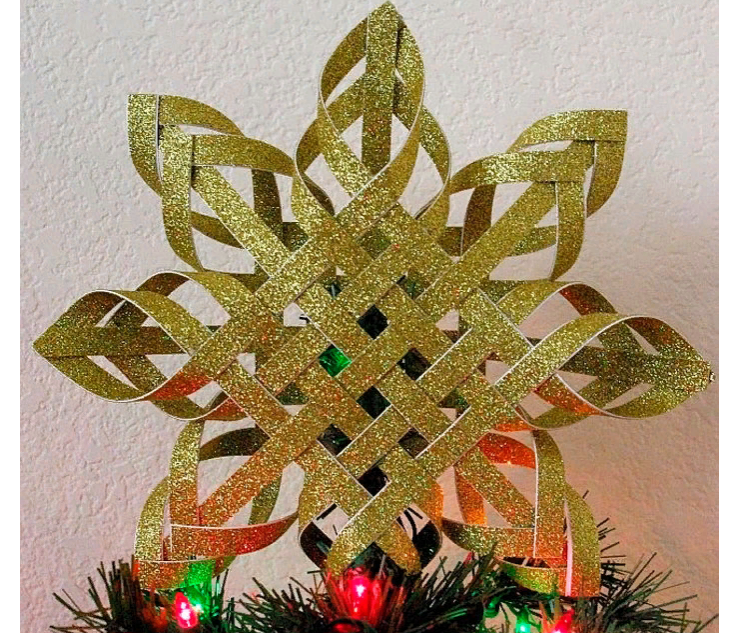
Such a modular snowflake looks stylish, and it seems that it is very difficult to make it with your own hands. But this is not so. Let's try to fulfill this craft - a voluminous and beautiful snowflake in the technique of origami. Here are the instructions step by step:
Buy such materials for this work:
- Shiny thick paper
- Scissors
- Glue
- Ruler
We begin to create:
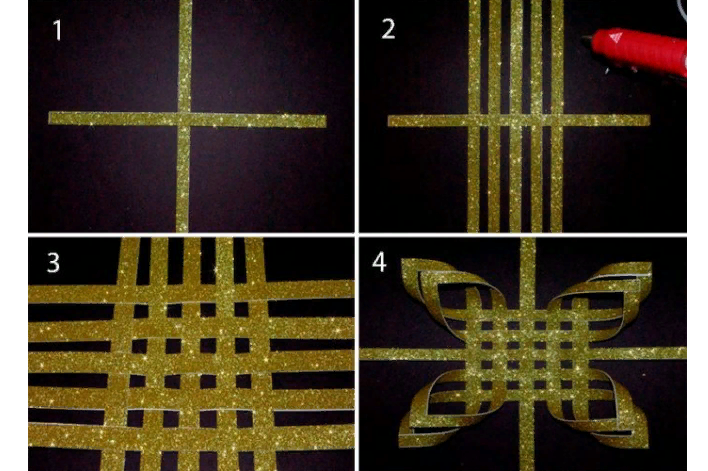
- Using the ruler, place a paper sheet to cut 10 identical thin tapes.
- First we lay out on a flat surface 5 stripsThen the rest are checkerboard.
- We glue the ends of the tapes as shown in the photo above. Do not forget that you should get a “cross” of four central lanes.
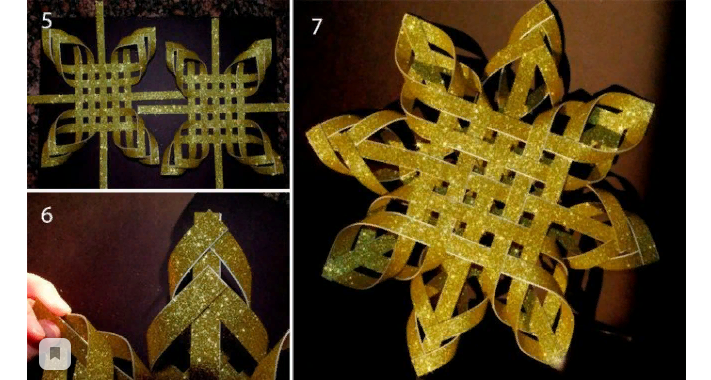
- In a similar way we make another workpiece.
- What happened in the end, namely 2 detailsWe fasten each other.
- Attach free tapes to the details of the resulting product.
At first it may seem that it is difficult to make such a craft, but in fact it is easier. It looks expensive and time-consuming, but it will be an excellent decoration of your home or even a gift to someone from loved ones.
Creative volumetric snowflake - how to make from paper: instructions in stages, video
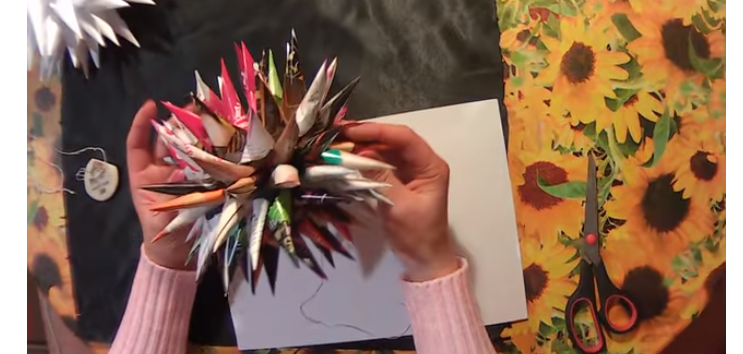
Creative is the most suitable name for such a voluminous snowflake. How to make it out of paper? Here are the instructions in stages:
Let's look at what is needed for her:

How to make such a product - stages:
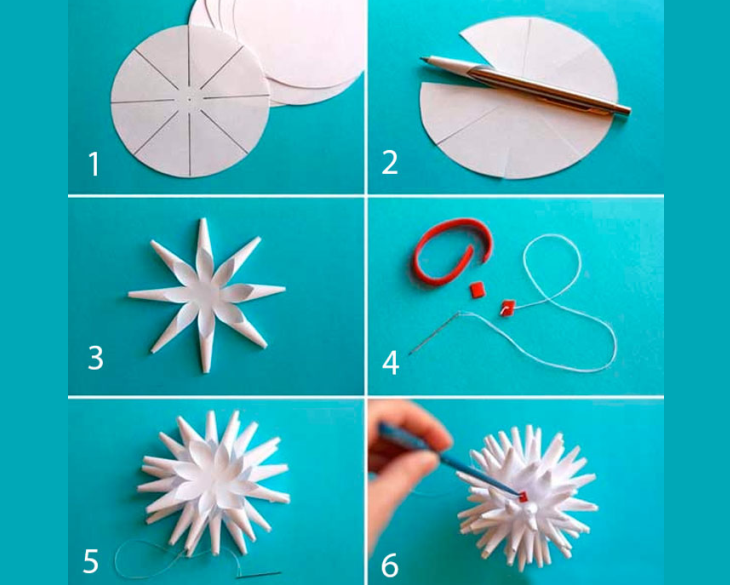
- Using scissors and paper, make 8 identical circles. The parameters of the pattern-circle can be any. It all depends on what parameters you want to make the product.
- We must divide these circles into 8 equal parts, making cuts, as shown in the photo above.
- All parts of the circles, twist in a conical shape, using glue and simple pencil.
- We do the same with other details.
- Using a needle, from cones we form a spherical shape and collect them together.
An unusual snowflake is ready. It turned out to be beautiful, and she can boast of the company, or enjoy the festive atmosphere in the apartment. More details on how to perform such a product, look in the video:
Video: Origami, paper from paper
Volumetric snowflake in the technique of modular origami - how to make from paper: instructions in stages, video

Such volumetric snowflakes made in the technique of modular origami look elegant. Their pointed corners give them a magical form, from which you do not want to tear their eyes off. And although we are used to seeing snowflakes in the form of simple snow, or simply round and shapeless, this is not at all. If you look at the snow descending on the paths well, you can see small patterns, as if someone looms them. It is such a snowflake that we will make from paper. This is a truly hard work on the performance of a product, which is important not to be broken by accident. Here are the instructions in stages:
- All that is needed to perform such a craft is paper and patience.
- To create this snowflake, first make one module, in a photograph, then the rest.
- For this work, you need a lot of time and patience, and if you have neither one nor the other, we do not advise you to take up work.
- And if you are bored, and you want to occupy yourself with something, while developing your accuracy, then try to fulfill this difficult snowflake, which will become an expensive thing for you.
Let's start fulfilling this beauty, just do not be afraid of the following photos. If you have never done origami before, work on them will seem difficult for you:
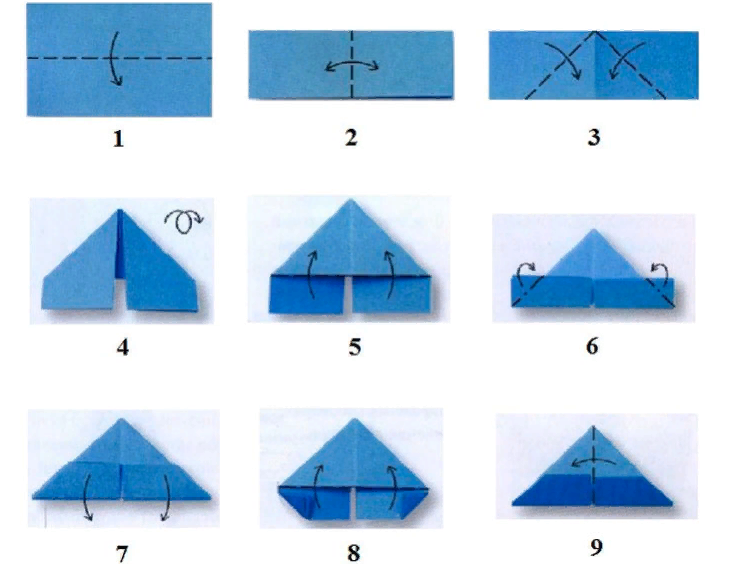
- To start making a product, first you must collect 12 modules. How to make them shown in the picture above.
- In order for everything to work out, we need to alternately insert the edges of some in the pockets of other modules - it turns out like a chain. More details can be seen in the photo below.
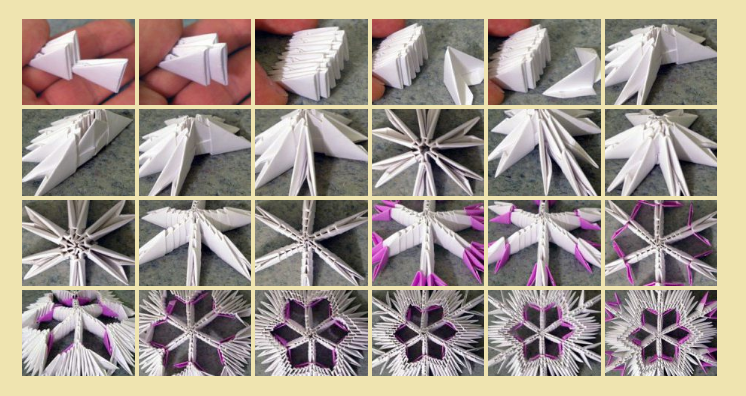
- We need a chain of 2 rows, and in order to fulfill it, we must fix all the pockets in a checkerboard pattern.
- We form a ring. Combine the ends of the chains, turning the last module.
- Attaching the modules, gradually increase the length of the rays.
- Continuing to increase modular parts, add the rest of the opposite color.
- Stop at such an increase only when you will satisfy the size of your future snowflake.
See what other beauty you can make origami technique out of money. Such products will be able to perform even children.
Such products attract the look, and I want to touch them, look closer. But it’s better not to do this, because you can destroy this beautiful design and a cozy atmosphere. If it is difficult for you to perform this beauty, then the video below will help.
Video: Snowflake from paper modules Origami step -by -step assembly for beginners
Snowflakes are associated with joy, cold and New Year's chores. Both adults and children love to catch them on the street, fascinated to watch when they fall from the sky. Everyone applies to them differently, but everyone secretly dreams of grabbing this magic “fluff”. Snowflakes are children's fun, freedom and beauty, the personification of the New Year, something new. Just remember this. This will help you constantly think that something good will happen soon. After all, the New Year is like a new part of your favorite book, you never know what is ahead, but it is always fine. Good luck!

