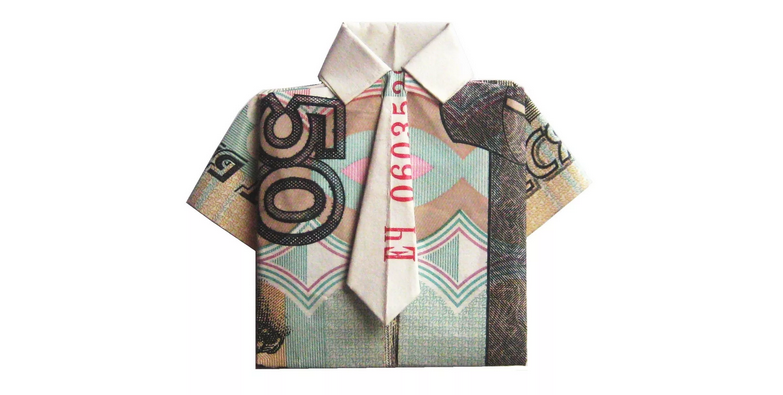
If you like to create something interesting, then you will be interested to know how to make origami out of money. It turns out beautiful and interesting crafts.
Contents
- How to make a dollar out of money on origami technique: scheme
- DIY money from money from money - how to make: step -by -step guides, scheme
- Christmas tree from money with your own hands - how to make: scheme
- A beautiful and delicate flower from money in the technique of origami with your own hands - how to make: scheme
- Video: Flower from Origami money
- DIY money sheet of wood from money - how to make: step -by -step algorithm with a photo
- Beautiful butterfly Origami from money with your own hands - how to make: scheme, video
- Video: money from money
- Bookmark for the book Origami from money with your own hands: step -by -step instructions, photo
- How to make a peacock origami out of money with your own hands: instructions, photos, videos
- Video: the easiest Origami pattern of money from money
- Shuriken from Origami money - how to make: scheme, video
- Video: Origami from money - Shuriken
- How to make a star David Origami out of money with your own hands: scheme, video
- Video: Origami from the money of the star David from the bill
- Do-it-yourself sailboat from money: Detailed guide with photo and video
- Video: Shipyard Origami Shipyard Shipyard
- How to make origami ring with your own hands?
- Video: Origami from money - a ring from a bill
- A shirt with a tie, origami from cash bills - how to make: a scheme of crafts from money
- Video: Origami a dollar shirt. How to make a shirt with a money tie?
- Tender heart from money with your own hands: light version of origami
- Video: Origami from money - Heart
- An envelope for money in the technique of origami for a gift: how to do it with your own hands?
- Volumetric ball Origami: How to do it with your own hands?
- Origami original from money with his own hands - how to make: scheme
- Video: Origami from money dress from bill
Origami is a special needlework technique that everyone can easily master. With the help of elementary knowledge and skills, you can make wonderful crafts that are perfect as a gift for a loved one. Moreover, such figures really like to do children together with parents. And if at first glance it seems difficult, then pretty soon you will understand that in reality everything is simpler.
Of the money, you can make completely different figures. The main thing is to perform all the actions according to the template, and then you will have an original and beautiful craft. Read further.
How to make a dollar out of money on origami technique: scheme
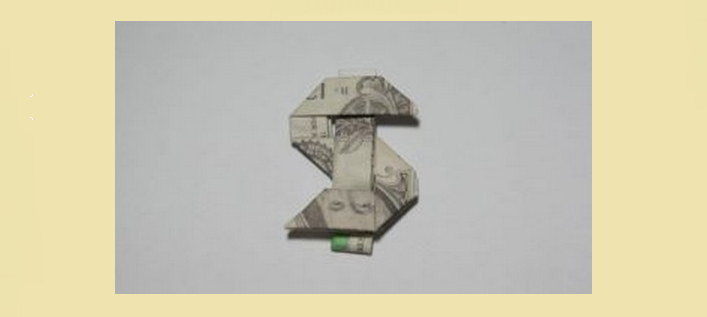
Everyone knows the sign depicting the dollar - $. It is used widely all over the world. You can assemble it from any money bank, although for this purpose it is better for you to use simple white or colored paper. How to make a dollar out of money or paper on origami - scheme:
Algorithm:
- Fold the bill in half.
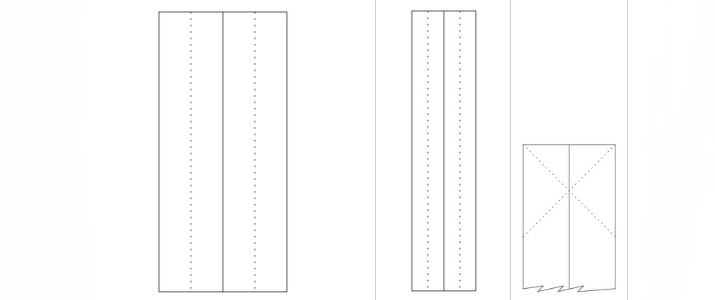
- Bend the sides again to the central part again.
- You form lines on which you need to make folds.
- Bend the left side of the product.
- Fold the layers in the way as indicated in the diagram, and then bend the “dollar” model in half.

- You should get a blocked area.

- Now go directly to giving the model of the desired shape. That is, it should form an English letter S.. To do this, perform a series of actions specified in the scheme:

- Expand the last fold. In this case, the fold I should be inside, and O - outside. Thanks to this, the icon will be more stable and strong.
- Make a fold as indicated in the figure.

- Expand the site shown in the diagram. After that, fold it up the resulting fold.
- Make the folds that are shown in the image.
- Now fold the drawing on the folds that you just made.
- You should get the same figure:

- Fold the model again in the figure in the figure.
- Bend the flap of the bill upstairs. It must pass through the entire icon.
- That's all - the symbol of the dollar is ready.
Useful advice: Put origami for several days in a wallet, or under a book. This will enable all the folds to grind well, so the design will become more durable.
DIY money from money from money - how to make: step -by -step guides, scheme
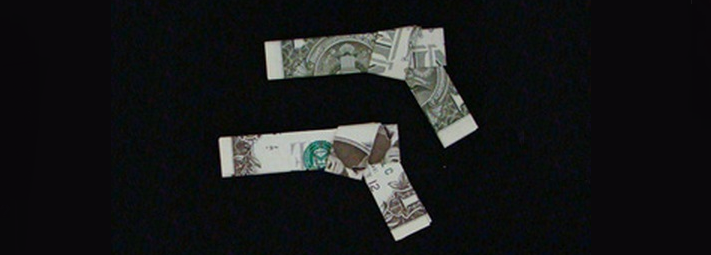
Origami from money in the form of a pistol is a very unusual craft. But it is original, and can become an interesting element of the decor of the room.
You can make such a figure in two ways. But in the first case, the craft is flat, but the technique of its manufacture is easier. In the case of the second scheme, a bill and a pencil are used, around which it is wound several times. This helps to get a more voluminous, and therefore the most attractive model of a cash pistol. So, how to make an origami pistol out of money with their own hands? Here's a scheme:
For assembly, take two identical banknotes, after which perform the following actions:
- Fold each bill in half, then straighten right away.
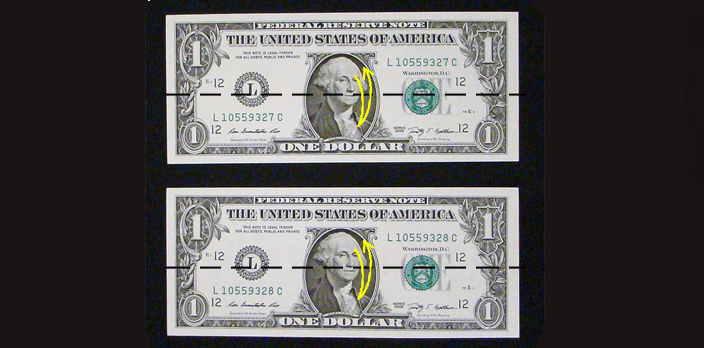
- Tighten the upper and lower part of the banknotes to the central fold.
- Fold both sheets in half from the bottom up.
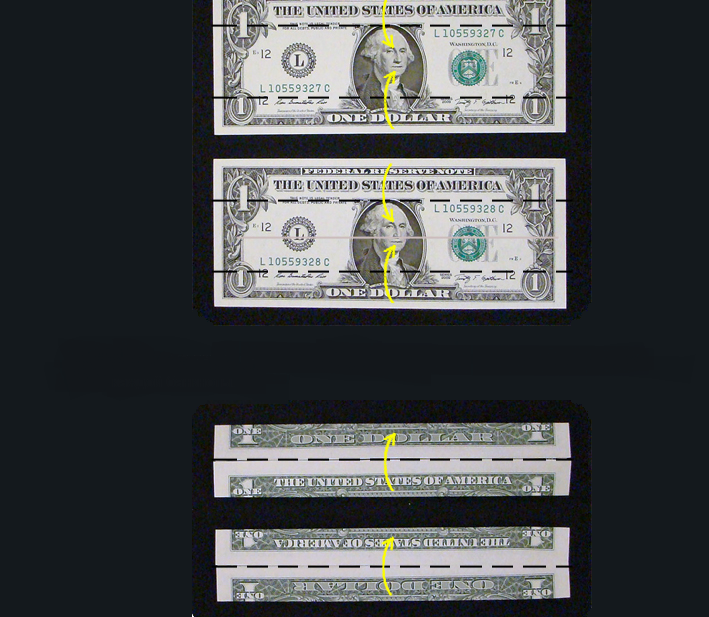
- Now you need to fold each bill across in the direction from left to right.

- Place both sheets as shown in the photo:

- Between the two layers of the first bill, stretch the ends of the second bill down.
- Pull the ends of the banknote to the very bottom.
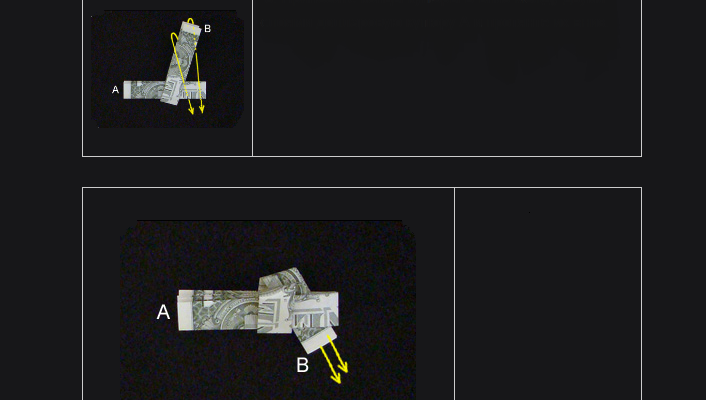
- The money from money is ready.
If you want the product to be more voluminous, you need to perform such actions:
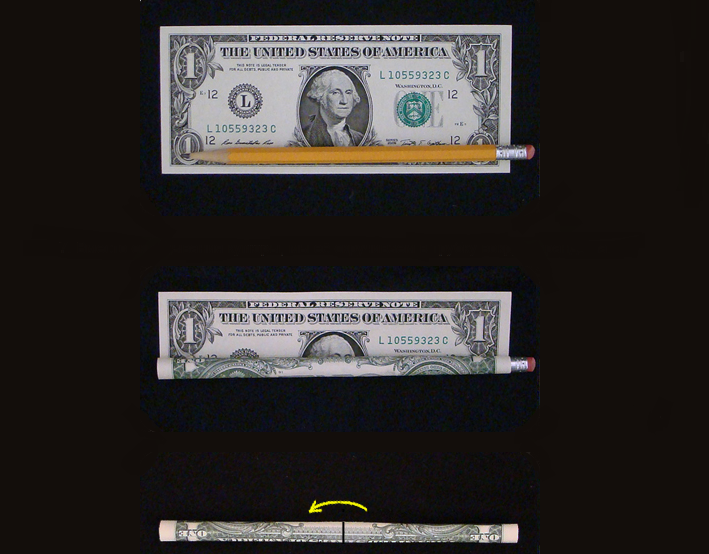
- Instead of folding bills, wind them on a pencil.
- Gently pull out the pencil, holding the formed monetary tube with your fingers. Now fold it across from right to left.
- Place the banknotes in the same position as shown in the image:
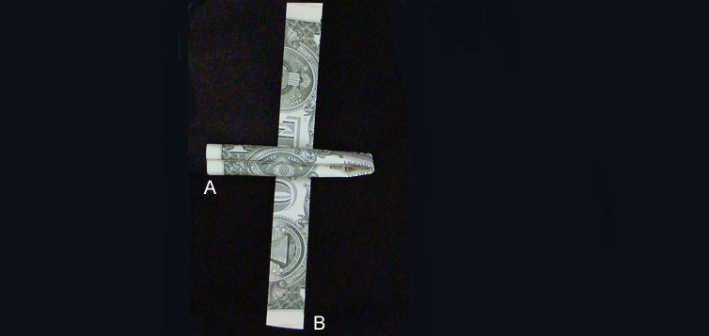
- Fold the ends of the second bill, then place them between the layers of the first bill. It is not worth straightening it.
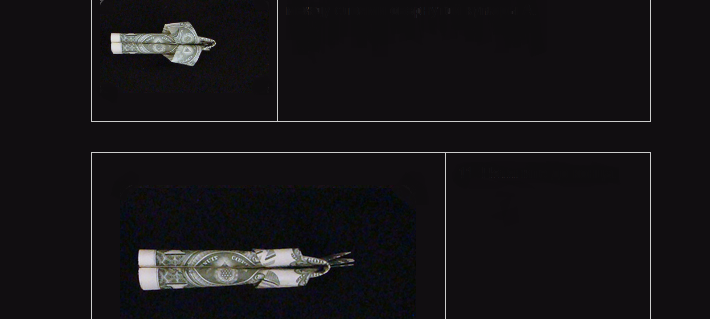
- The last touch - pull the ends of the banknote to the end.

A beautiful, voluminous gun is ready. It is as close as possible to the 3D model of the figure.
Christmas tree from money with your own hands - how to make: scheme

The money tree is a very simple origami. Even a child can cope with him. Of course, with the help of adults. Creating a tree is a fast and light process, and also very interesting. How to make such a product from money with your own hands? Here's a scheme:
Put the bill with the face up and place it in an upright position. Next, follow this algorithm:
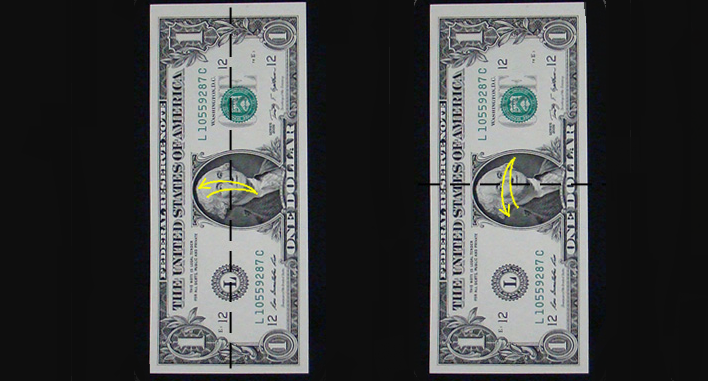
- Fold the bill in half, then turn it back. You get a line.
- Fold the banknote across and unfold it again. Another line is formed.
- Fold the right lower corner according to this principle. The fold line originates from the middle of the right side, and ends with the central zone of the lower side.
- Fold the angle of bill to the right, as in the photo:
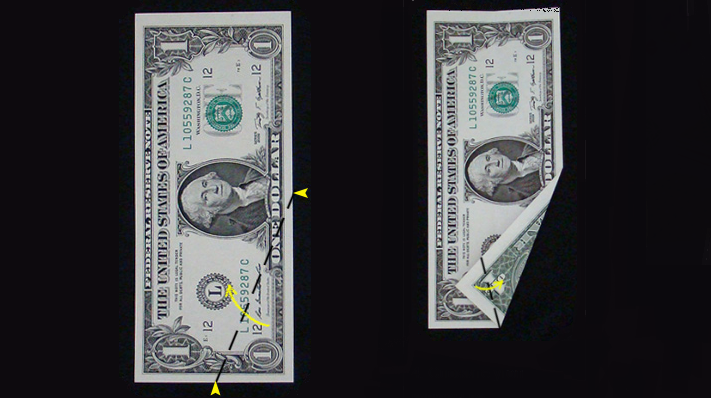
- On the left side of the banknote, repeat all actions from the above points. Bend the angle.
- Now fold the corner to the left.
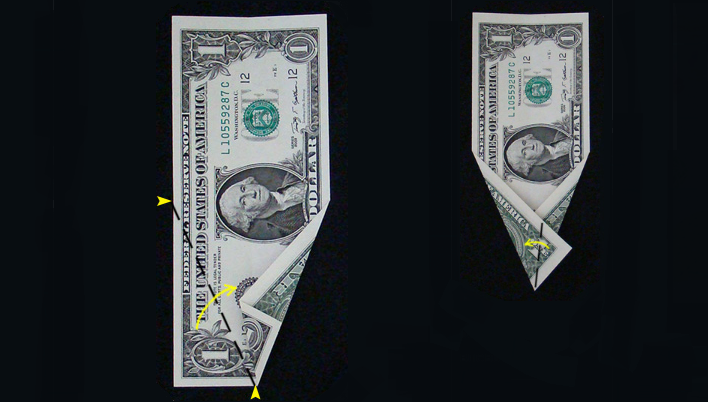
- In the upper right side of the bill, repeat all the actions prescribed in the previous steps.
- Do the same, only on the upper left.
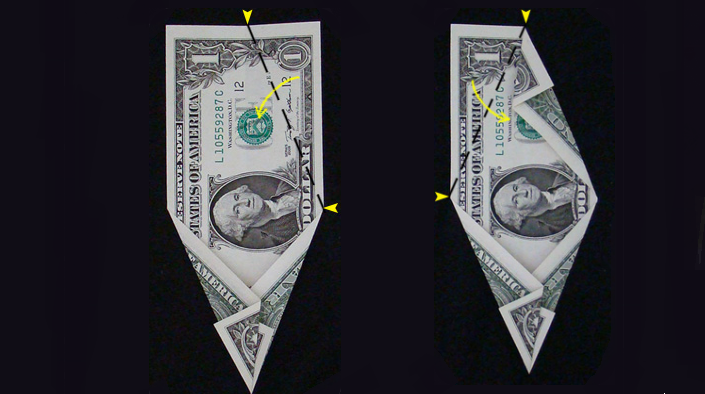
- Fold the model from below and from above.
- Fold the top layer down. The location of the bend is at your discretion.

- The lower tip of the model can also be folded as you like more.
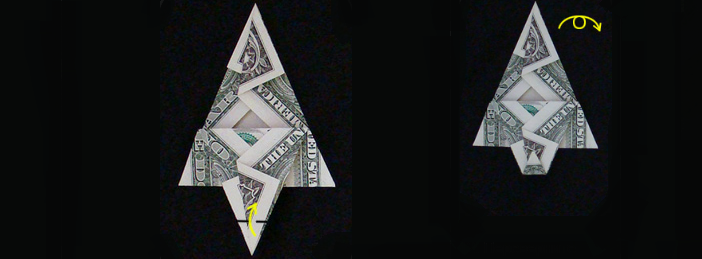
- Turn the model.
Now you can admire your money craft. Glue confetti or other jewelry, and such a Christmas tree will look like the New Year. It is completely ready, and you can use it for its intended purpose - to decorate the house, New Year's tree, presentation as a presentation, etc.
A beautiful and delicate flower from money in the technique of origami with your own hands - how to make: scheme
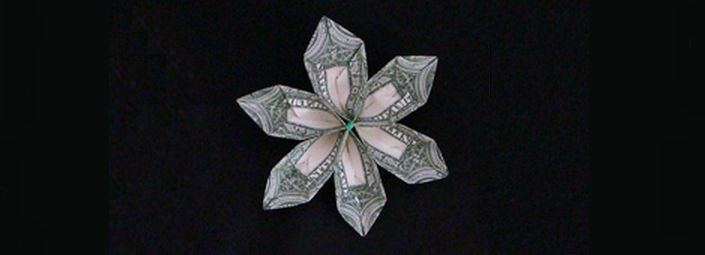
Money flower is a magnificent, unusually beautiful craft. And making it much easier than it might seem at the very beginning. For this you will need 3 identical banknotes Any denomination. Also take an elastic band, wire or wire twist. But if there is no way to use one of the above elements, an ordinary thin rope is suitable. How to make such a delicate flower from money in the technique of origami with your own hands? Scheme:
So what you need to do:
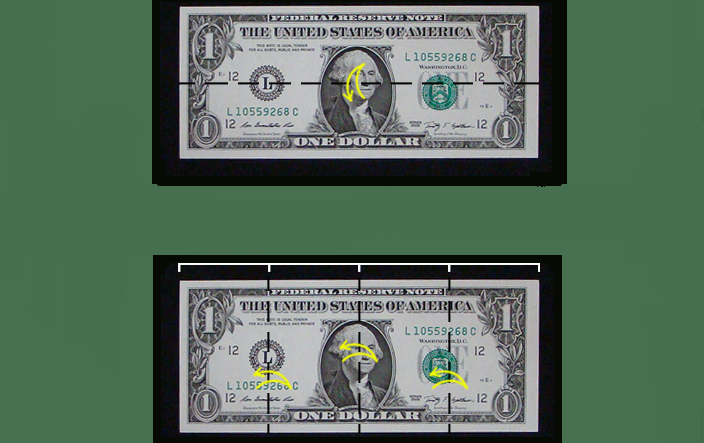
- Put the bill in front of you with the front side up. Fold in half, then expand.
- Fold the sheet again in half, then pull each section to its center. Knight, then turn the folds.
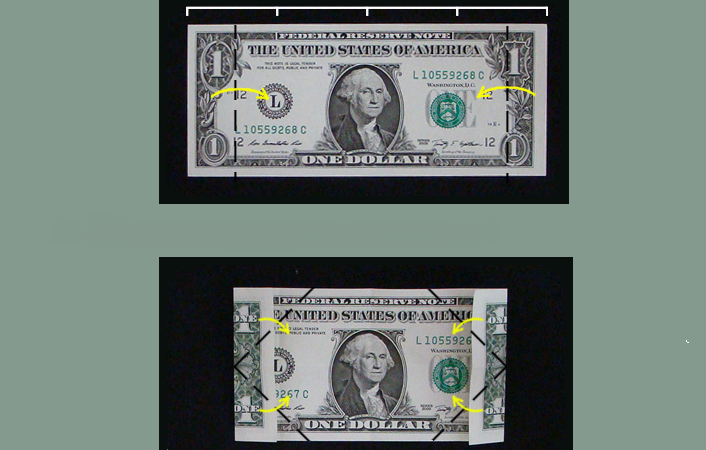
- Fold the right and left sections by half.
- Fold the corners as shown in the figure. Make sure that on both sides they connect in the central part of the banknote.
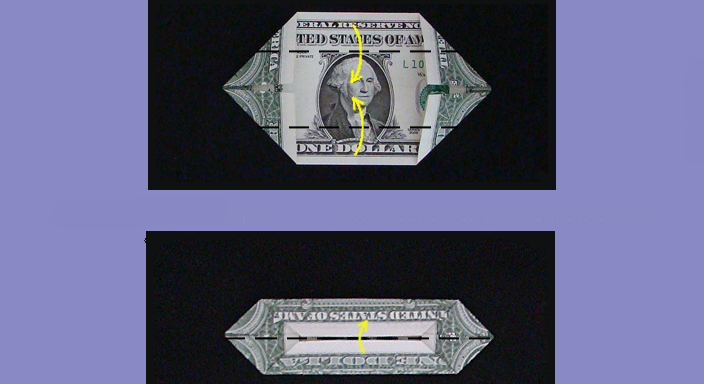
- Also add the upper and lower parts of the bill. They must come into contact in the central region of the sheet.
- Fold the model from the bottom up.
- By the same principle, collect the following 3 elements. Prepare a product for fixing products.
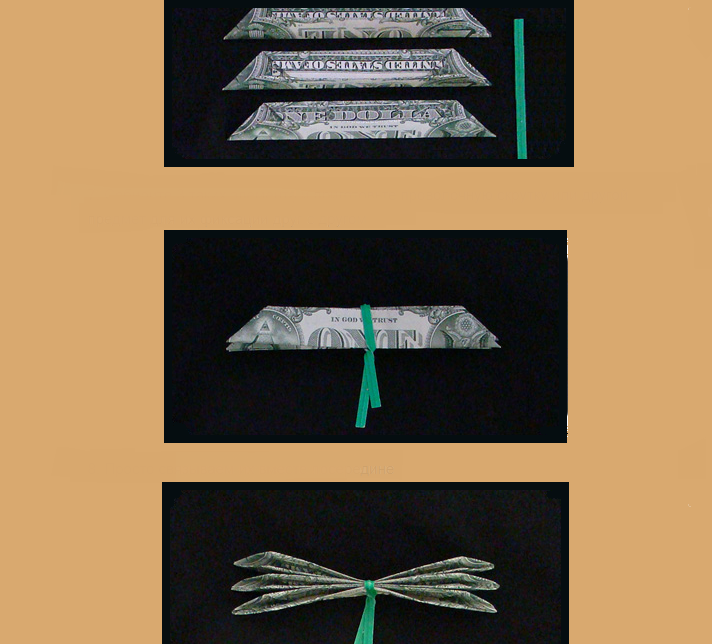
- Tie all the flower petals in the middle.
- From above, the craft should have the same look:

- Now each of the petals, open and straighten.
It turns out a very beautiful and unusual flower. Its appearance will also depend on which side of the bill you began the manufacture of this wonderful craft.
Video: Flower from Origami money
DIY money sheet of wood from money - how to make: step -by -step algorithm with a photo

You can make an addition to a flower from a banknote - a sheet also made from a banknote. Such a model can be made of any bill, but, of course, it is desirable that it be painted green. How to make a sheet of wood of origami from money with your own hands? Here is a step -by -step algorithm with a photo:
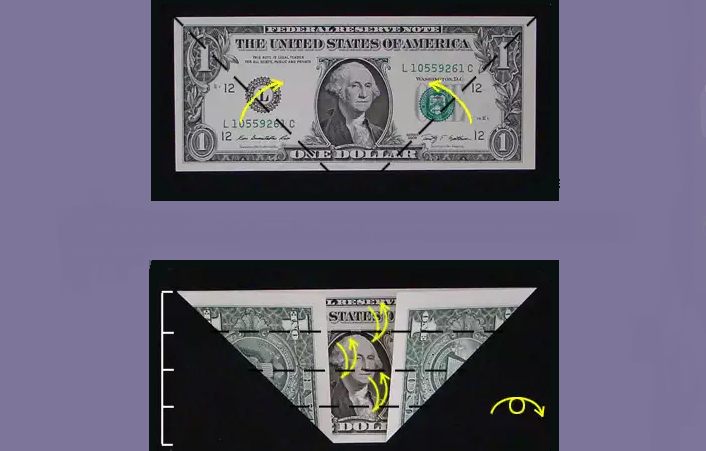
- Put the bill upside down and bend the lower corners up.
- Fold the sheet in half, then bend the upper and lower part so that both of them reach the central fold. Expand the bill completely.
- Bend each section received in half. In total, you need to do 8 or 16 folds On a banknote.

- Bend the sheet so that it acquires the shape of the accordion. Focus on the photo below:
- Turn the figure over.
- Raise the largest flap and put it on top of a short shred. If nothing happens, you will have to additionally fold the tip on the short side of the bill.
- Now squeeze the sheet well.
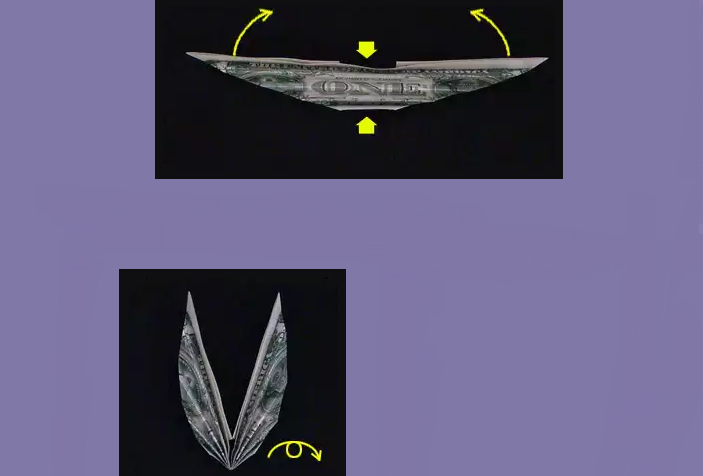
- Then squeeze the tip of the figure - where the arrow of green color indicates.
- Finish: Your craft is completely ready.
Nothing complicated, isn't it? The sheet in the style of origami is a very beautiful figure. And, despite the recommendation regarding the color of the bill, you can choose completely different shades. Especially if you want to make a whole “leaf composition”.
Beautiful butterfly Origami from money with your own hands - how to make: scheme, video
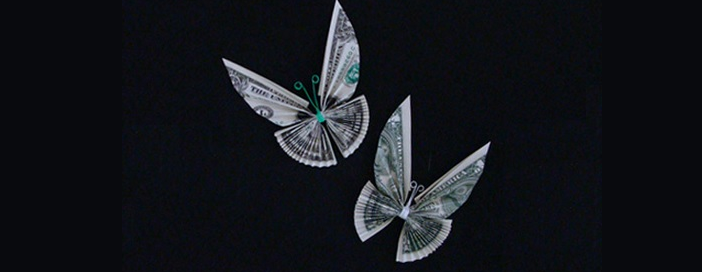
To make a cute butterfly out of money, take banknotes of the same face value. Additionally, you will need a wire covered with plastic. The usual copper wire in this case will be an inappropriate element. How to make a beautiful butterfly origami from money with your own hands: here is a scheme:
The money butterfly consists of two parts. Production instructions 1 part:
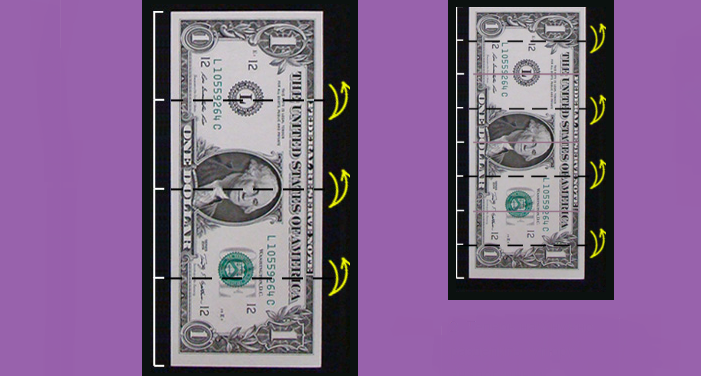
- Start assembly on the front side of the sheet. Divide it on 4 sectionswhy fold for in half, and then each Of the 2 parts - Once again in half.
- Similarly, divide the banknote 8 equal zones.
- And divide the sheet again, only in this case already on 16 parts.
- Turn the bill over.
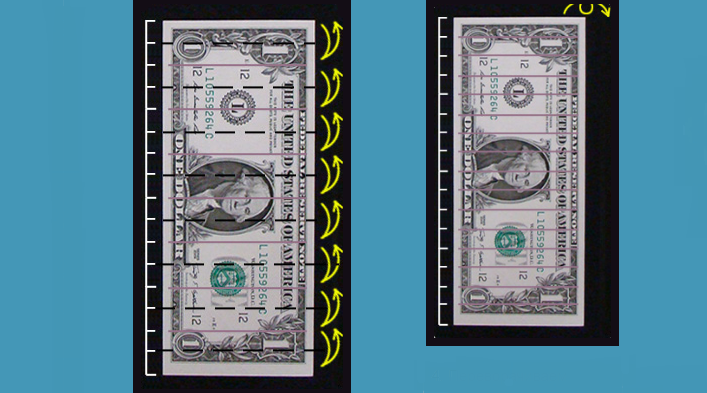
- Now you have a more responsible and painstaking work. It is necessary to divide the sheet in 32 parts.
- To complete the assignment, fold the paper with an accordion. Focus on previously formed folds.
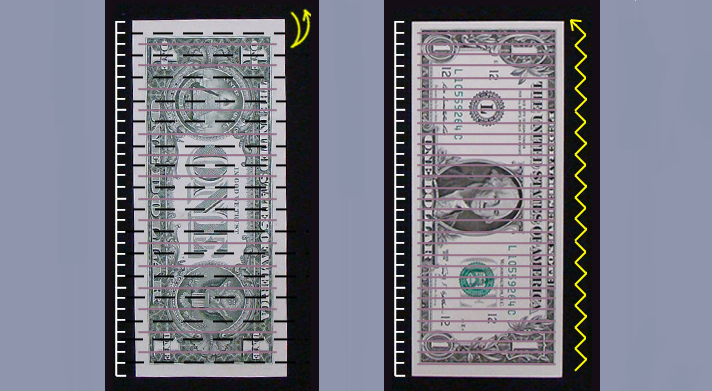
- Now that everything is ready, put this bill aside, and take care of the second banknote.
The second part:
- Starting from this point, you make the second part (half) of the butterfly from money. To do this, put the money in front of you with the back side. Fold the lower left and right corner as shown in the diagram.
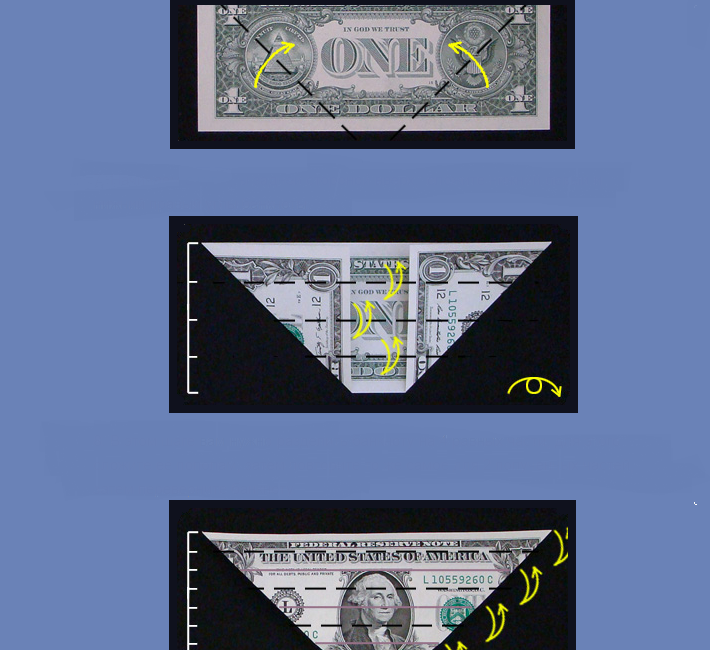
- Divide the paper in 4 parts By folding it in half. Then fold 2 sections Also double. Turn the sheet over.
- On the same principle, share the bill on 8 equal sections.
- Thanks to the resulting folds, form the lower butterfly wings. To this end, fold the banknote with an accordion and knead well.
- Combine parts of the craft with a prepared latch. This is how it should look at this stage.
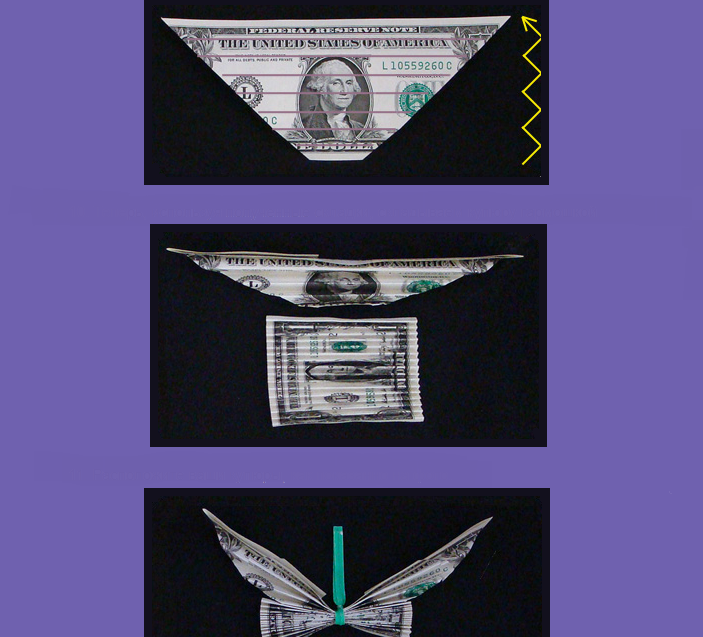
- Now you need to finally fasten the halves of the butterfly.
- For this, a wire with a plastic coating is best suited twist Tie.
- Of course, you can apply any comfortable tie, but then your money butterfly will not have beautiful and cute antennae.

- If you still chose the wire, then after fastening the parts of the butterfly, just straighten the ends of the lock and slightly tighten them at the very top.
- You will get a beautiful butterfly with cute round antennae.
And the last stroke is the leveling of the wings. Now your craft is completely ready, you can admire the fruits of your labors. This is a really wonderful sight.
Video: money from money
Bookmark for the book Origami from money with your own hands: step -by -step instructions, photo
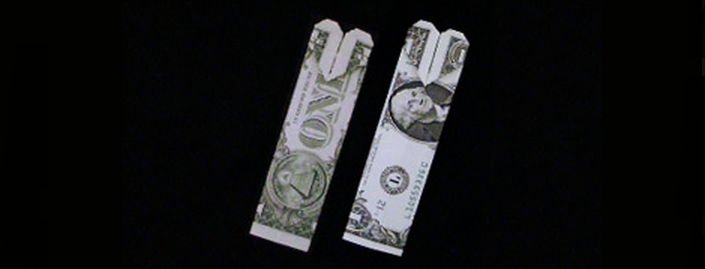
From a paper bill you can make a beautiful laying with a heart. It is perfect for your favorite book, or will be a good additional gift for the person you give as a gift from the publication. How to make a bookmark for Origami from money with your own hands? Step-by-step instruction:
- Turn the bill over. Its back should be in front of you.
- Fold it in half, then - once again in half.
- After that, expand the banknote. Thanks to this simple action, the paper will be divided on 4 equal partsAs in the photo below.
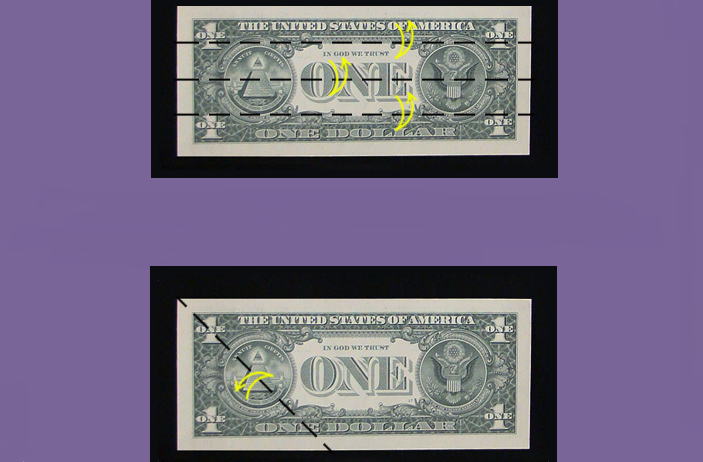
- Bend the left lower corner, then expand. This is necessary to obtain a diagonal fold.
- Do the same with the upper angle of the bill. As a result, you should get a line, in shape appropriate letter x. Turn the bill downward.

- Along the marked line, make another fold. Pay attention to the fact that it should go through the central part letters x.
- Open the fold and turn the paper again.
- The corners indicated by the arrow, connect. Follow this, to make the model - this is necessary.
- Fold the model to the right and threaten. You should get a triangle.
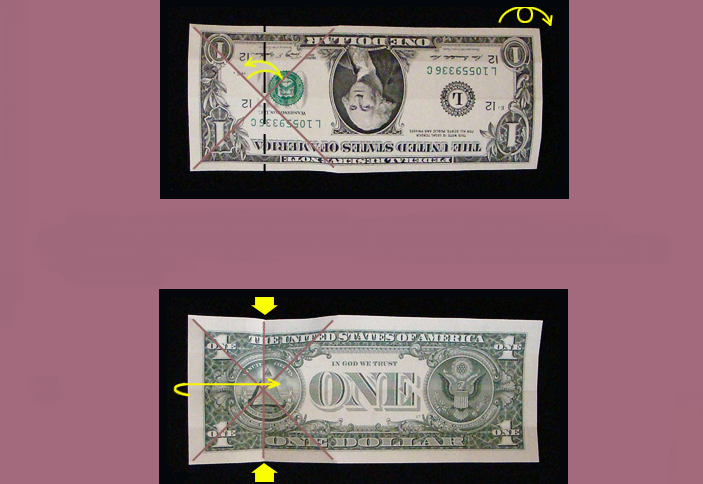
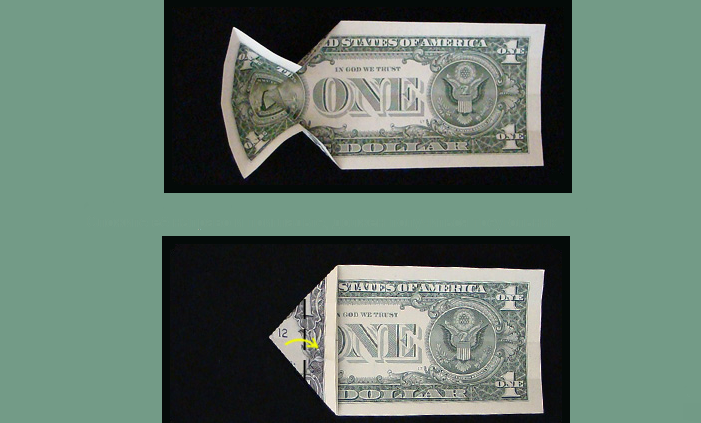
- The tip of the triangle is led to its base.
- Expand the fold - you will need it a little later.
- Take one of the wings of the triangle up.
- Fold the fourth part of the lower section of the banknote. See that it refuel as shown in the diagram below.
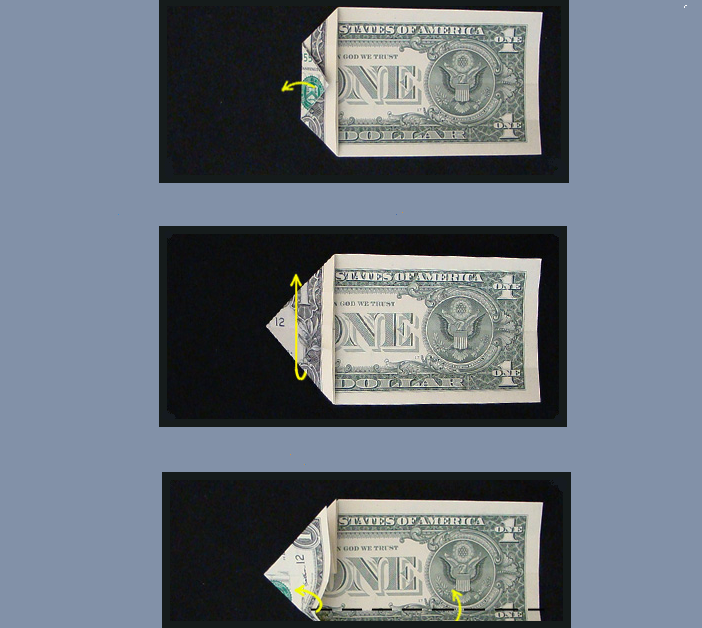
- Lower the two sashs of the triangle.
- In the same way, fold the upper part of the figure.
- Now, try to straighten out the wings of the formed triangle so that the arrow comes out.
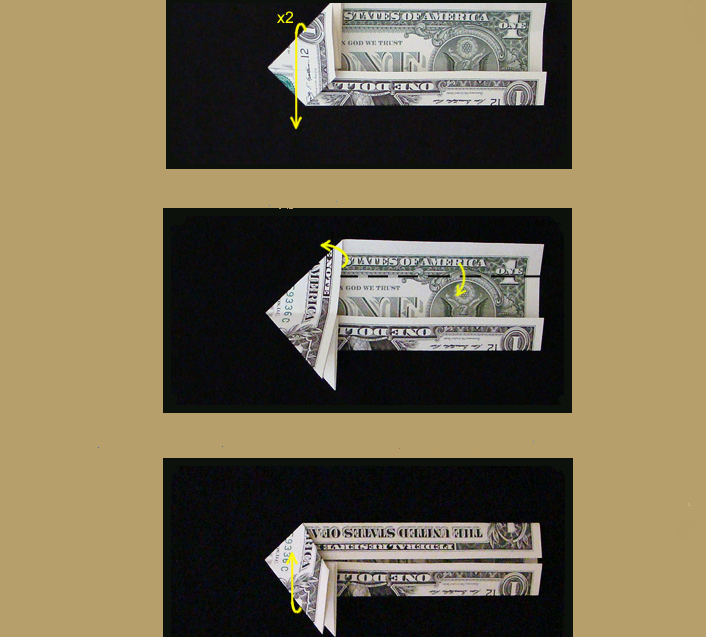
- Use the fold that was made in the item above , To fold the upper part of the figure to the left.
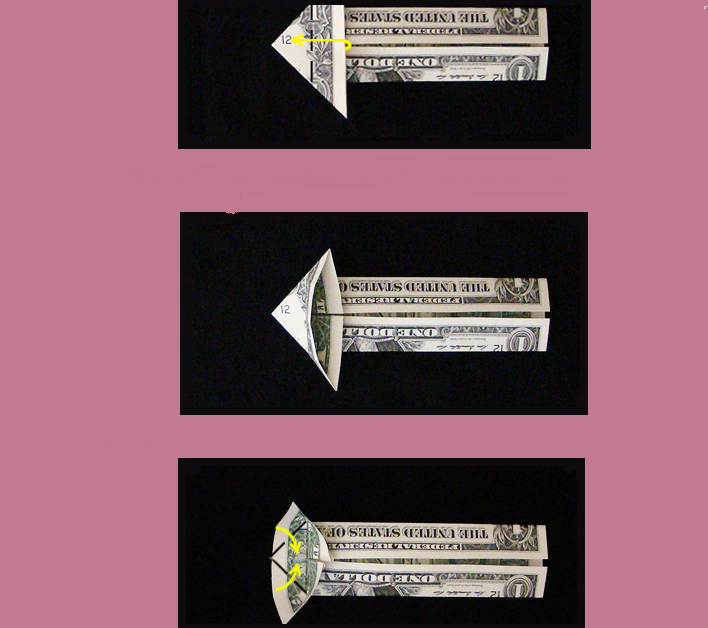
- Fold the triangle from the folds. Try to make your model look like in the photo:
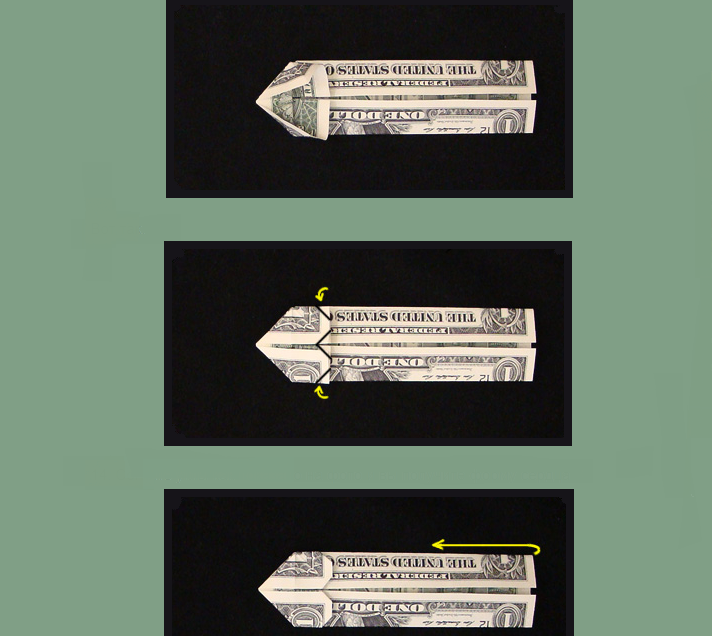
- Bend the corners of the bill as shown in the photo. You will get a heart.
- Transfer the right side of the model in the rear to the left.

Bookmark with a heart is ready. Now you can make sure that it came out original and exquisite. The work is thin, and since you did everything yourself, with your own hands, it is even more valuable.
How to make a peacock origami out of money with your own hands: instructions, photos, videos
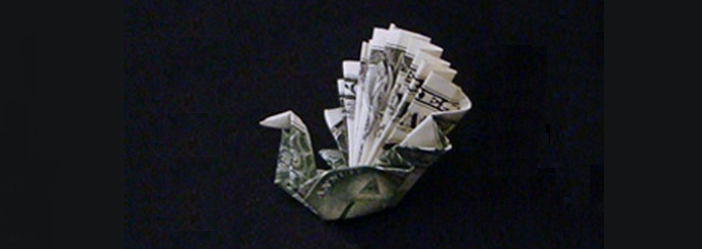
If you want to make a bird from a banknote, pay attention to the peacock. In itself, he is a very beautiful and majestic animal. Therefore, the craft of money in the form of a peacock will also look wonderful. However, it is miniature, so it is better to put it in the most prominent place, so as not to be thrown away by chance. So, how to make a peacock on the technique of origami from money with your own hands? Instructions with photos:
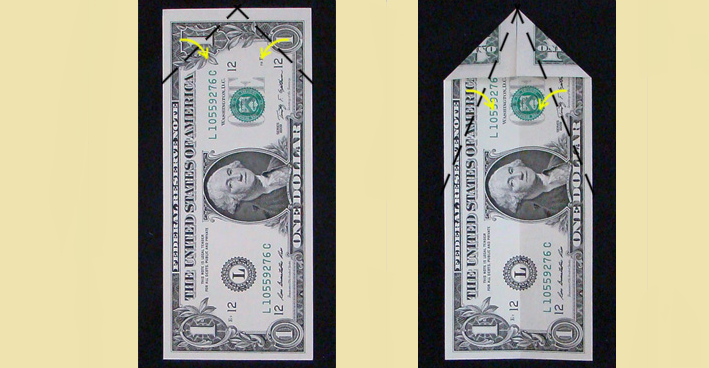
- Fold the upper edges of the bill on the front side. They must converge in the central part of the banknote.
- Fold the left edge with the right again so that they come into contact in the center of the sheet.
- Bend the upper one frequently back. Make sure that the fold is located in places where the sides of contact go in different directions. The upper part of the paper is the body, and the lower one is the tail of the monetary peacock.
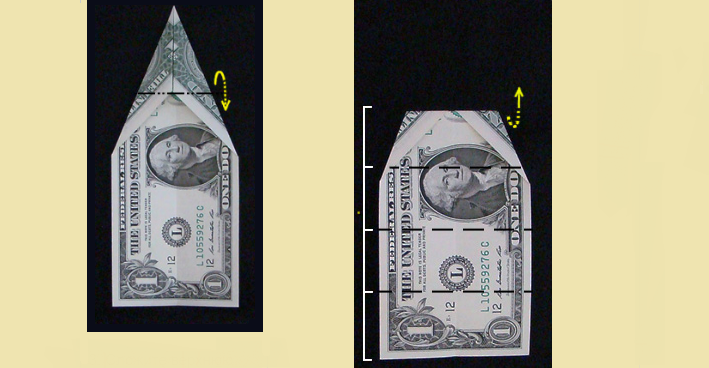
- Start working on the tail of the figure. Therefore, divide first this banknote department in 4 parts. To do this, fold it in half, and then again in half. So that all parts of the crafts are even, the folds can be made under the ruler. After that, you can disclose the upper part of the model.
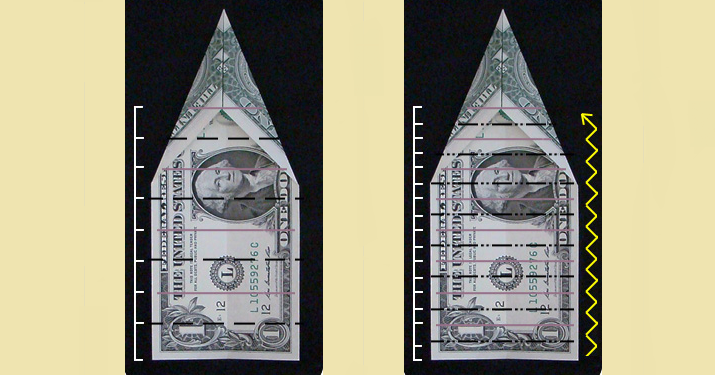
- Now fold all these parts with an accordion, as shown in the photo.
- Fold the figure in half with a shift to the left.
- Make a turn for a quarter of turning clockwise.
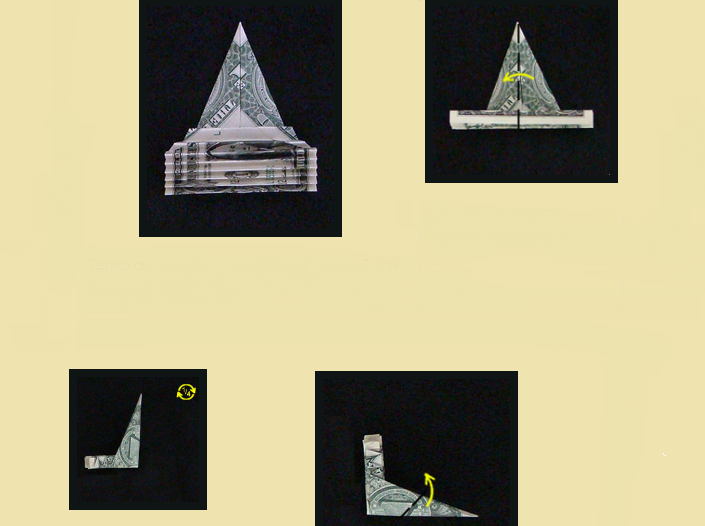
- At this stage, you can proceed to the formation of the body of the peacock. Fold the tip as shown in the photo below, but you will have to form a fold by eye. Try to be about the center of the figure.
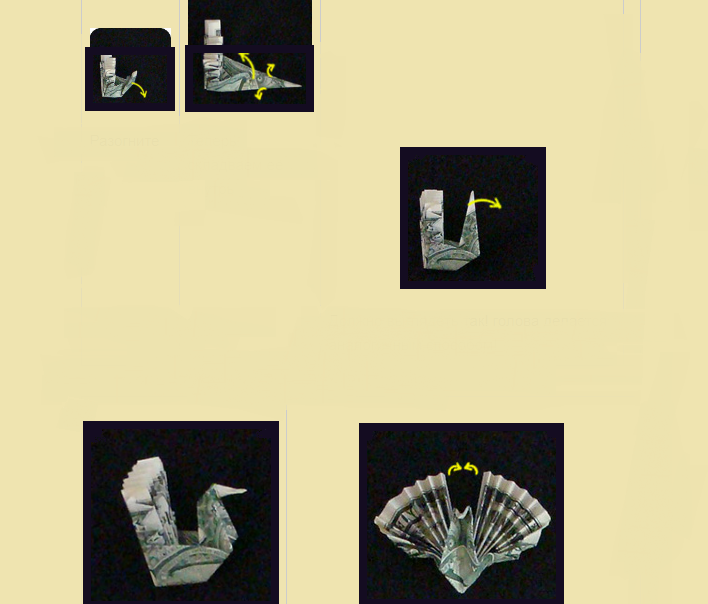
- Pay attention to the fact that you need to bend two corners and connect to each other. To keep the tail well, you should make two folds.

That's all ready! Your peacock from cash bills looks just great. Detailed description in the video:
Video: the easiest Origami pattern of money from money
Shuriken from Origami money - how to make: scheme, video
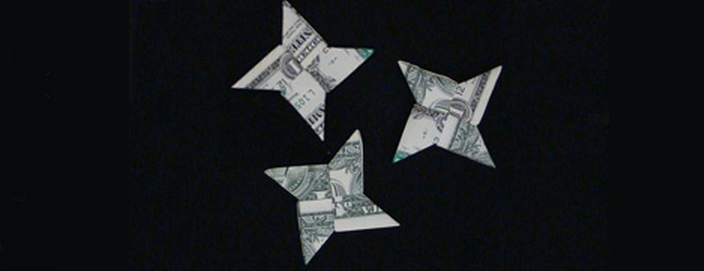
For lovers and admirers of rap, Shuriken will be a pleasant surprise. After all, this is a four -pointed star, which is also called the "ninja star." This is a signature sign of performers of songs in the style of recitative.
In addition, such a symbol really exists. It is not only the “business card” of the ninja, but also a very dangerous weapon. Such stars threw into enemies, and successfully dealt with them, since each tip of Shuriken was sharpened, and therefore very hard.
You can make it with your own hands from money, ordinary or colored paper. Choose which of the options is better, of course, you yourself will be. But the Origami scheme will be alone in any case:
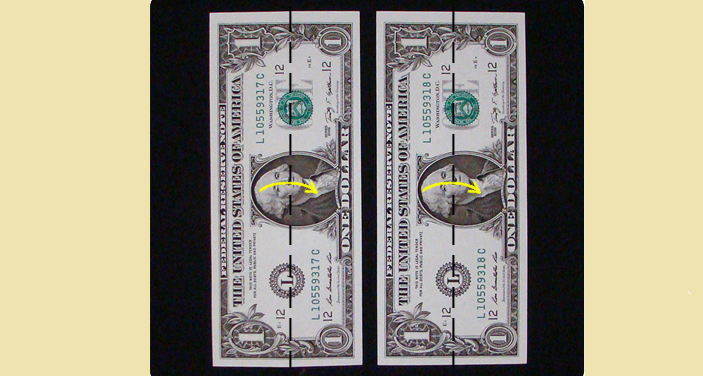
- Take two banknotes and add them in half, as shown in the figure.
- Form a fold in the middle of the paper, then immediately return it to its original position.
- Fold the bills in a mirror position relative to each other. That is, the left banknote should be bent to the left, the right, respectively, to the right.
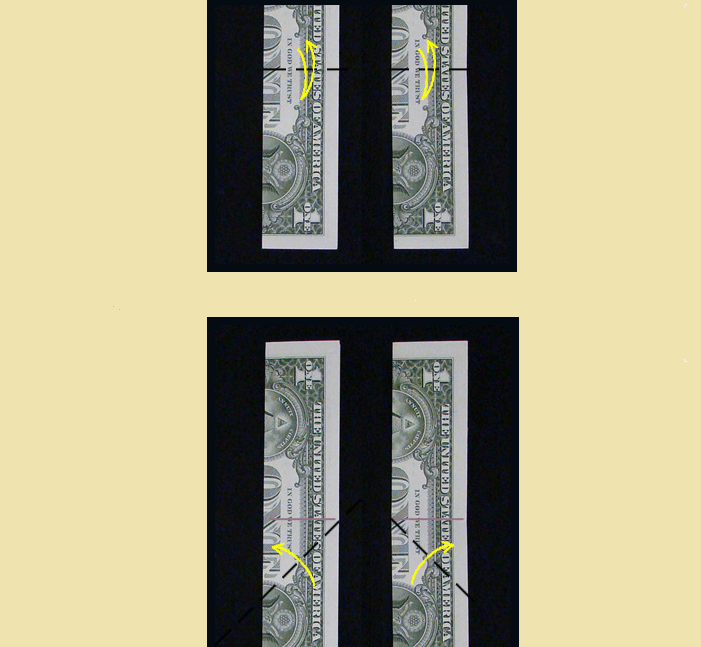
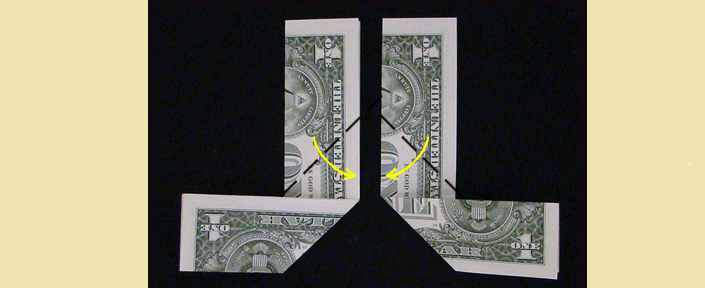
- After that, perform actions in the opposite order. That is, put part of the left bill to the right, part of the right - to the left. Focus on the lines shown in the diagram.
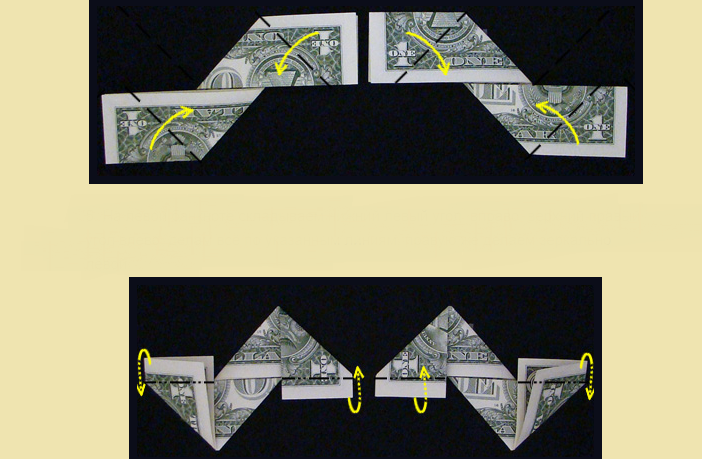
- On the left banknote, fold the lower left corner to the right, and the upper right corner is in the left side. Make the right banknote in a mirror. Look at the photo above.
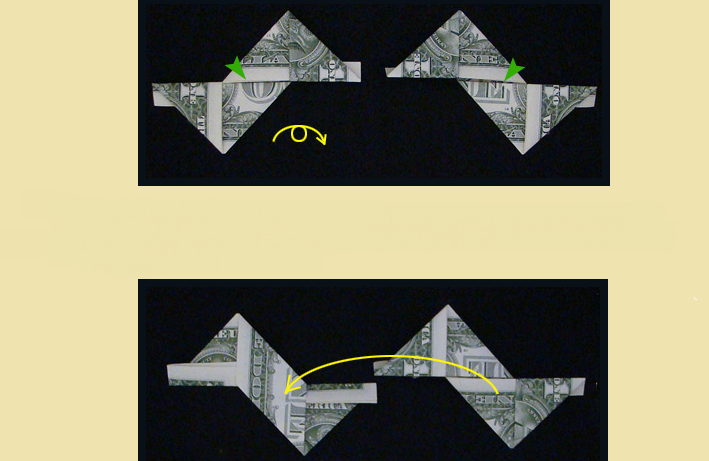
- Make the reverse folds that are shown in the diagram.
In the center of crafts you can notice peculiar pockets. They need to season the tips in them. To see these depressions, turn the left leaf over.

- Place the right bill on top of the left - as shown in the photo. You get a star in the shape of a star.
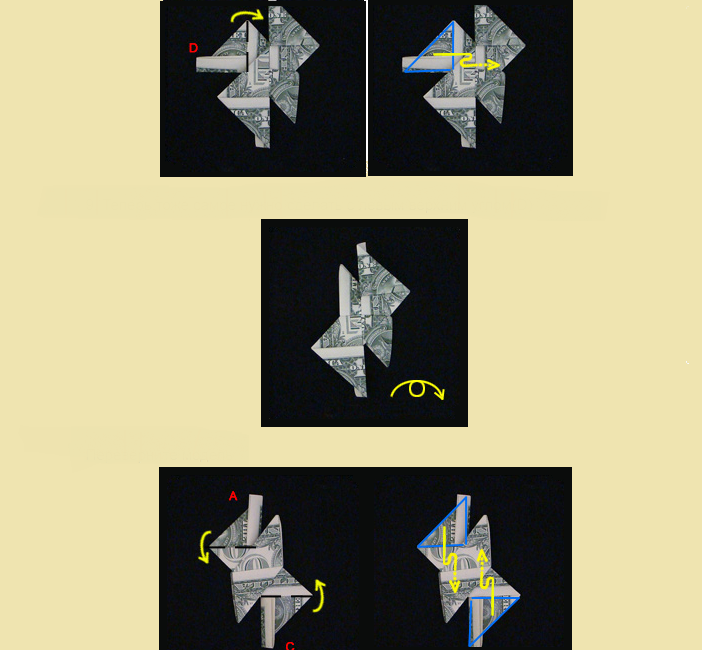
- Turn the right lower corner in the pocket placed in the center of the crafts.
- Do the same, only with the upper left corner of the product.
- Now turn over the model.
- Repeat all the same, only with those sections of the star that are designated by the letters A and C.
If you correctly perform all these simple steps, you will get a very unusual figure of a quadrangular star. At the same time, all its elements will be good and firmly hold on, it will be stiff to the touch. But this is exactly what it should be, in the end, we sought.
Read more Watch the instructions in the video:
Video: Origami from money - Shuriken
How to make a star David Origami out of money with your own hands: scheme, video

For this craft you will need only 1 banknote. However, be prepared for the fact that in this case you should work hard. After all, from a rectangular sheet you will need to make a triangle. But in fact, this process requires more attention and concentration than time. How to do it?
The algorithm of actions in the manufacture of the David star (hexagram) on the technique of origami from money with your own hands is this:
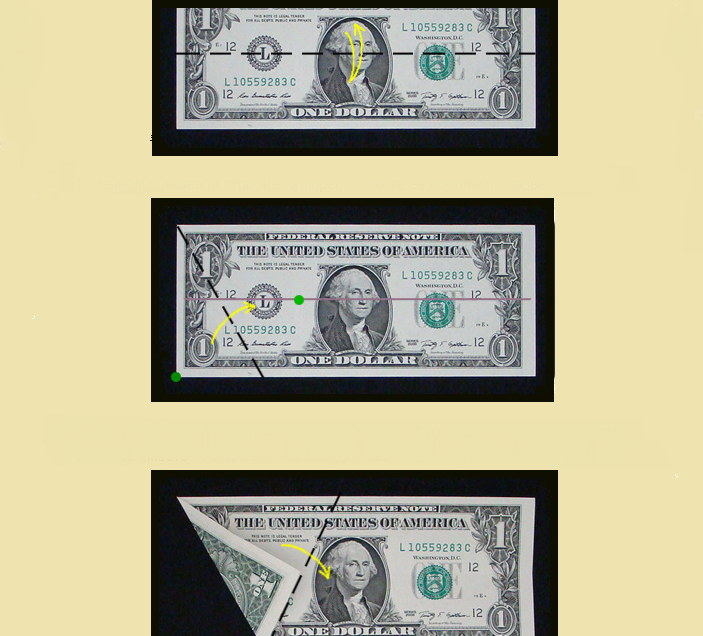
- Take the bill of any denomination and put it with the front side up. Fold in half and immediately expand.
- Bend the left lower corner so that the green points indicated in the photo come together with each other. At the same time, make sure that the folding line you created divides the upper corner in the left side of the sheet.
- Now bend the left upper corner so that you get the right, equilateral triangle.
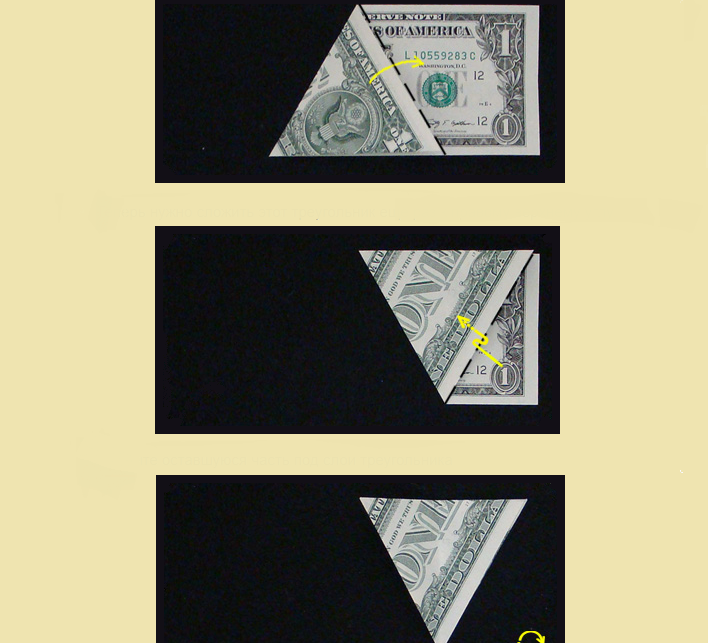
- Fold the formed figure again, only to the right corner in the upper part of the banknote.
- Fold the remaining part of the paper under the layers of the triangle. Turn the figure to the right.
- In the middle of the model, make a fold.

- Now form a new bend according to the median indicated in the diagram.
- Make a new fold, only in a different direction. Look carefully at the arrows indicated in the photo. Look carefully at your model. As you can see, everything is in the area of \u200b\u200bthe red point 3 folds intersect. This place is the center of the triangle.
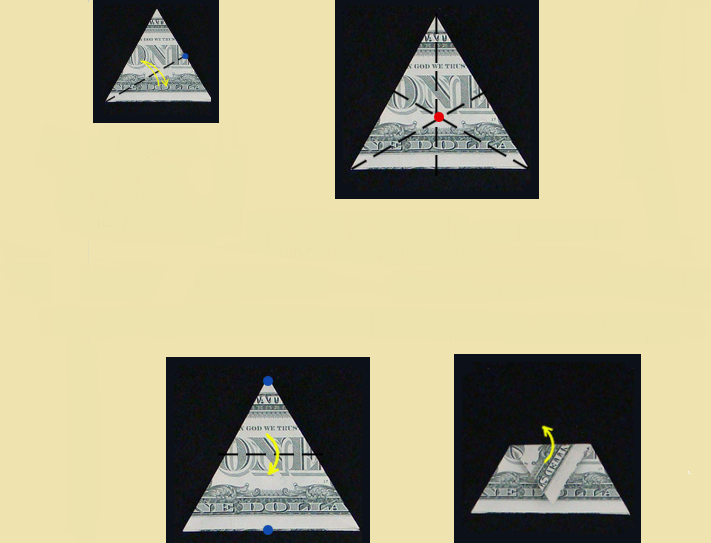
- Make blue points with each other, thereby forming another fold.
- Expand the bill.
- Repeat the same for this side:
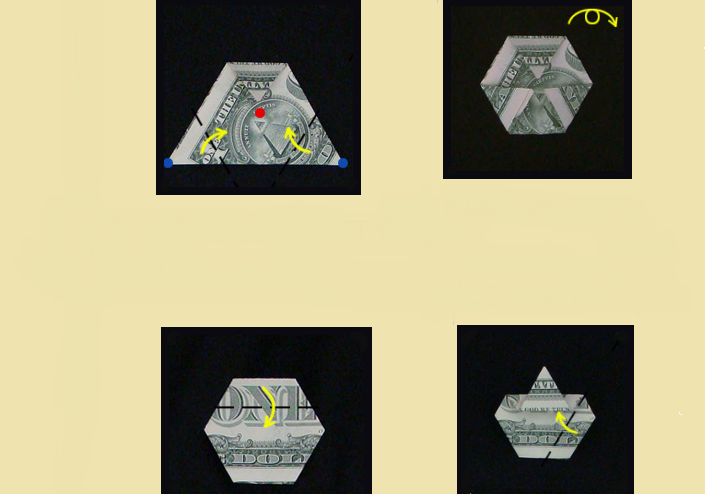
- Now turn over your money figure.
- Form the fold, attaching the blue point to the red.
- To process the two remaining angles, repeat all the actions prescribed above. After that, turn the figure.
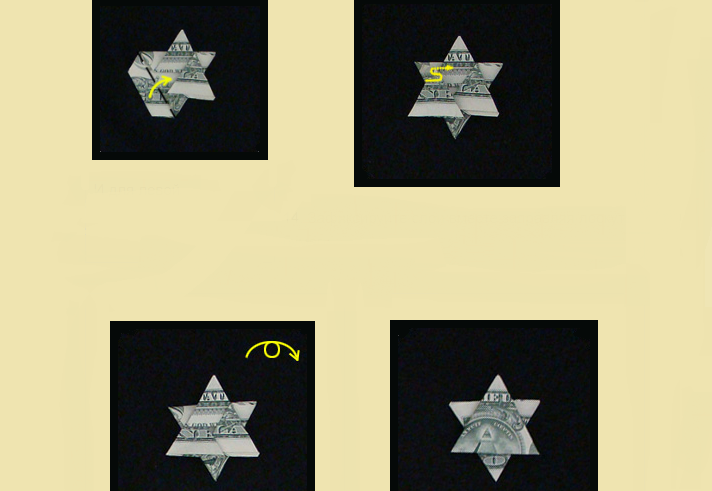
- Bend the upper part of the product on the fold. Repeat the action for the right and left side.
- Season the paper shreds, thus fixing the layers together. Turn the craft again.
The beautiful and unusual hexagonal star David is ready. Very beautiful creation, right? It will be a beautiful decoration of the house, and can also be an excellent gift for one of friends or relatives. Read more in the video:
Video: Origami from the money of the star David from the bill
Do-it-yourself sailboat from money: Detailed guide with photo and video
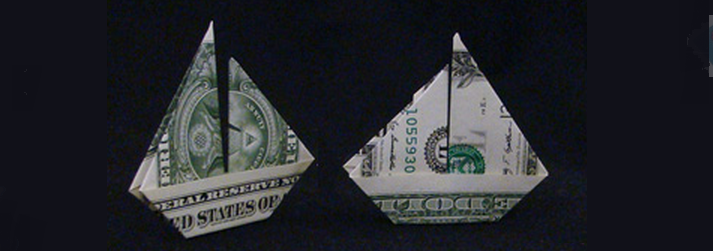
A cute and beautiful paper sailboat can be made with your own hands from money of different denominations and colors. Even a beginner can fold such an origami figure. This process will not take you much time if you follow the instructions below. Here is a detailed guide with a photo:
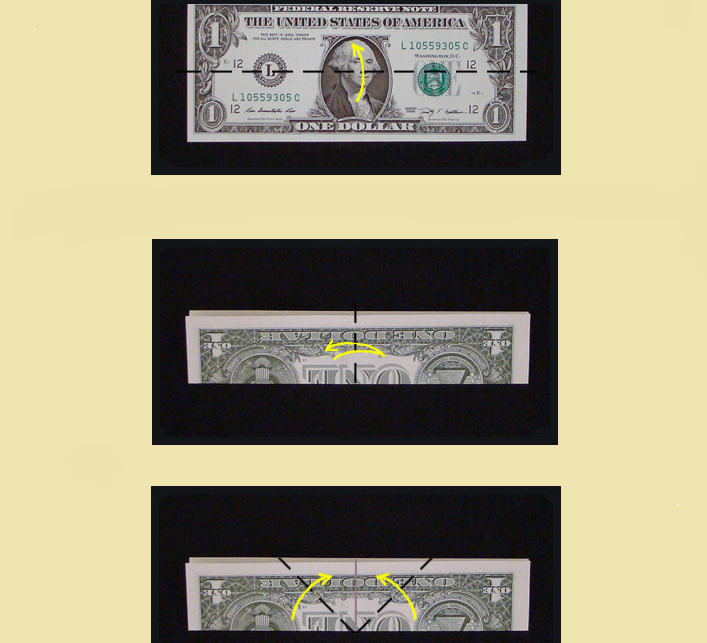
- Turn the bill to yourself with the face and fold in half from top to bottom or bottom up.
- In the middle, make a bend and expand the paper. Do as in the picture.
- On the indicated bends, add the left and right moans of the bill.
- Expand the sheet again.
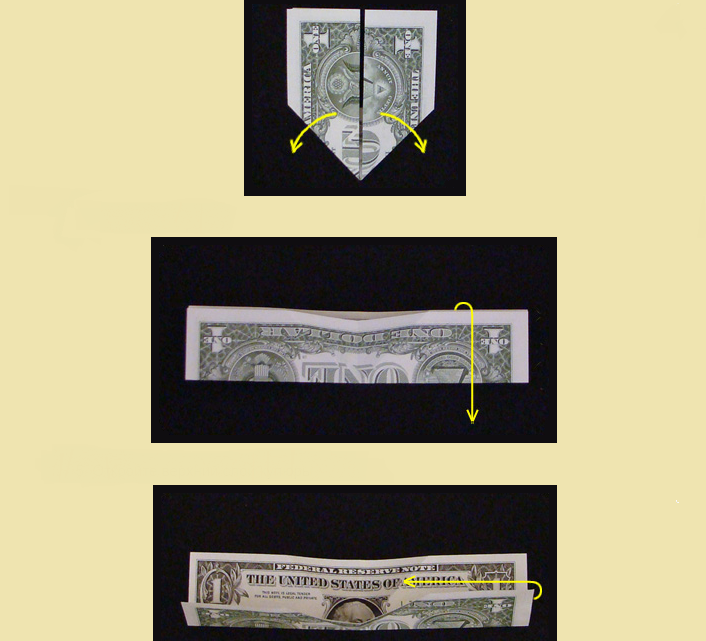
- Bend the upper part of the bill. Fold the right side of the sheet in the direction to the left. According to the already present folds, stick the right side of the paper inside. It should look something like this:
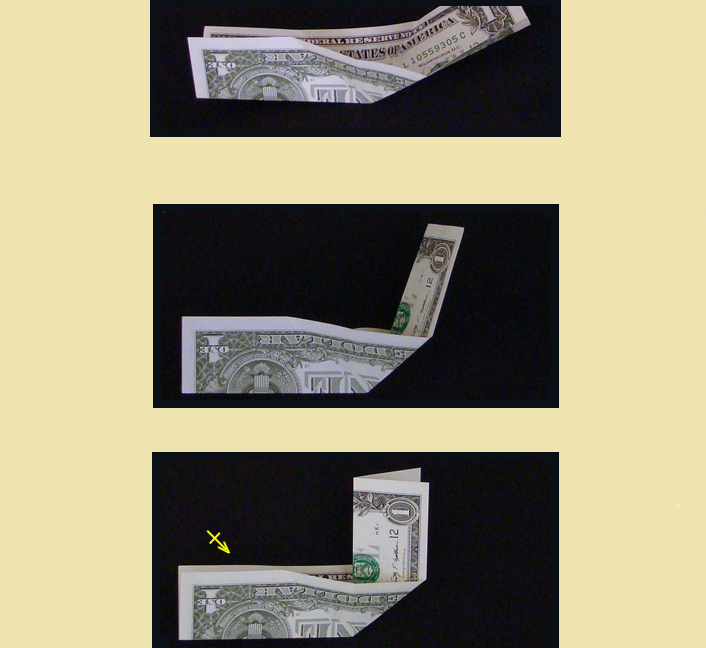
- Repeat all the same actions, only for the other side of the banknote.
- Turn the right layer of paper to the left in the way that you are leafing through the book. Thus, you will get a fold in the center. Repeat the same actions from the back of the banknote.
- Bend the upper left corner of the figure.
- Now do the same with the right angle.
- Turn the model.
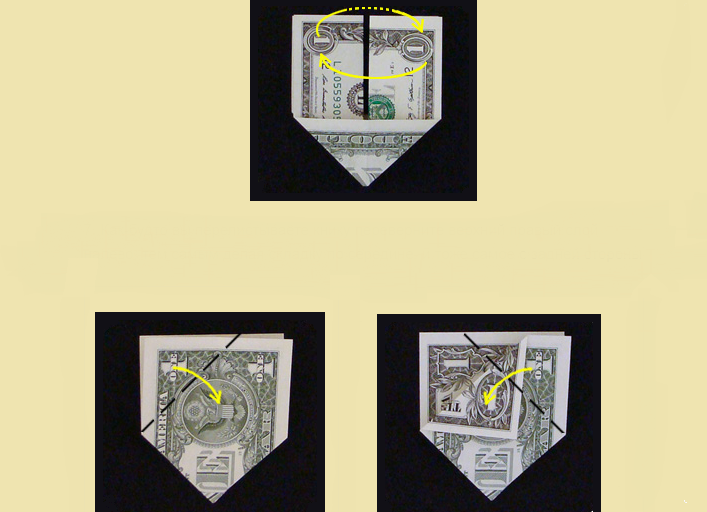
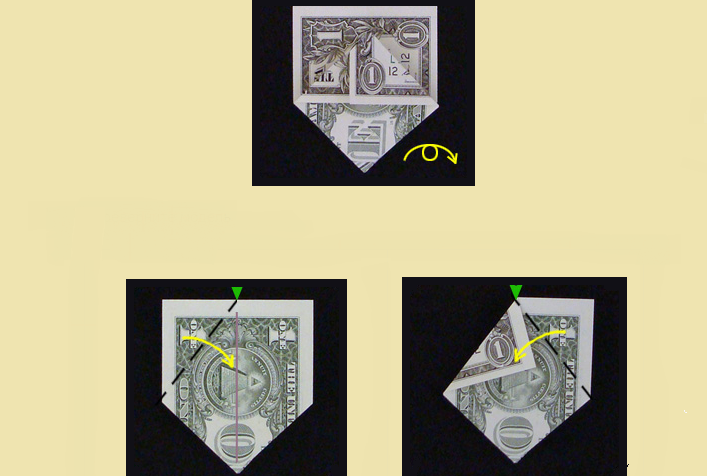
- Fold the upper corner on the left. To do this, you need to move from the bottom of the model to its central zone.
- Perform the same actions, only on the right side. This part of the figure should be placed slightly higher than from the rear section.
- Turn the right layer to the left in the way that you are leafing through the book. Do the same, only behind the model.
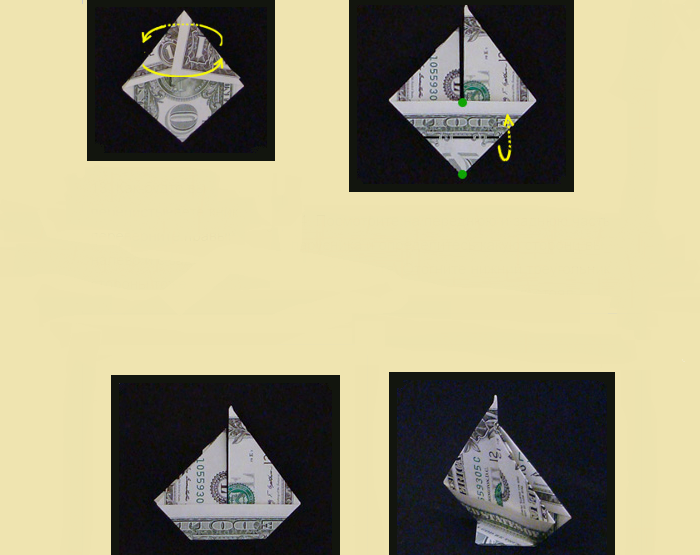
- Carefully inspect the sailboat from both sides and make a decision which one is more preferable to you. If you do not want the sailboat to be stable, then bend the lower triangle.
If you bent the lower part, then your craft will look like in the last photo above. But this will be a sailboat if you decide to use the lower fold in the role of the stand:

In general, the choice of the main side of the sailboat depends on what kind of bill you make it from. Indeed, it goes without saying that a craft of rubles will differ from the one that is made of a dollar or euro.
It is clear how to make such a product, you will see in the video below:
Video: Shipyard Origami Shipyard Shipyard
How to make origami ring with your own hands?

Origami in the form of a ring looks great in any case, that is, regardless of the banknote from which it is made. Of course, you will have to work a little, but the result is worth all efforts. This is a very original idea that must be implemented. How to make such an origami model with your own hands?
To do this, follow the following actions:
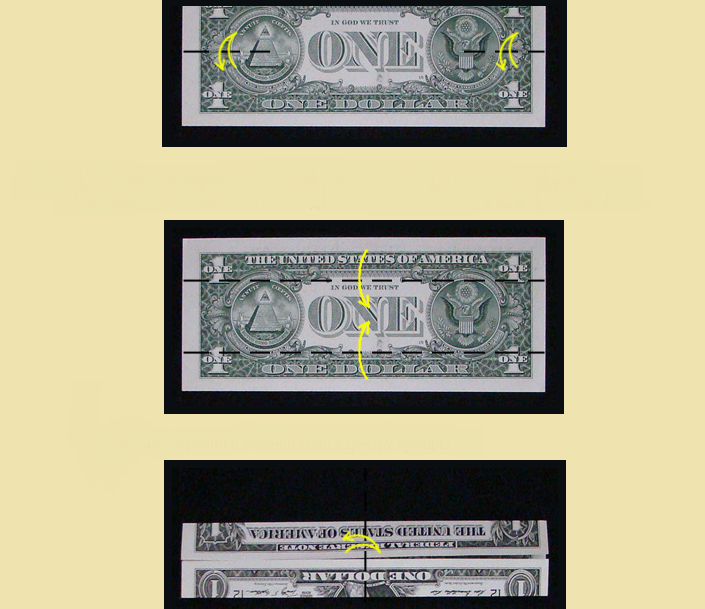
- Put the bills with the back side up, and make a fold in the center. But pay attention to the fact that the bend should not be complete - it needs to be done only at the edges of the banknote.
- Bend the upper and lower part of the bill to its central part.
- Fold the model across, then straighten it right away.
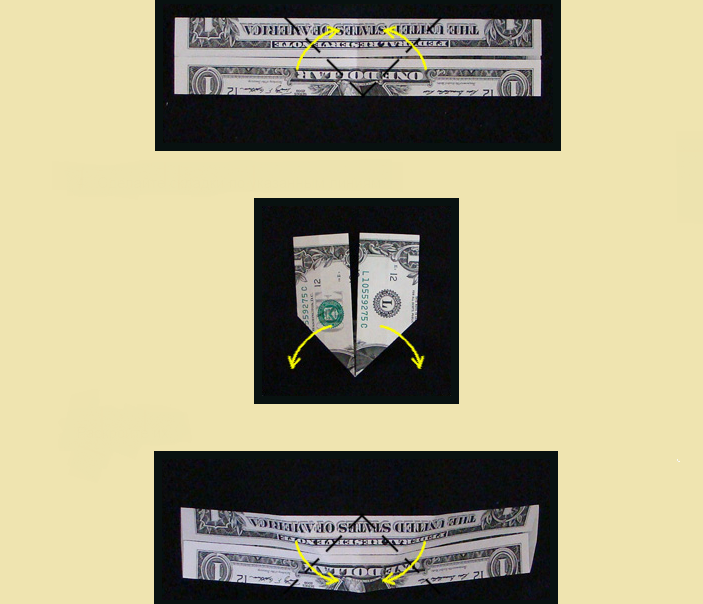
- According to the lines indicated in the picture, make bends. Now open them completely.
- Make the same folds as in step 4, but already down. Expand the figure again.
- Turn the craft.
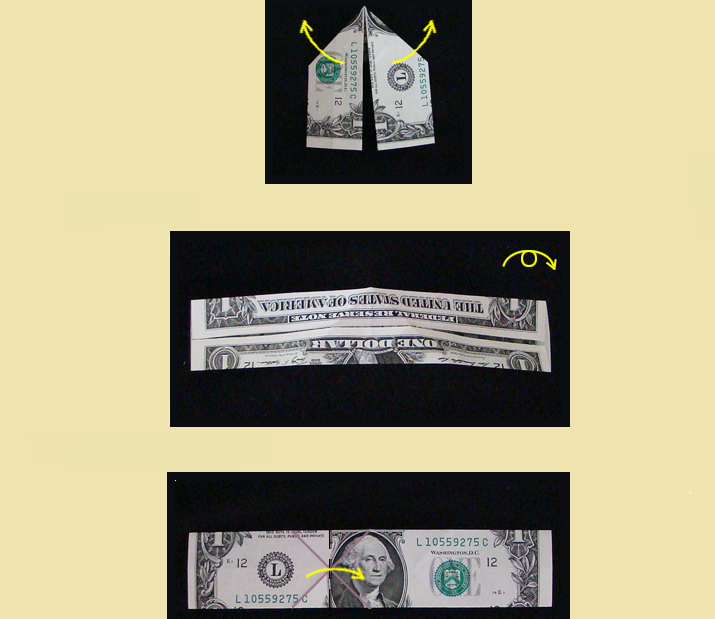
- Take the left part to the right. Make sure that the central fold is between the cross -shaped folds obtained during the execution of the previous steps. Bright the bends again.
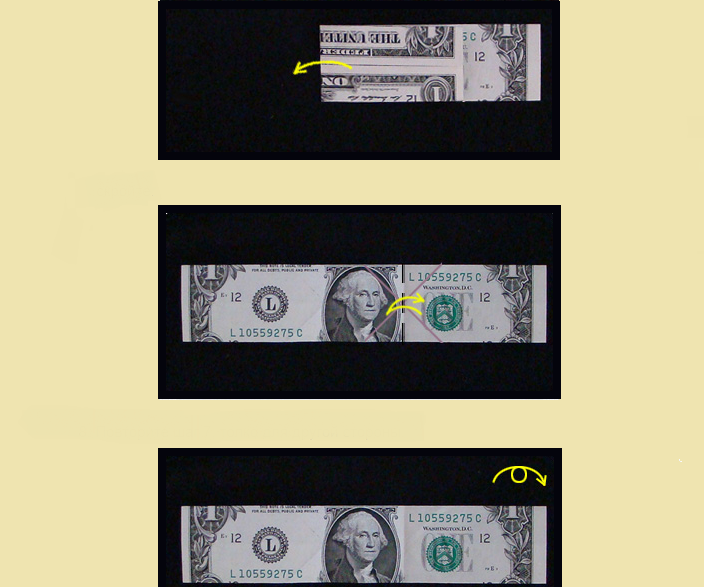
- Repeat the same actions, only for the other side. Turn the model.
- Squeeze the upper and lower bends tightly. Now press the left side to the right. Triangular bends should be located inside.
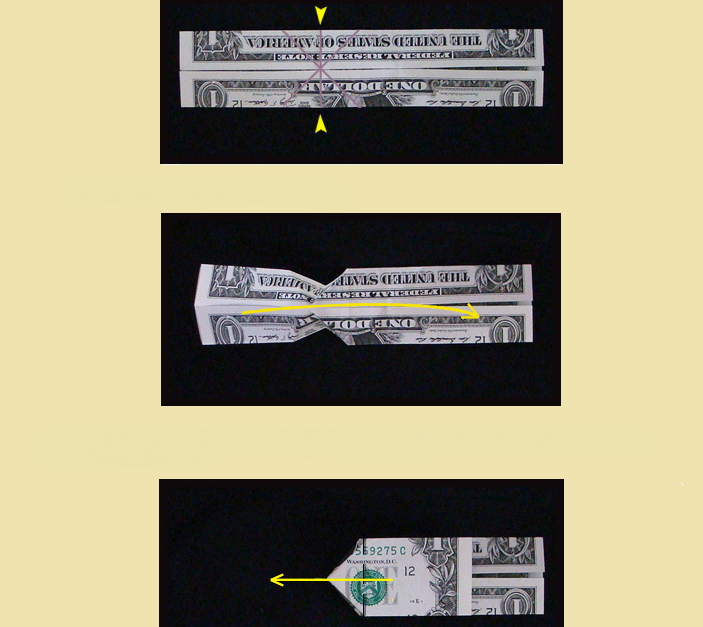
- Fold the top layer to the left. Make a fold according to the line specified in the diagram;
- Follow the instructions from step 9, but already on the right side. Then fold it to the left.
- Open the top layer completely. Make a fold in the indicated place.
- This is how it looks:
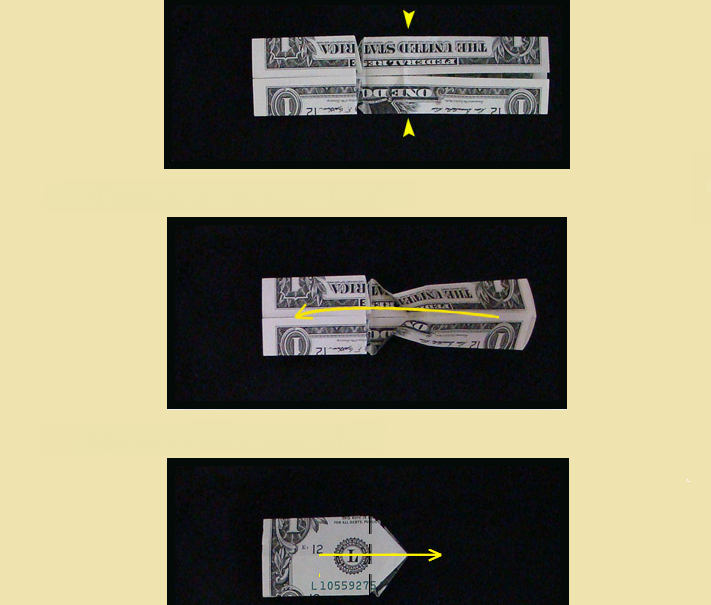

- Now fold the banknote one third of the lines outlined in the figure.
- Make both ends with each other:

- Insert one end into the other - and the ring from the bill is ready.
The product looks very neat and attractive. It can be safely worn on a finger as an unusual decoration.
Video: Origami from money - a ring from a bill
A shirt with a tie, origami from cash bills - how to make: a scheme of crafts from money
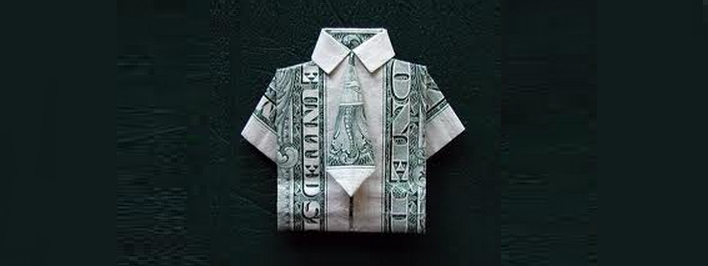
The monetary craft in the form of a tie shirt looks very interesting and unusual. It can be made from other paper material. However, it will look more solid from banknotes. How to make a shirt with a orgi money tie? Here is a scheme of crafts from banknotes:
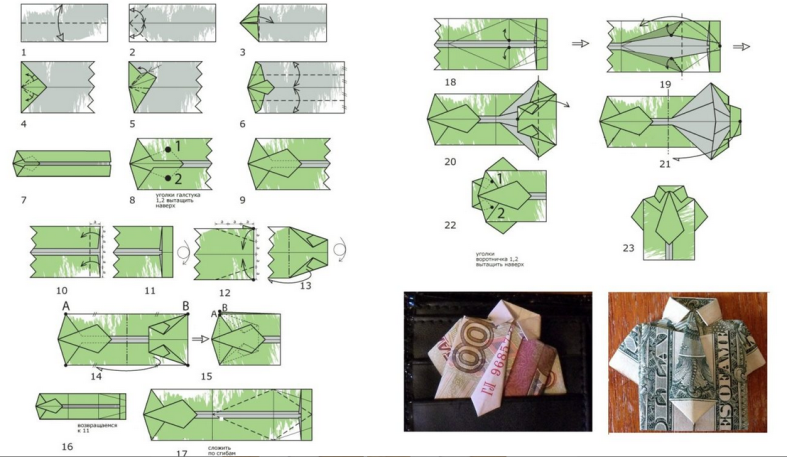
- Put the selected bill on a flat working surface and fold it in half along.
- Press the bending place, and then straighten it right away.
- Turn the workpiece so that its smaller side is opposite you.
- Fold the upper corners to the central line. You should get a triangle.
- Bend the same part of the workpiece on the base.
- Now you need to make a tie. To begin with, draw lines in those places where this additional element should be.
- Bend the bill on the created contour.
- From both side edges, make bends of several millimeters each.
- Carefully heat the resulting lines.
- Turn the workpiece with a tie up.
- Bend the edges of the bill to the middle. The tie should be hidden under them.
- After that, gently remove it and place it over the base of the paper shirt.
- The opposite part of the shirt is bent inside. The retreat width should not exceed 5 mm.
- Turn over the product, making sure that the formed collar is free. Bend the edges on his part to the middle. They must form an inverted triangle.
- Turn the workpiece again upside down.
- Retreat from him about 0.5 cm And bend the edges at an angle of 45 degrees.
- Perform such actions on the other side of the shirt.
- Turn the workpiece and fold in half.
- Gently remove the collar and place it near the tie.
- At the very end, carefully heat all the lines of the bends of the crafts.
Only 20 steps - and a shirt from a banknote is ready. And not only a shirt, but also a wonderful tie, which serves as an element of jewelry and perfectly emphasizing the sophistication of the product.
Video: Origamishirt From the dollar. How to make a shirt with a money tie?
Tender heart from money with your own hands: light version of origami
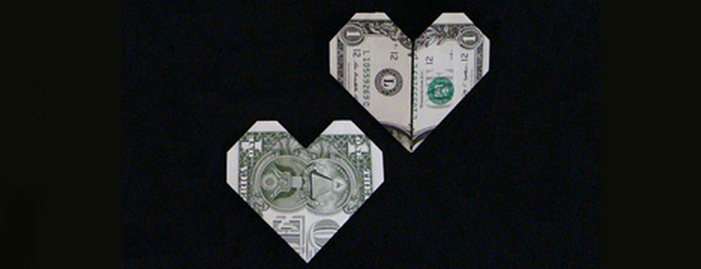
When it is necessary to give a gift to a loved one, it immediately comes to mind - a gentle heart. After all, how else can one express your love and adoration with a second half? And the present will be much more valuable if you make it with your own hands from money bills.
This version of the heart of origami from money is simpler and more understandable than previously described. But he is no less beautiful and cute. This is an easy version of origami. Therefore, do not lose time in vain - start work:
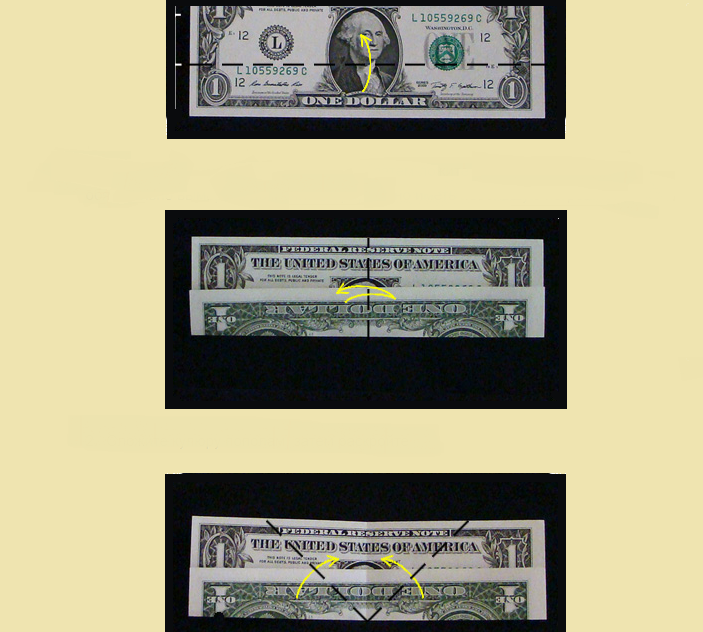
- Choose a bill, put it in front of you with the front side.
- Bend the upper edges down to their connection with the lower edge.
- Open the bill and repeat all these actions, only with the lower part of the money.
- Again, open the banknote and turn it upside down.
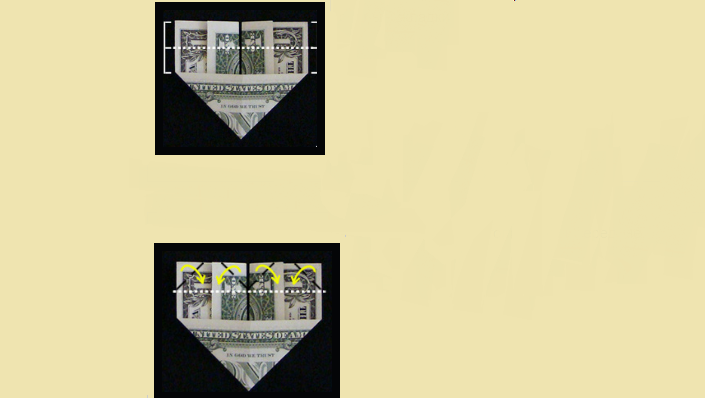
- Wrap the right and left edge of the paper inside. The line should cross the point where the two previous folds are in contact.
- Lay out the product, and then squeeze in those areas of its edges where there are contours of the folds. As a result, you get a workpiece, which in its form resembles a candy candy wrapper.
- Fold the banknotes to the central part and knit well in the folding places.
- It turns out a triangle, the edges of which bend so that they come into contact with each other.
- Perform the same manipulations, but on the other side of the craft.
- Take one of 4 folds that formed during previous actions, pull aside and press well.
- Repeat the same procedure for the remaining elements. As a result, you should get 4 identical squares.
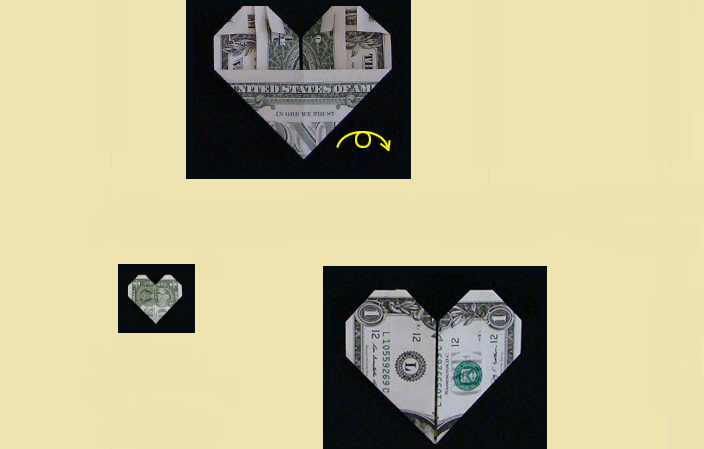
- Wrap the corners of each square to the center. After straighten and heat them.
- By the same principle, process the remaining 3 figures.
- Bend the left part of the crafts and threaten.
- Turn the workpiece with the back to yourself and fold it the upper part.
- Turn all the remaining sharp corners. You will get a very neat and cute heart.
The finished craft will be a wonderful gift to a beloved person for Valentine's Day or another important date. And the fact that the present is made with your own hands will make it even more valuable.
Video: Origami from money - Heart
An envelope for money in the technique of origami for a gift: how to do it with your own hands?
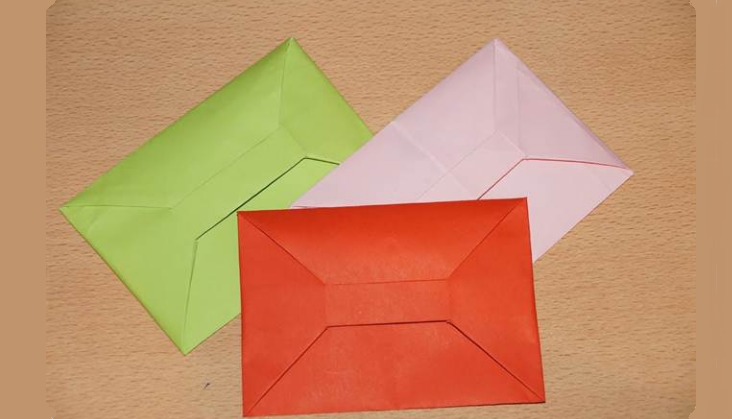
As you know, the best gift for any holiday is money. But to give them from hand to hand not very beautiful and decent. Therefore, for these purposes, we always buy special multi -colored envelopes from cardboard. Their cost is not very high, but if you often have to attend events where they give “cash” gifts, then the envelopes need to be bought every time.
Now you do not have such a need. You can independently, with your own hands, create such an envelope for money on the technique of origami. The following simple scheme will help you with this:
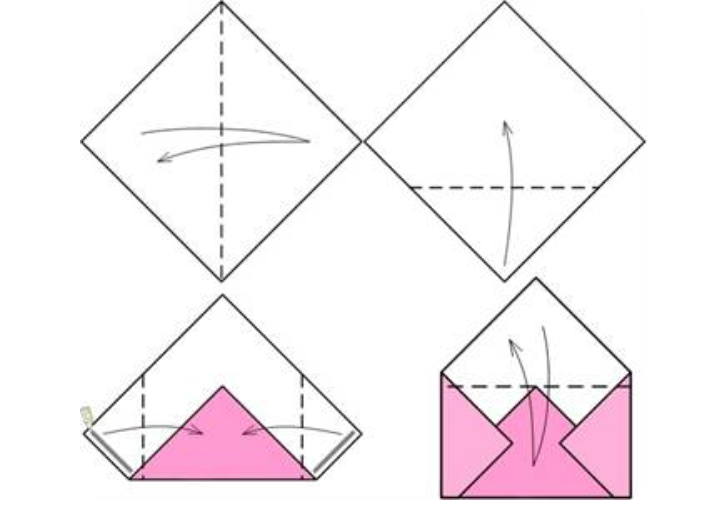
- Fold a sheet of colored or white paper in half. No need to wring it hard - just make a noticeable fold on which you will focus on.
- Turn the lower edge of the sheet to the center. Fold the resulting bend again so that it comes close to the line planned in 1 point.
- Bend the corners on both sides, thereby making vertical folds.
- The last stroke remains. Bend the finished triangle in a horizontal position - it will close the envelope.
Envelopes can be done absolutely any form. The main thing, do not be afraid to show imagination. For example, see how the envelope hearth looks pretty:
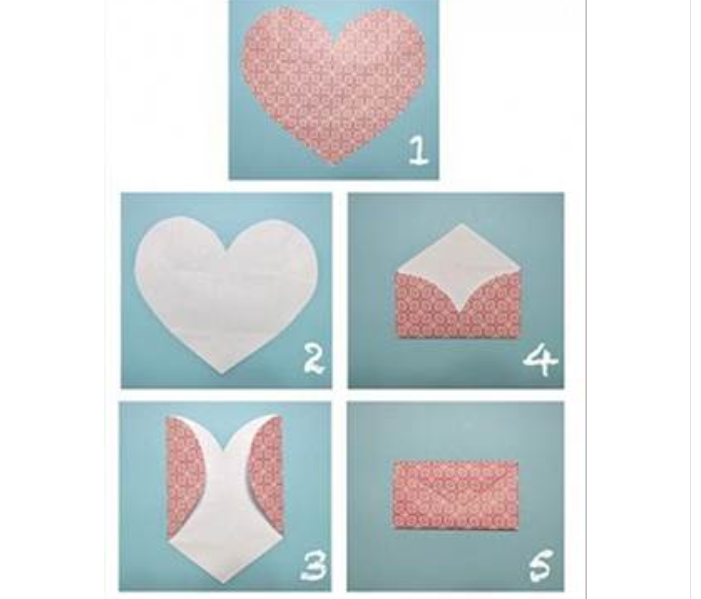
You can make such a simple but beautiful envelope for money from any color of paper. In addition, it can be decorated with different decorating elements - rhinestones, beads, carved figures, ribbons, etc. This will give the product a more solid and sophisticated, refined appearance.
Volumetric ball Origami: How to do it with your own hands?
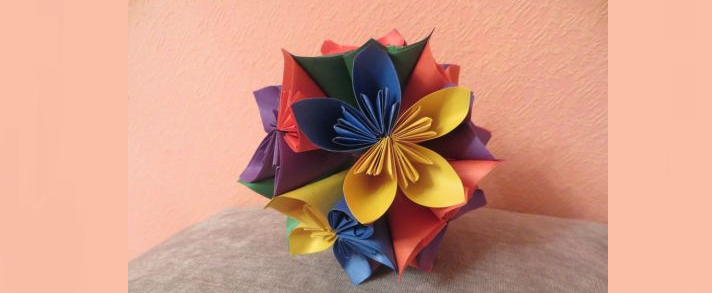
Kusudami is one of the directions of origami, which uses great honor. These elements are nothing more than “balls of happiness” - that’s what they are called. But many do not want to make such a product out of money, since you have to cut paper and glue particles among themselves. However, if you do not feel sorry for the money, then forward. If you want to use alternative material, then prepare the paper. So, you will need the following materials:
- Colored sheets of paper or banknotes
- Ruler
- Scissors
- Glue
- Pencil
Now you can proceed to action:
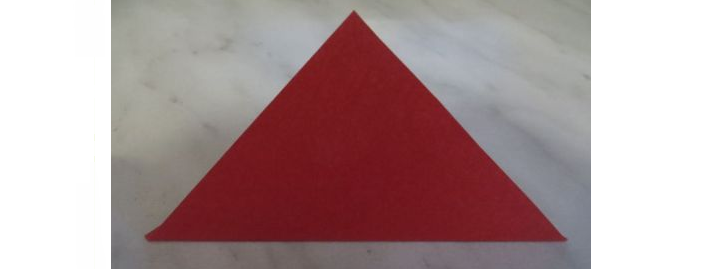
- Cut colored paper with squares, the size of which does not exceed 7 cm.
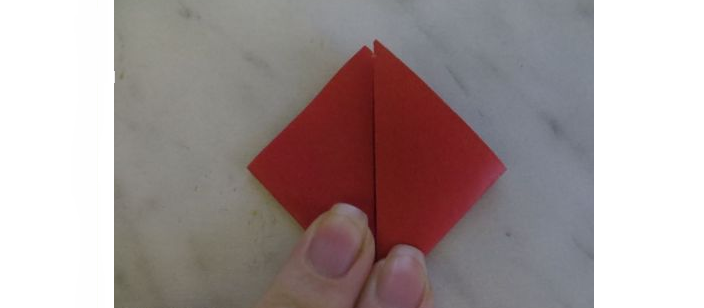
- Creating the first module. Fold the square in half along the diagonal line.
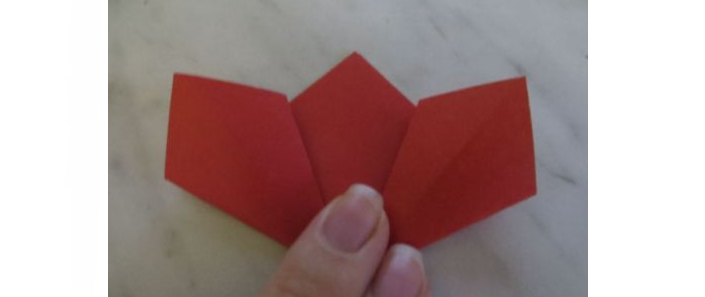
- Fold two tops of the triangle, as shown in the photo.
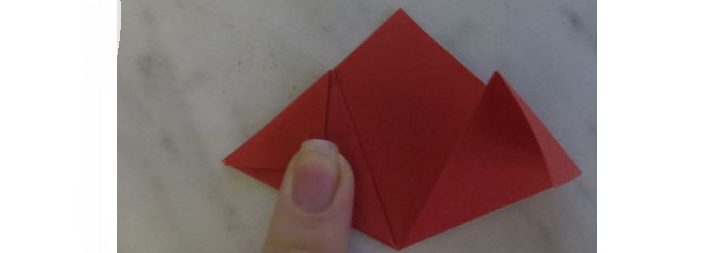
- Expand the "pockets".
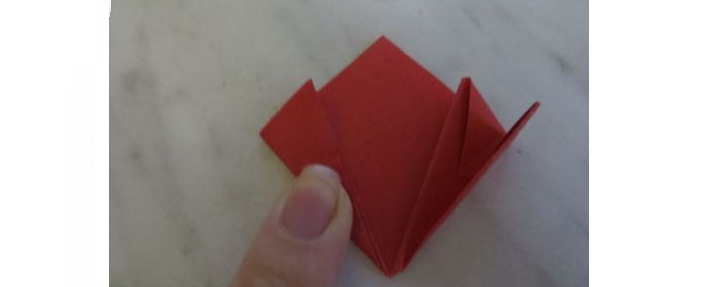
- Fold the corners of the rhombus as shown in the image.
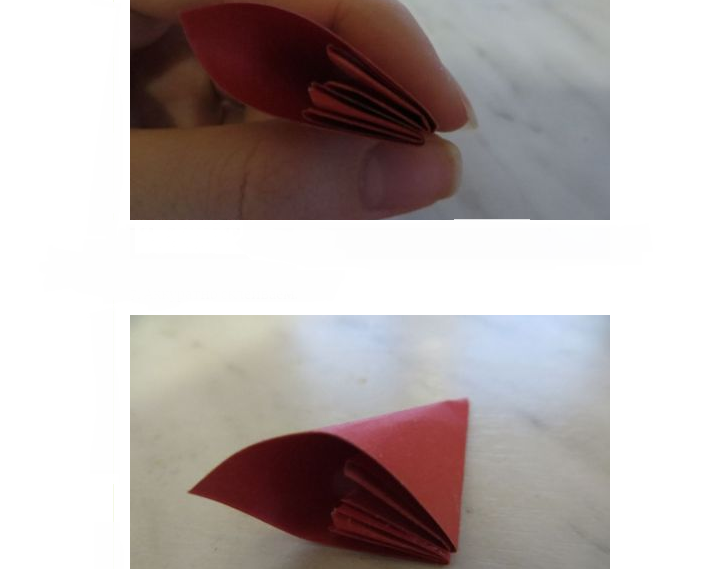
- Now the part should be folded with a cone.
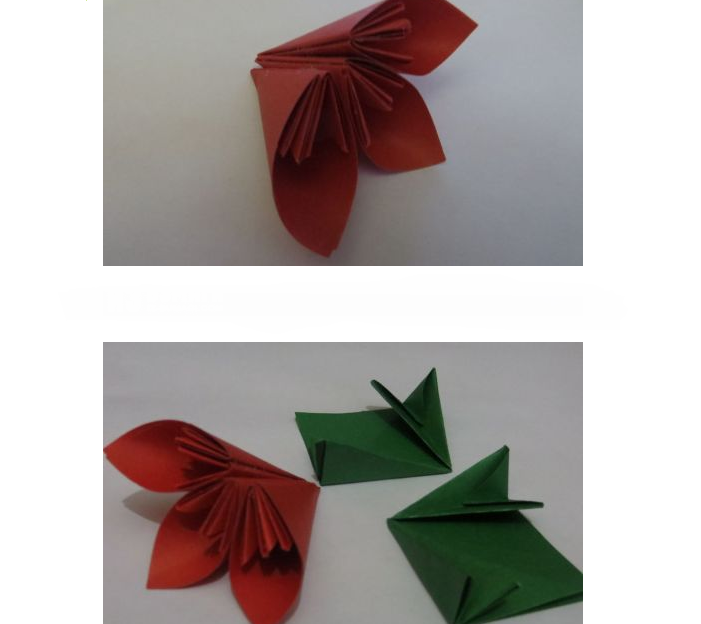
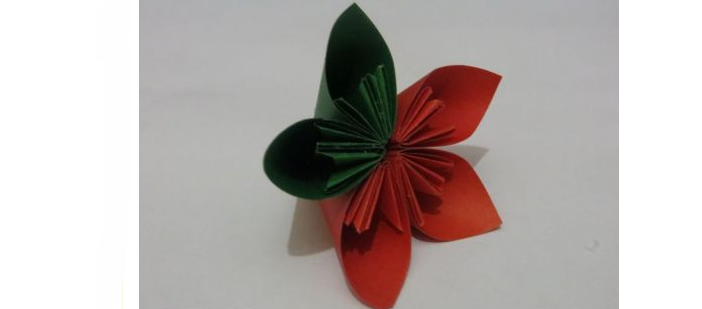
- Gently glue its parts.
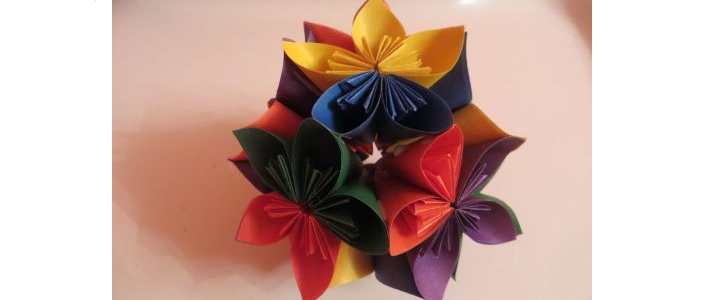
Prepare for one flower 5 modules According to the above scheme. Each of them is best made from different colors of paper. Glue all the petals, forming a full -fledged bud. And according to the same principle, make the rest of the flowers for your ball. In the end, you should get 12 colors. Close them alternately - and you will get such a beautiful floral ball that is perfect for decorating the premises for the holidays.
Origami original from money with his own hands - how to make: scheme
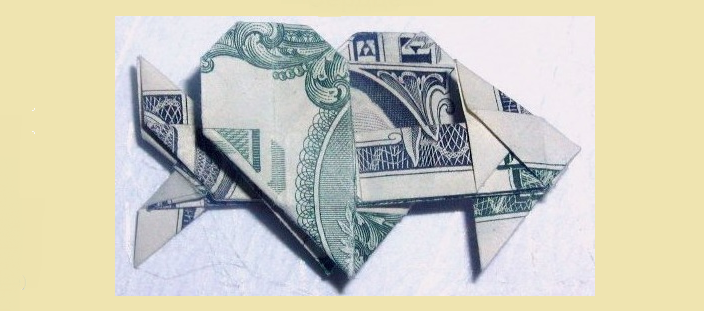
Origami from money in the shape of a heart is suitable as a gift for Valentine's Day, and just to make a pleasant to a loved one and loved one. In addition, the format of such a product itself is also unusual, because you will prepare it from money bills. How to make an original heart from money with your own hands? Scheme:
What you need to obtain an original figure:

- Make it 8 horizontal folds On a banknote. They must be even, have the same intervals. In addition, do it 1 vertical fold, which will share the sheet in half.
- The right lower corner is bent to the center of the sheet, and then straighten. Mark this section with a letter or digit.

- Repeat the procedure, only with the left part of the banknote.
- Make folds that will share the distance from the extreme folds to the central part of the sheet. Focus on the scheme:

- Create new folds that will divide these sections into equal parts.
- Also, make equal folds from the outside.
- From below and top of the sheet, make the reverse folds.

- In the lower part, behind, using the diagram, make a fold along the line. Turn the model.
- Fold the upper part of the sheet, making the angle on the right side, as shown in the diagram.

- Pull the paper down from under the fold that goes vertically.
- Make another fold, simultaneously pulling the triangle.
- Fold the sheet on the folds that were made earlier. Along with this, turn down the upper part.
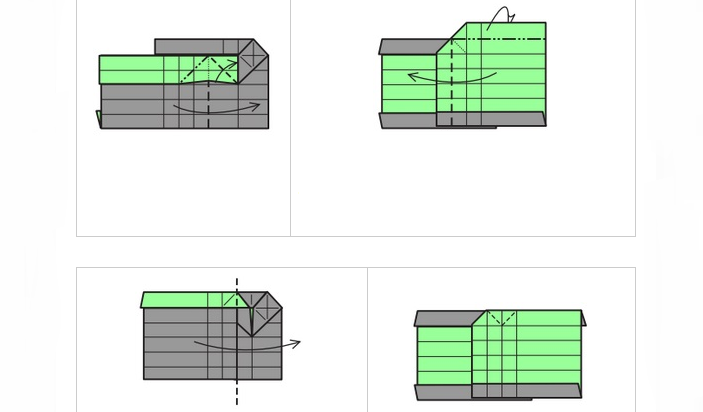
- Make a fold back.
- Then one more.
- And a few more folds. Exactly follow the specified scheme.
- Straighten the last fold, turn the model and perform the actions prescribed in points above.
- After that, fold the top valve and repeat the same action, only from the back of the product.
- Make a reverse fold and turn the figure.
- Make another reverse fold.
- Fold the resulting shutters to the left on the existing folds.
- Make the folds depicted in the diagram.
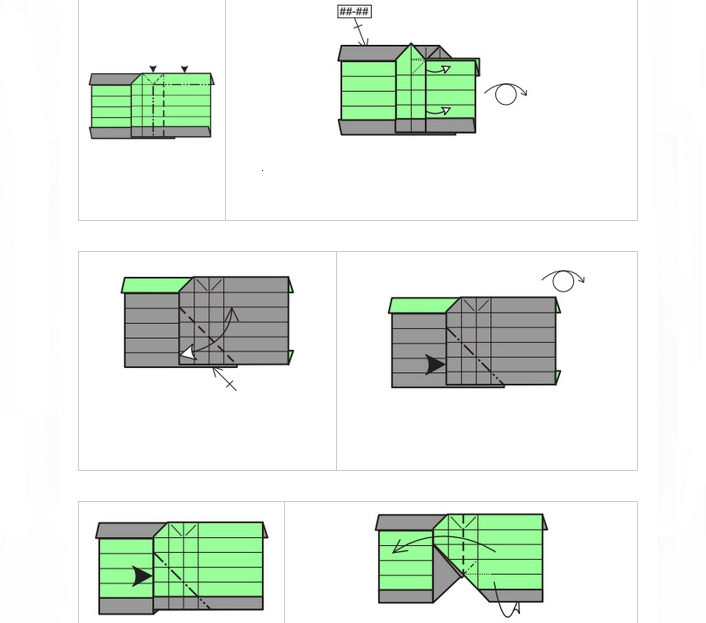
- The new valve that you got is on the right side.
- Take a reverse fold upstairs.
- Carefully pull up until the sink opens.
- On the back of the product, follow all the steps that are registered in previous points.
- Make another reverse fold on the left.
- Fold the damper on the left side so that the angle remains behind.
- Make the folds depicted in the diagram below.
- Make a fold again.
- Move the layer to the right.
- At the top, take new folds, then repeat the previous steps, only in the back of the figure.
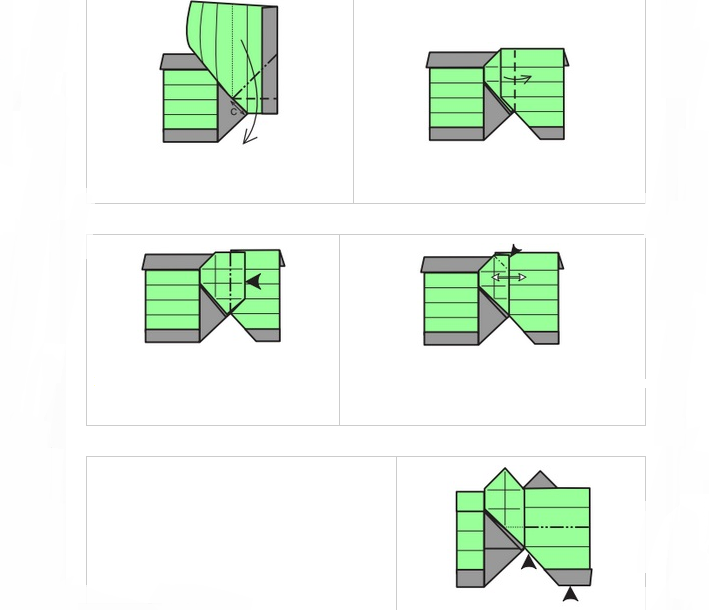
- Expand the resulting triangle so that it “looks” up, folding the left side of the craft.
- Add the back fold up.
- According to the line indicated on the line, make a liner in the form of a hollow. Season the tip in the pocket that was formed in front of him. Turn the craft.
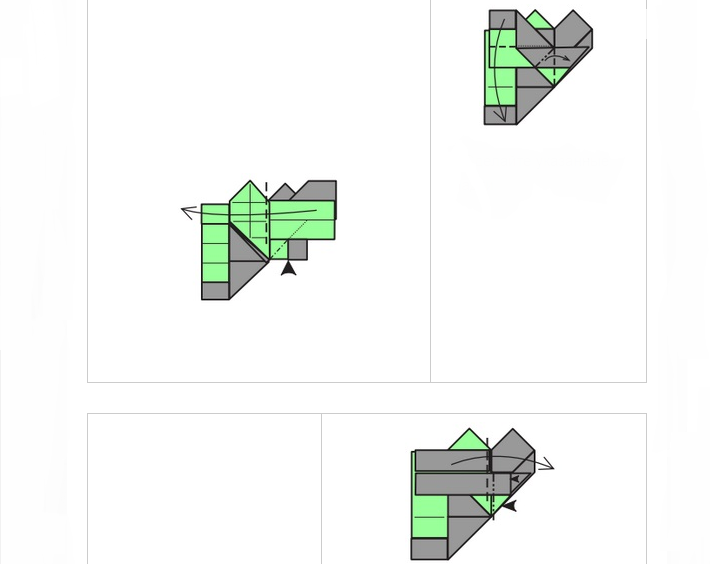
- Fold the reverse fold down, again filling the tip of the paper into the pocket.
- Now proceed to the formation of the arrow.
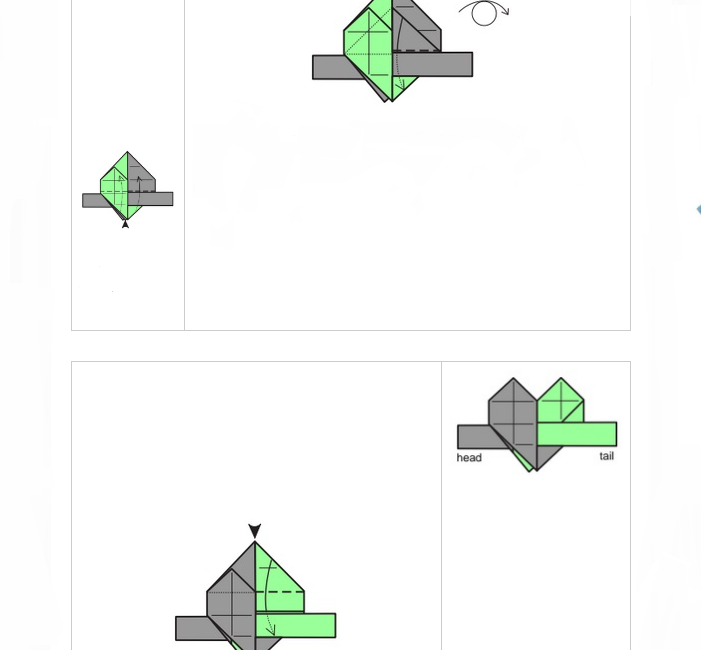
- Fold the corner as in the diagram above.
- Turn the corner to the left.
- Turn the craft.
- Fold the layer up.
- Turn the figure upside down.
- On this side, repeat all the actions from the points above. Turn the craft again.
- Make a corner by turning it back.
- Make a reverse fold.
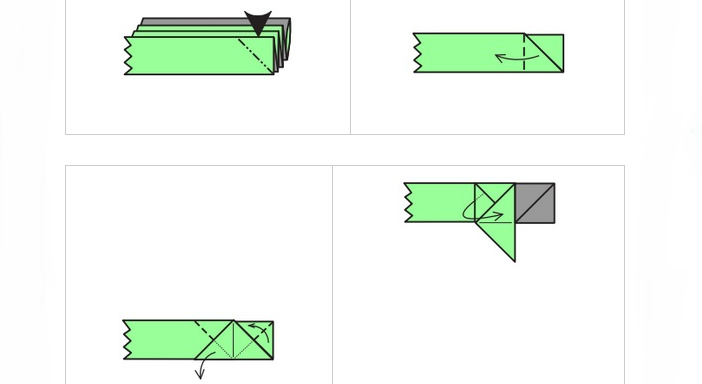
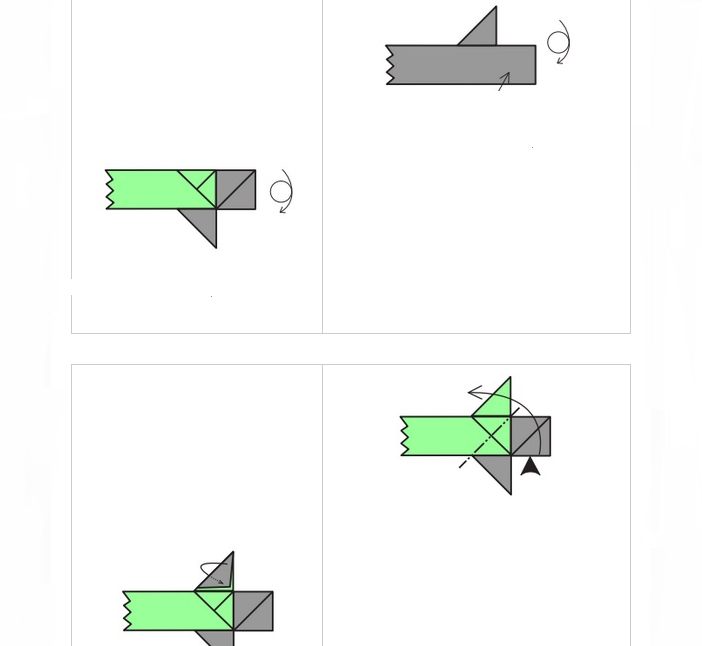
- Pull a piece of paper and turn down, following the lines of the front edge.
- Turn the middle triangle back and back, while pulling the front triangle.
- Season the free triangle in the pocket. The arrow is ready, the product can be turned over.
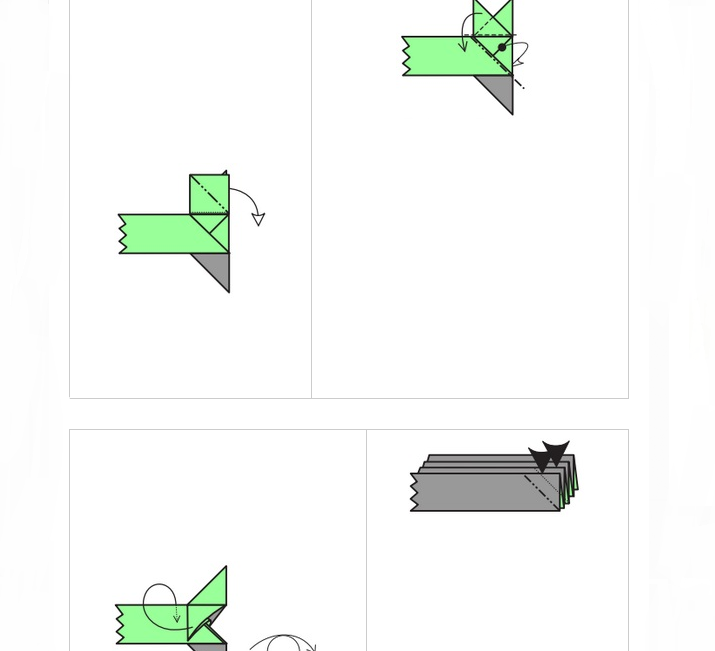
- Now proceed to the manufacture of the arrow. To do this, first make folds. They must be symmetrical. The reverse fold is necessary for the first 2 corners.
- Bend them to the left.
- Pull the corner.
- Turn up the model from the bottom up.
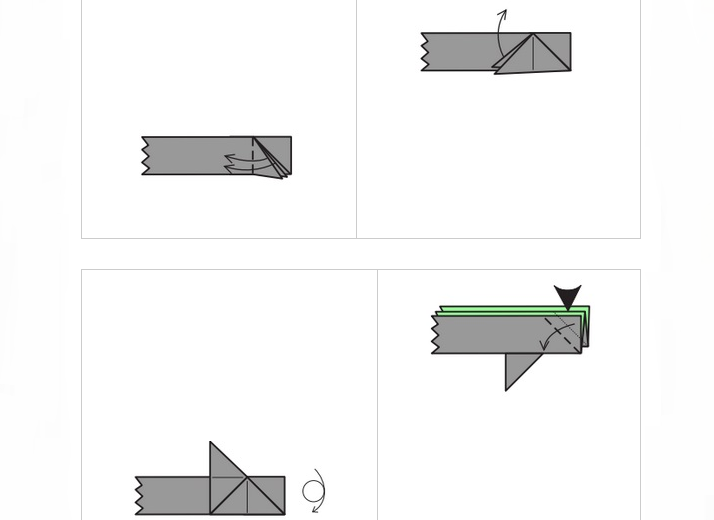
- Now make the folds indicated on the diagram above.
- Create a reverse fold.
- Perform the previous steps, repeat.
- Fold the back of the resulting triangle forward.
- Put the new damper in the front pocket.
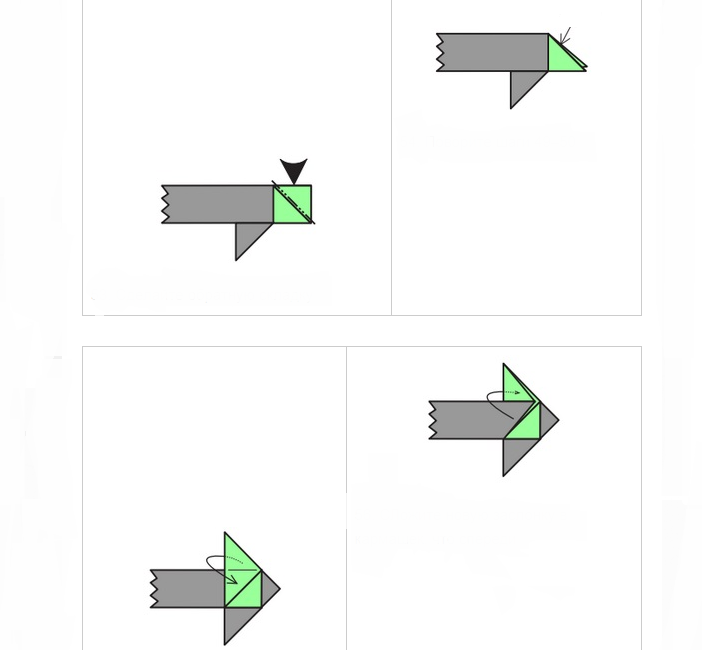
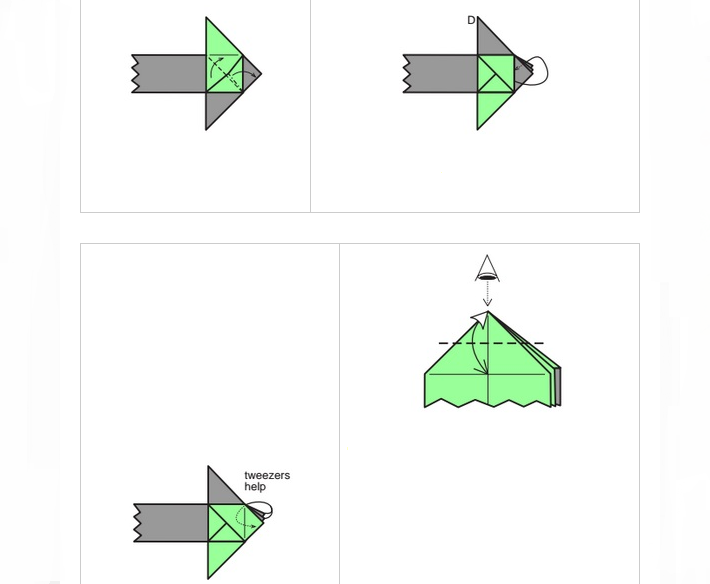
- Now create the indicated folds.
- Fold the upper layers of the triangle to the rear.
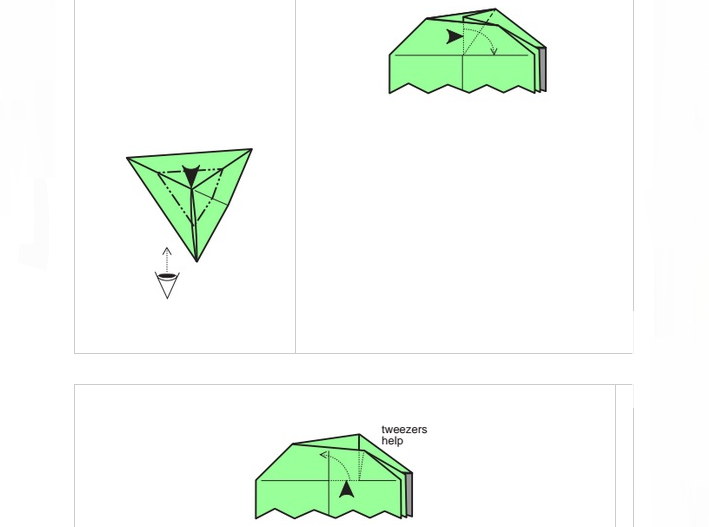
- Now put all the ends inward, as shown in the above photos.
- The view from the top of the figure should resemble the heart:

- Make a new reverse fold.
- Form a few more reverse folds, as in the scheme. Repeat the previous steps, only on the right side of the heart.
That's all - the formation of a heart model is completed. It looks difficult only at first glance. But as soon as you try to perform the above actions, you will understand that in fact everything is very simple. The process is quite exciting. You will definitely feel this from the first moments.
Origami only at first glance seems complex technology. But in fact, this is a very simple and incredibly exciting activity. DIY crafts are very much like. Therefore, your models, folded using this technique, will certainly be appreciated. Good luck!

