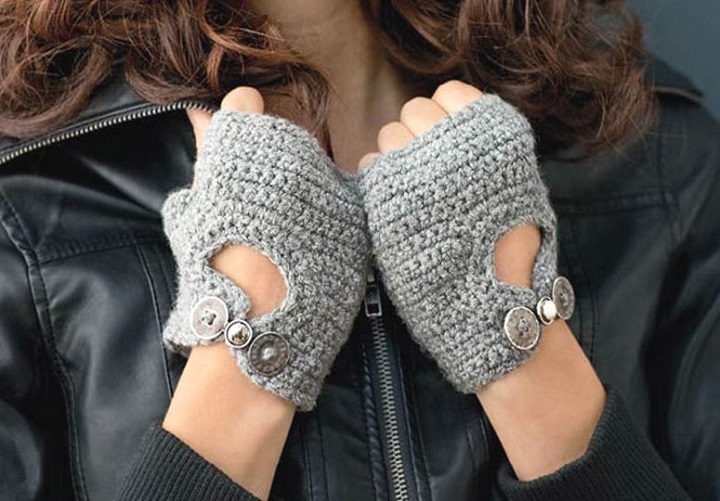
In this article we offer you the best and simple master classes on how to crochet mittens even by a novice craftswoman.
Contents
- Conditions that we will use when knitting a breeze crochet
- Crochet Miteni with a pattern with imitation of knitting needles: step-by-step master class
- Video: The simplest mittens Crochet "unisex"
- Master class on how to quickly tie the openwork mittens crocheted: Pattern "Fan"
- Video: Beautiful Mitina Crochet Patter "Lessons"
- A detailed description of how easy to tie mittens with a crochet with a relief pattern
- Video: Crochet Miteni Pattering "Nodes"
- Ideas and schemes, how to crochet mittens
- Video: Crochet openwork mittens
Mits, or mittens without fingers, look great on the hand, protect from the cold, but at the same time do not constrain the movement of the fingers. The product is knitted quickly, you need a little yarn, and playing with patterns, you can create various interesting options. The easiest way to crochet mittens, which we will tell below in detailed master classes.
Conditions that we will use when knitting a breeze crochet
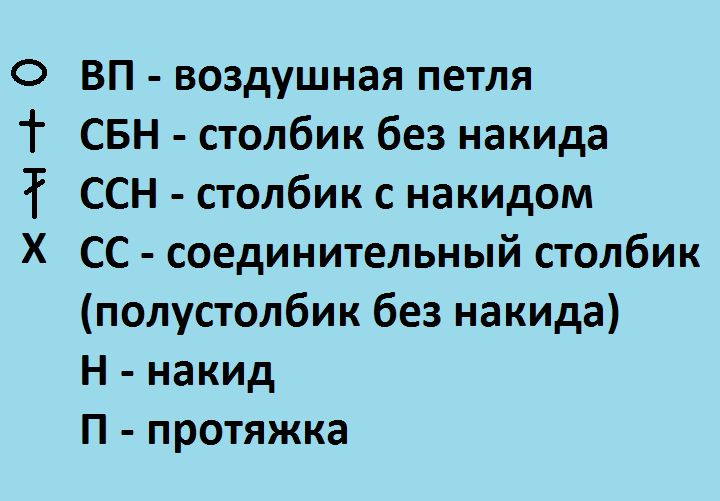
Crochet Mitinok contractions when knitting:
Crochet Miteni with a pattern with imitation of knitting needles: step-by-step master class
We need:
- about 50 g of any yarn (yarn made of wool and acrylic is great)
- hook number 4
- clips or pins as a marker
Knitting techniques:We knit the SS for the distant dop of the loop of the previous row.

Algorithm:
- We type a chain of 38 VP + 1 for lifting. Adjust the number of loops by your volume of brush. But take into account that the air chain should be slightly larger than the circumference of the hand.
Tip: To make the edge even, we turn the work clockwise.
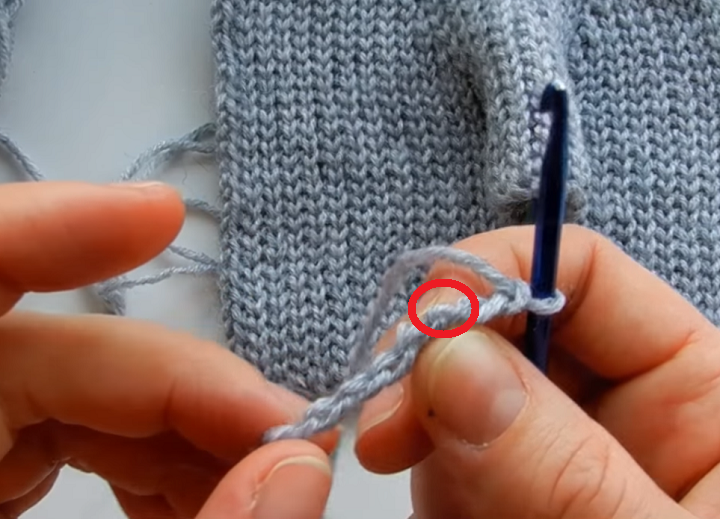
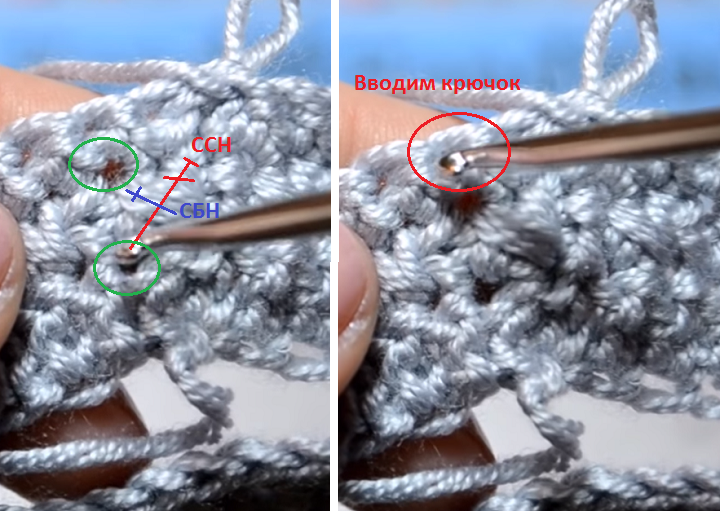
- We make a loop for lifting, the first row we knit the SS. But we do not enter the hook beyond the air loop of the chain, but for the protrusions on its circulation (see photo).
- Next, the mittes crochet SS already for the distant hand of a loop. Two rows make an elastic band 1*1. As a result, we knit 9 rubber bands - this is 19 rows of the SS.
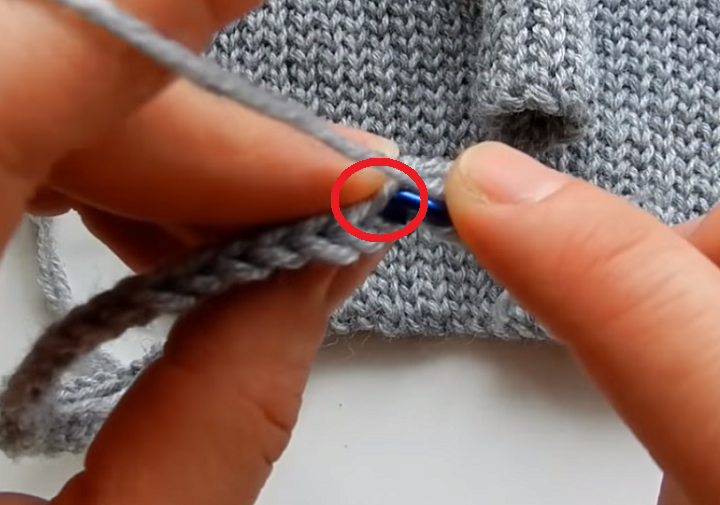
Important: the direction of work for the right mittens from left to right, and for the left hand - in a mirror display.
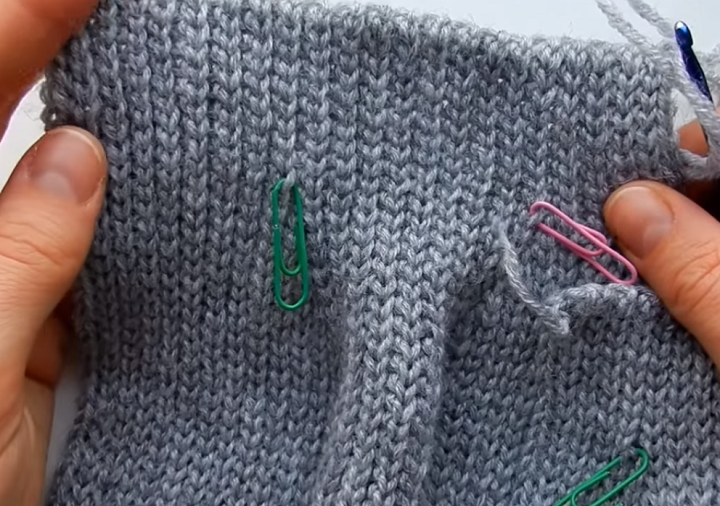
- We begin to form a thumb. We mark with a pin or a paper clip of 10 columns. We do not knit them! Next, we begin to shorten 2 loops in each facial row (we simply will not knit them). In the last row - we remove only 1 loop.
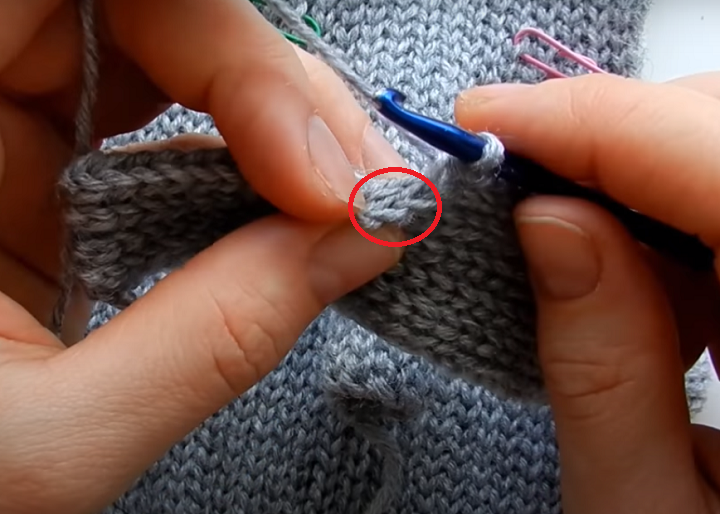
- We knit the wrong loops without decrease. Look more on the diagram.
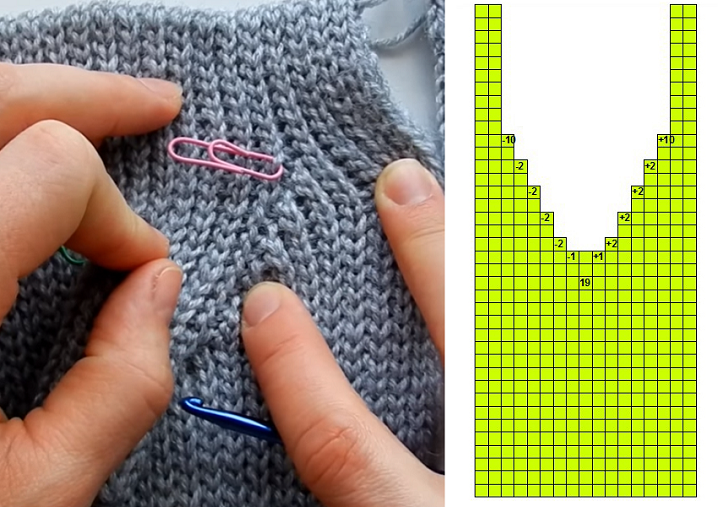
- As a result, we make 12 shortened rows and get 19 loops. We fix the main thread with a pin and proceed to the direct knitting of the thumb.
- From an additional thread we make 9 centuries. p. This is the future height of the thumb. And these loops we fasten the SS on the front side to the base of the knitting (in the center of the scheme where shortening was completed).
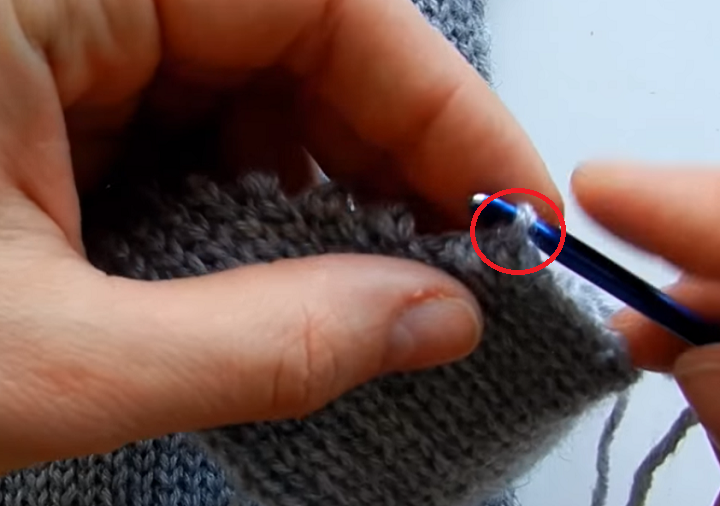
- Next, we knit along the steps of shortening and move to the end of the row (we knit those 10 loops that we left).
Tip: so that when forming the thumb, we do not get holes in the canvas, we insert the hook into the upper thread of the wrong row and capture the loop of the next row, knitting all 3 loops together with SS.
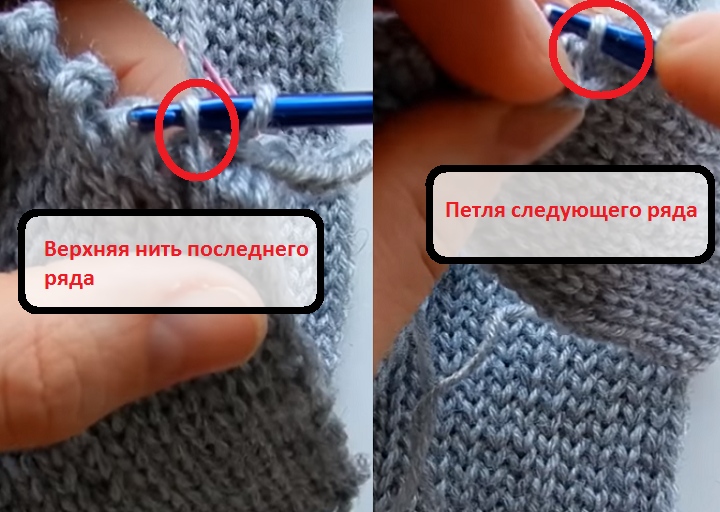
- We knit the wrong row along the entire length of the SS canvas. But on the air chain, the first row is not knitted for air loops, but for convex parts on the back.
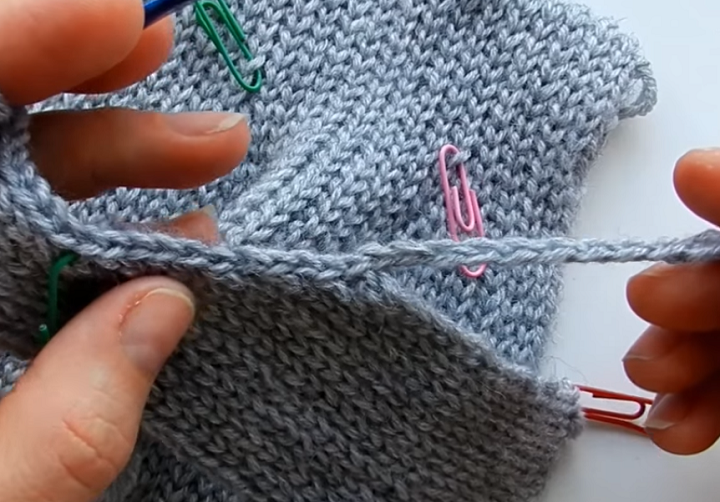
- In total, 18 rows are needed to get 9 rubber bands.
- We sew the thumb on the wrong side - we do it SS, but you can use any convenient way. More information on how to do this, we read in our article "How to combine the edges of knitted products with a needle, hook and knitting needles?" We fix and cut an additional thread.
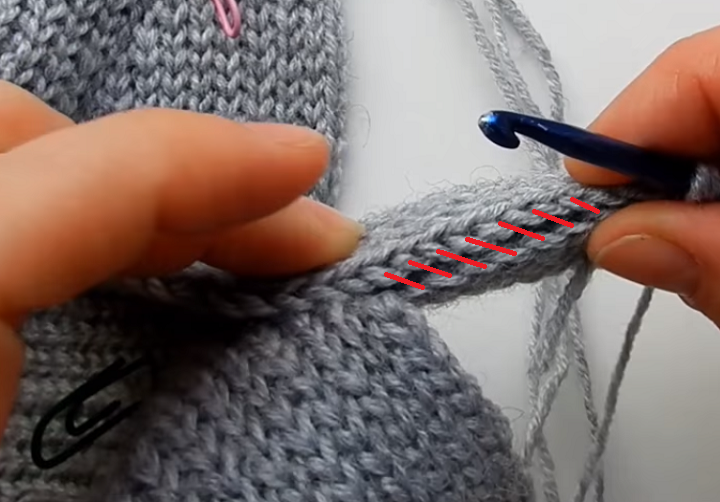
- We return to the main thread, knit 19 columns without increasing! We knit the last loop, capturing the thread from the base of the thumb. This is necessary so that there is no hole on the canvas.
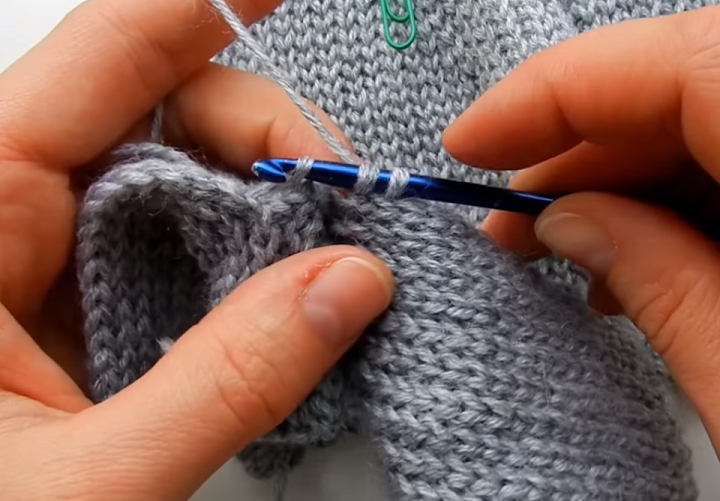
- We knit the wrong rows without increasing the number of facial loops.
- In the next front row, add 1 loop. We do this as follows: after we knitted the loop from the previous row, pick up the arc in the height of the column (see photo) and knit it, capturing the loop from the thumb (3 together).
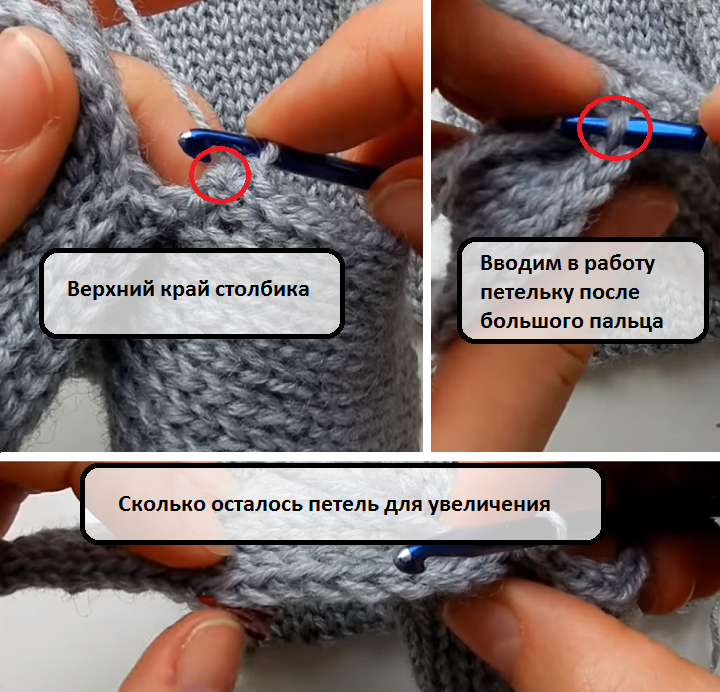
- In the subsequent rows, we already add 2 loops, until we return the abbreviated 9 loops. To do this, we knit 2 ss from an arc in the height of the loop. We knit the last column, capturing the loop of the previous row (3 together).
- As a result, we get 20 rows (2 rows without increasing the center of the product). We turn on the left 10 loops, continuing the knitting of the base of the mittens. We knit another 8 rows of the SS - it turns out 4 rubber bands. And 1 more fixing row for connection.
- We fasten our mittens crocheted on the wrong side of the SS, or you can do it with a needle.
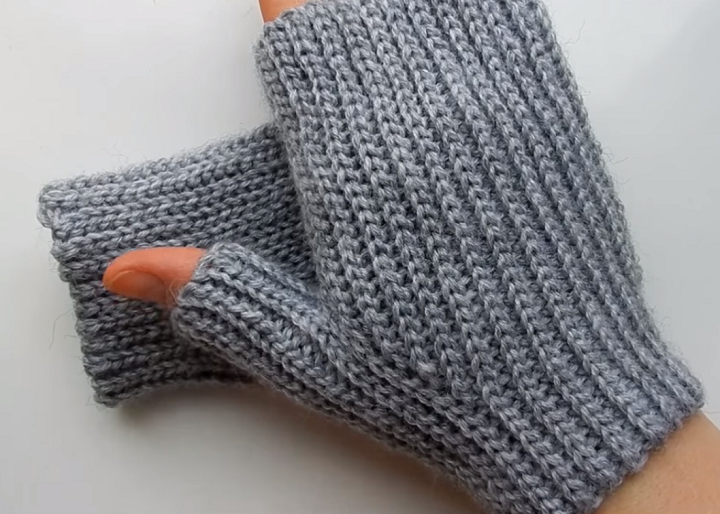
Important: we knit the left mitten in the reverse order - 9 rows to create 4 rubber bands, we knit the thumb with decrease and further addition, we finish in 18 rows of the SS to create 9 rubber bands.
Video: The simplest mittens Crochet "unisex"
Master class on how to quickly tie the openwork mittens crocheted: Pattern "Fan"
Prepare:
- 80 g of half -wool yarn
- hook No. 3.5
Peculiarities:We make an elastic band vertically, i.e. across the circumference of the wrist. Therefore, the length of the elastic band will be adjusted along the knitting.

We read about the principles of knitting columns in different versions in our article “How to knit a crochet column? How to make it convex? How to knit a convex embossed column without a crochet? ”
Glastic knitting algorithm:
- Row 1 - to the height of the elastic band of 5 cm, we collect 11 VP and 3 more VP for lifting. In the front row we knit 11 SSN. Enter the hook by the upper hand of the loop.
- Row 2 - we recruit for lifting 2 VP, because Our pattern is embossed and the column will be lower. We turn the work and knit SSN, but we enter the hook behind the wall of the column from the previous row before work.
Important: for the elastic band to be flat, we knit the last SSN by the lifting loop. In the next row we will skip it.
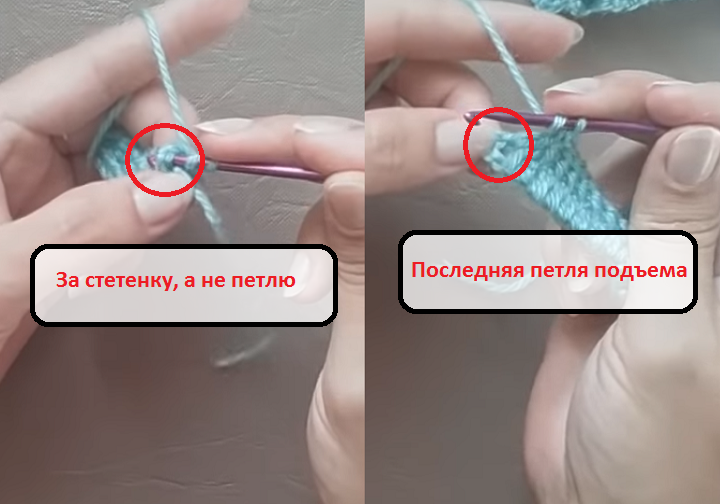
- The number of rows depends on the necessary length of the elastic band. But we make it a little less for the best girth. And another important point - the number of rows should be a multiple of 4! We have in the example of 28 rows.
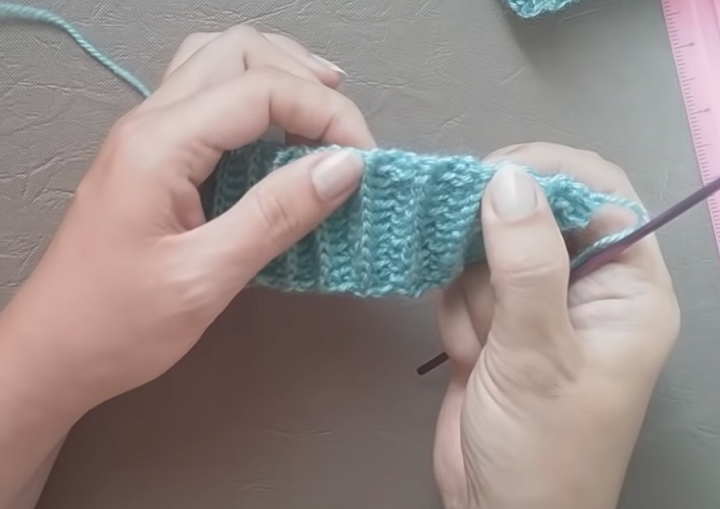
- We sew the elastic band by the “loop into the loop”. On the segment, which is closer to us, we capture the 1st upper loop, and on the opposite segment - the entire loop, for both dots. We do SS.
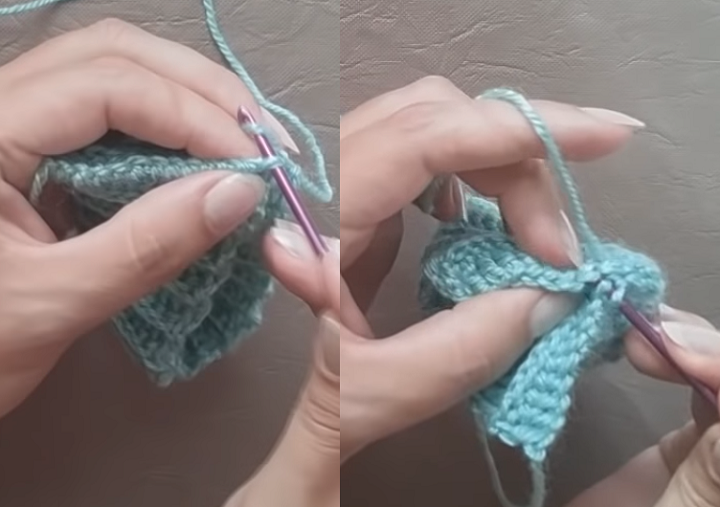
- We do not cut the thread, but immediately begin to distribute the “fan” pattern along the circumference of the elastic band. We will knit one wall of the column, pass the second and so on until the end of the row. The first row is starting with a broach - the SS affairs to be the center of the arch.
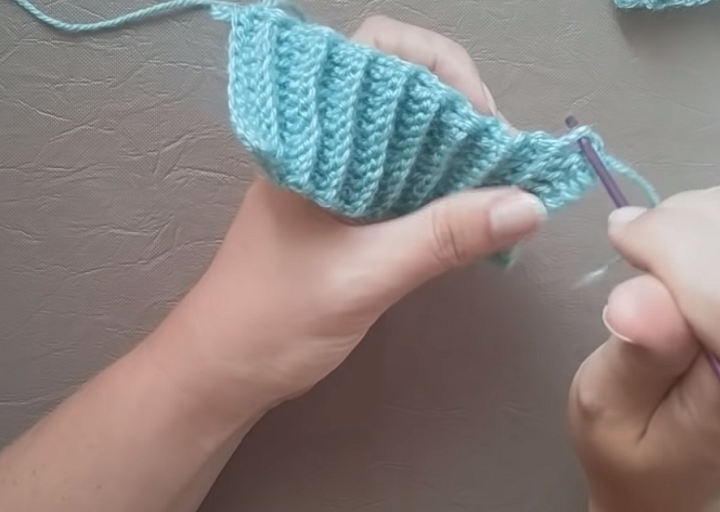
The pattern of the fan pattern to tie the openwork mittens crocheted
Row one:
- We make a "slingshot": 3 VP, 1 SSN, 2 VP, 2 SSN;
- We make a “lush column”: n, p, n, p, n, p, stretch the thread through all these loops and fix another loop;
- * 2 SSN, 2 VP, 2 SSN;
- * "Listen column", hwe are accumulating.
Next, repeat from * to *.
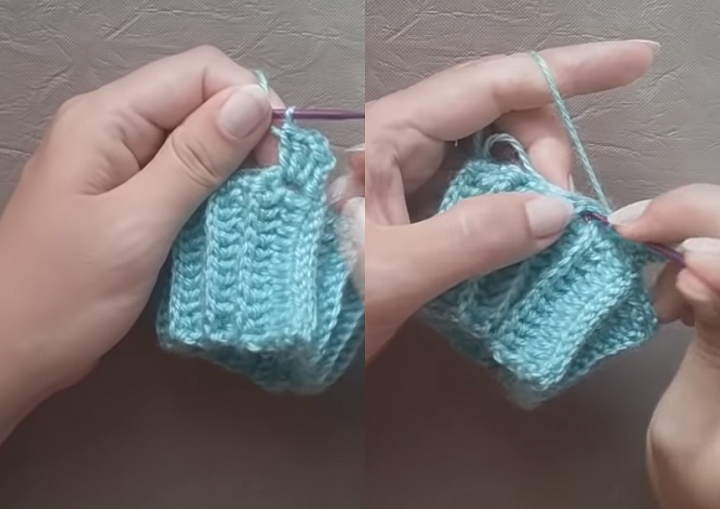
- We finish the row: After a lush column, connect the arches. To do this, we count the 3rd loop on the chain from the VP, connect the SS for both hubs of the loop and do another 2 SS to be in the middle of the arch. Those. In the center between the SSN, where they made 2 VP.
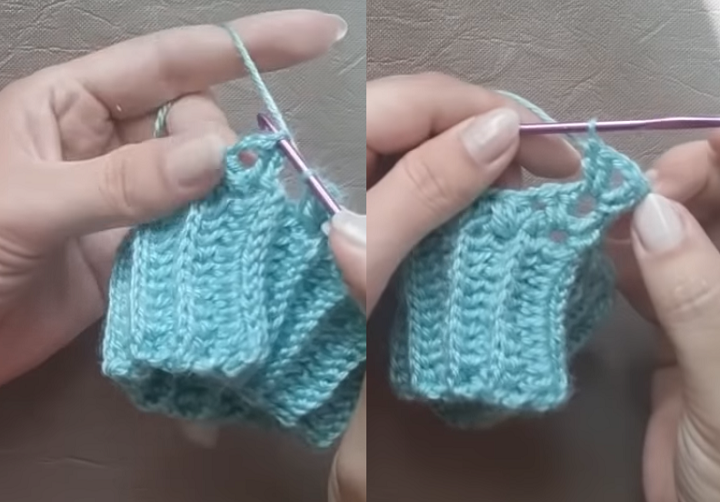
Row 2 We knit along the pattern - “slingshots” above the “slingshots”, lush columns above lush columns:
- 3 VP, 1 SSN, 2 VP and 2 SSN;
- We grab the wall of a lush column behind work and knit n, p, n, p, n, p, stretch the thread and fix it.
Next, we knit according to the scheme, as in the first row - from * to *, we connect the arches.
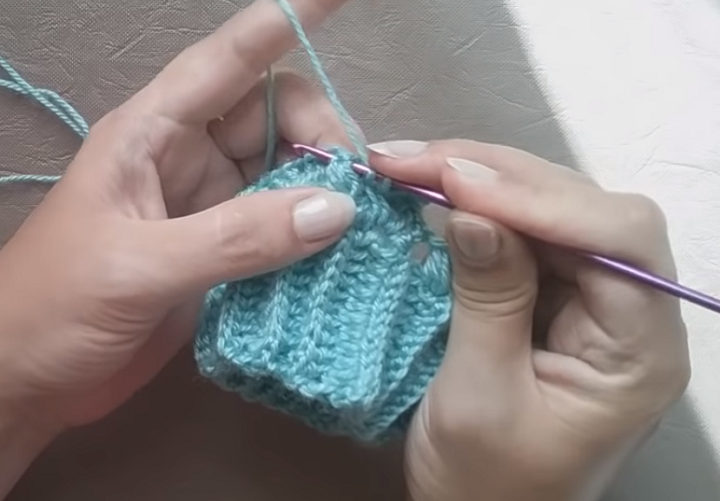
Row 3:
- We repeat the row 2.
Next, we will make expansion and formation for the thumb. To do this, you need to do 3 SSN in each "slingshot", instead of two.
Row 4-8:
- 3 VP, 2 SSN, 2 VP, 3 SSN;
- A lush column behind the wall of the loop of the previous row.
We repeat the 2nd row, but in the "slingshot" we use 3 SSN. We finish a row with a connection with a chain from the VP, but now we need to do 3 SS to be in the center of the arch.
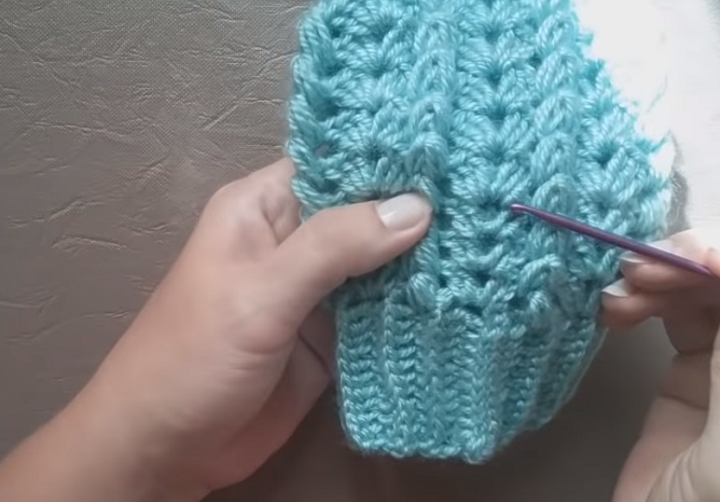
Row 9:
- 3 VP, 2 SSN, 2 VP, 3 SSN;
- We capture not the wall of the previous lush columns, but a loop itself! We pass 2 motives for the thumb and capture another loop above the column. We make a lush column in two loops.
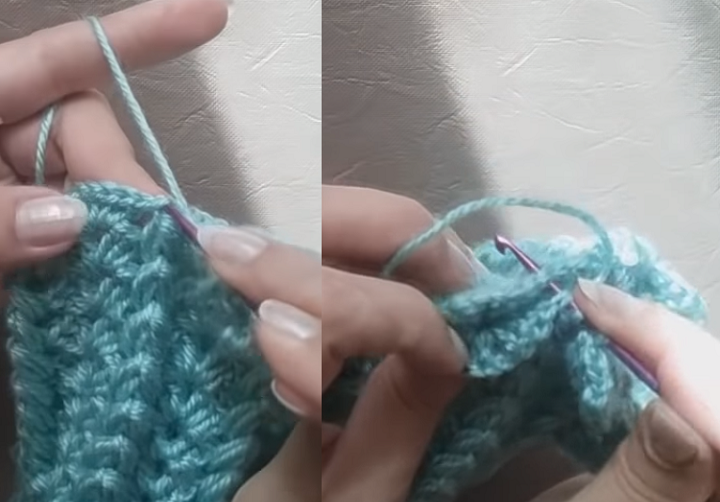
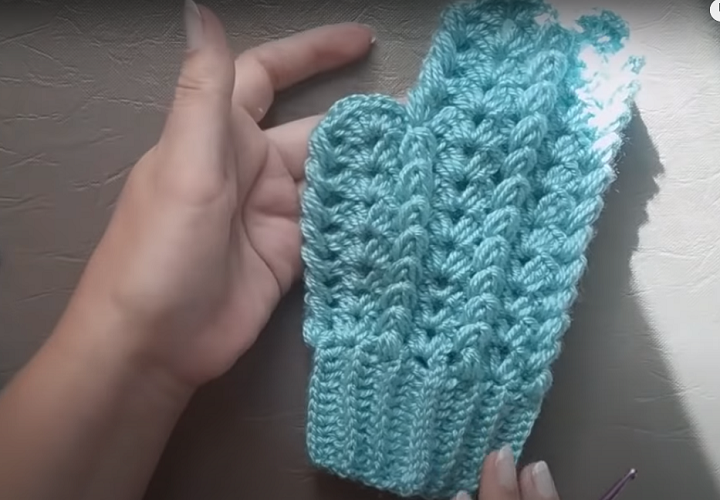
- Next, we knit, as in the previous rows, making a magnificent column embossed. Those. knitting behind the wall of the previous column. We knit 4 more rows (height can be adjusted). We fix the thread from the wrong side.
Video: Beautiful Mitina Crochet Patter "Lessons"
A detailed description of how easy to tie mittens with a crochet with a relief pattern
We need:
- 50 g of any winter or half -visible yarn
- hook number 2.5
- hook number 1.75 for elastic band on the thumb
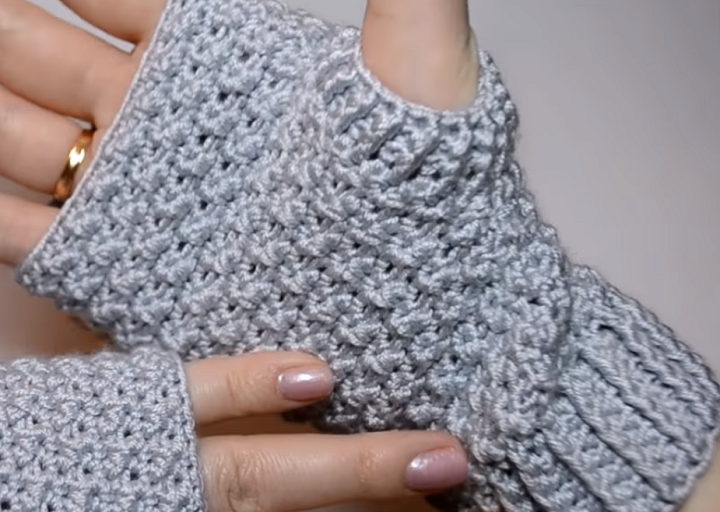
Description of how to crochet mittens even beginner craftsmen:
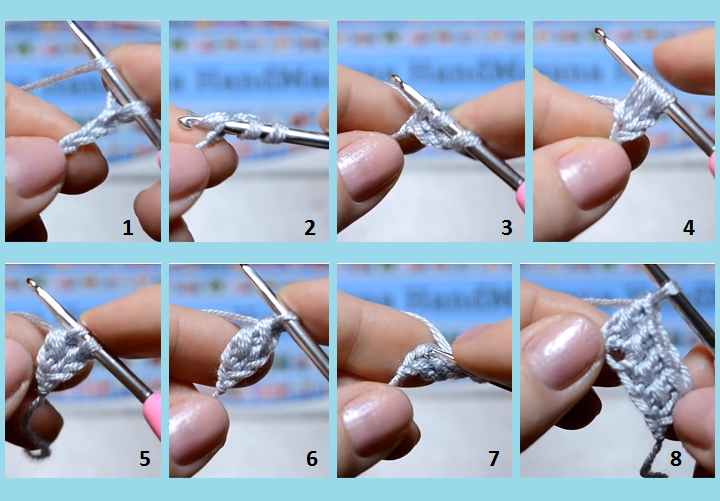
- First row. We start knitting not with a chain from VP, but immediately from the columns:
- We collect 3 VP, make a cloak and enter the hook into the first loop;
- We knit the first loop, then the same air loop;
- Next, we knit the cape and at the end we knit two loops on the hook;
- We make a cloak and knit the lower air loop. We knit VP, cloak and two loops at the end.
- In this way we repeat the chain of columns with one crochet to the desired length of the elastic, which is equal to the girth of the palm.
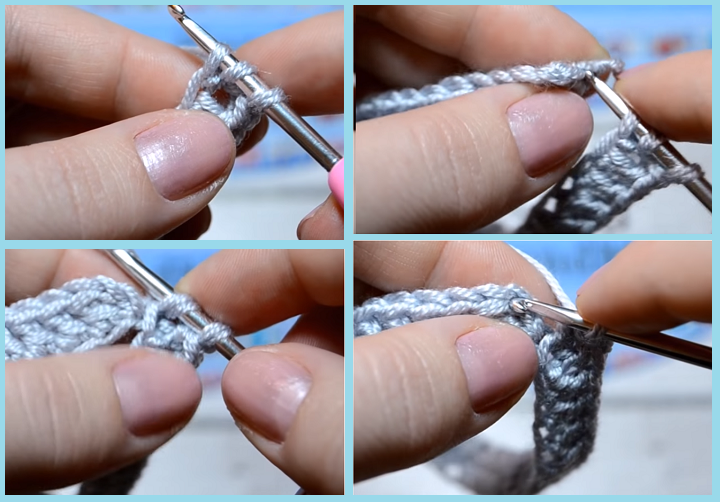
Important: the last closing column should be even! Those. You need to dial 27 columns, and 28 will be connected.
- We connect the first row:
- We make a cloak, enter the hook into the lower VP and immediately into the very first VP;
- We knit two VP together, knit the capacible and then the last two loops on the hook;
- Enter the hook into the third VP (not into the column) and knit the connecting loop.
- 2 wrong row:
- We turn the work on the wrong side, do 1 VP;
- We skip the loop with which we just tied the rise, and in the next we knit SSN for both dots of the loop;
- We return to the missed loop and knit the SBN (as if crossed);
- We pass the loop again and knit SSN, in the missed loop - SBN.
We repeat to alternate the columns, carefully letting the loops. We finish a row of a connecting loop (with a stretch of thread through both loops).
Important: make sure that the loop in which SSN is already knitted in the work.
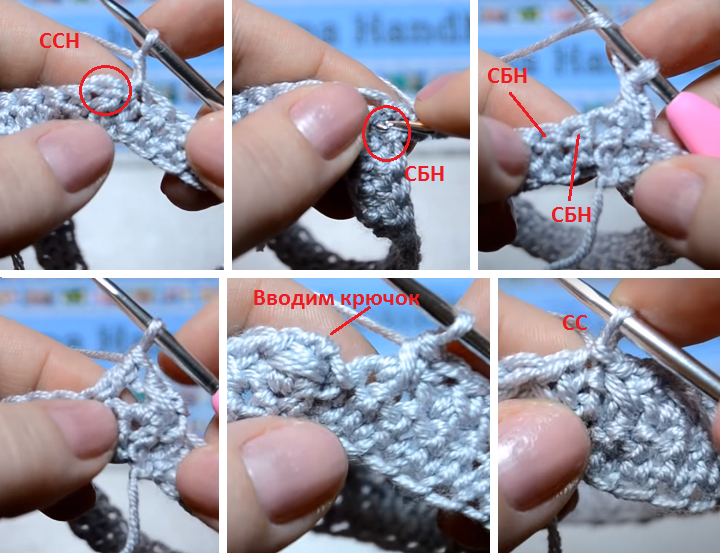
- 3 and all other facial ranks We knit the SBN for both dots of the loop. It is important to ensure that the number of columns with the previous row coincides. We finish a series of SS with the first loop of lifting.
- 4 The wrong row we knit very carefully! All columns should be symmetrical! We find our cross from columns and SSN we knit strictly on one line (see photo). Those. We introduce the hook not in the second, but the third from the beginning of the loop. At the end of the row, we knit a combination of columns, introducing the hook into the very first column that we missed.
Repeat the knitting from 3 to 4 row! Before the base of the thumb, you need to knit in the total 10 rows or 5 wrong ones (you can adjust the height).
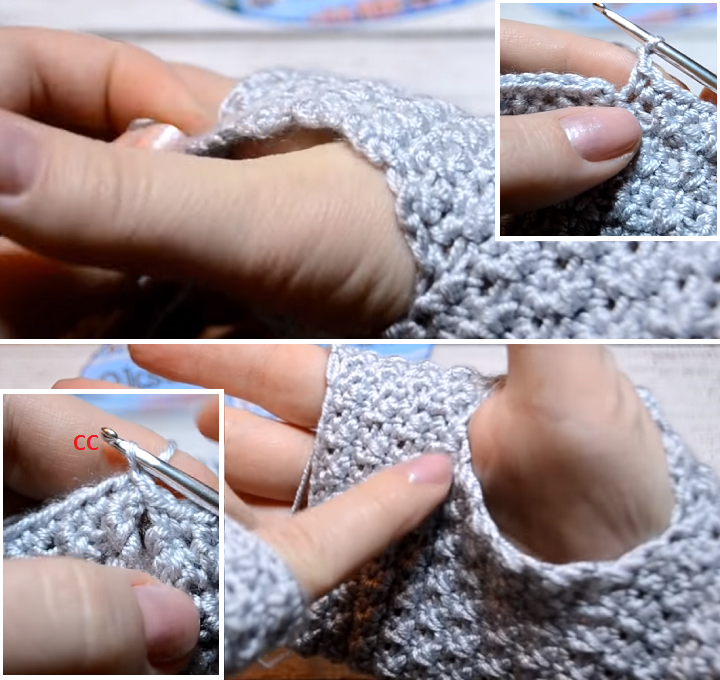
- We make a armhole for the thumb:
- To do this, we continue to knit our pattern, but not in a circle. We turn out to work on the front side for convenience and knit another 10 rows;
- In this case, on the wrong side, we will repeat the series 2 (pass only one loop, which we use in the perspective). And in order not to go astray, consider columns;
- We connect the SS and continue knitting according to the “Row 3-4” scheme. Enough 8 rows or 4 wrong ones. We finish the knitting of SBN, we hide the cut thread on the wrong side.
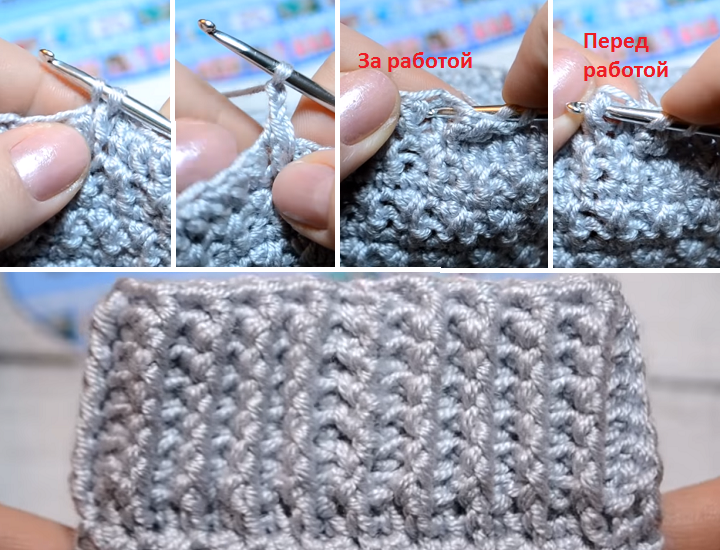
- We make an elastic band from embossed columns. Those. Enter the hook not into the loop, but directly beyond the wall of the loop:
- We stretch the thread between the columns and knit the SBN for two loops (see photo), do 2 VP. This combination will replace the first column;
- Now we introduce the hook from the wrong side (from ourselves) and knit SSN;
- We make the next SSN on the front side and so alternate to the end of the row;
- We finish the row with a connecting column with an air loop. Then we make SBN over the wall of the loop and 2 VP for lifting and continue to knit a relief elastic band of the desired height.
Important: the front columns should be over the front, and the wrong ones - over the wrong ones!
- We tie the thumb:
- We knit 1 row with ordinary SSN. Be careful to make the right number of loops. Drive their account so that there are the same amount on two mittens;
- 2 and 3 rows are made by embossed SSN (persons., Out.).
Video: Crochet Miteni Pattering "Nodes"
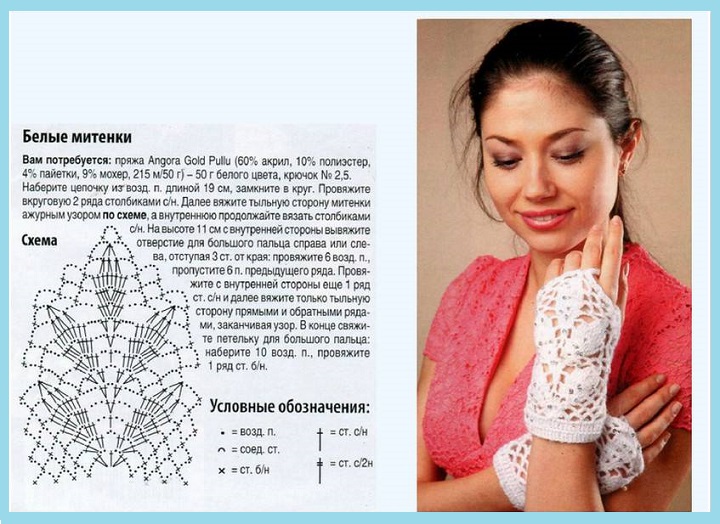
Ideas and schemes, how to crochet mittens
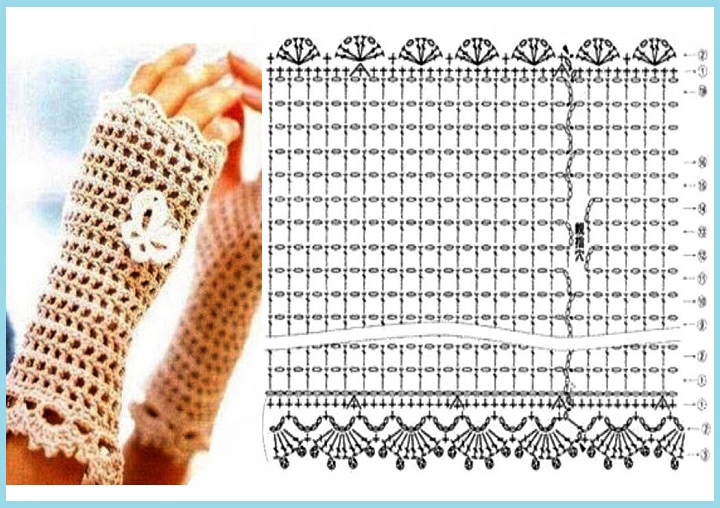
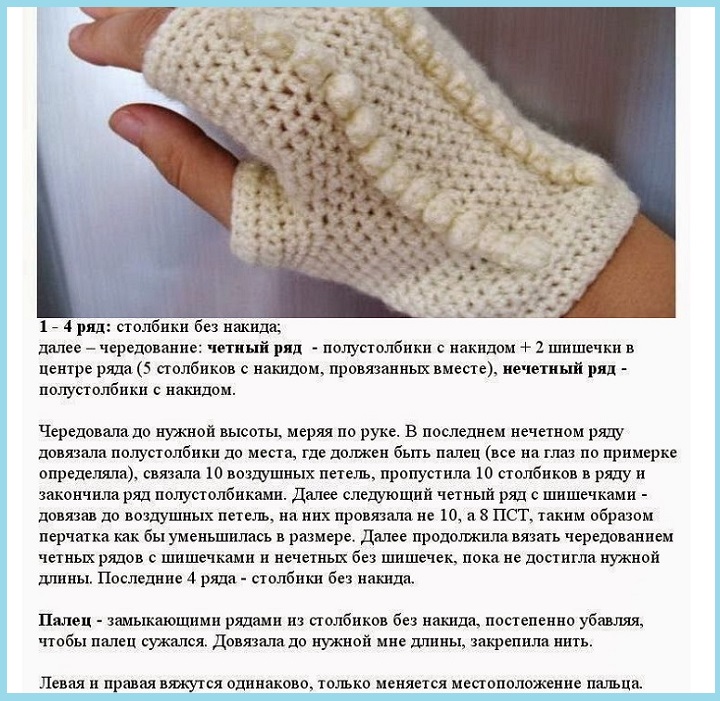
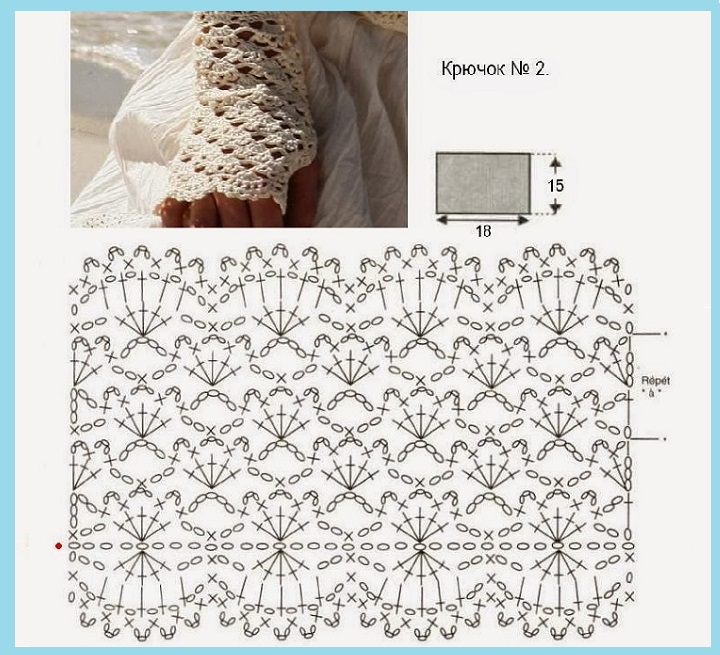
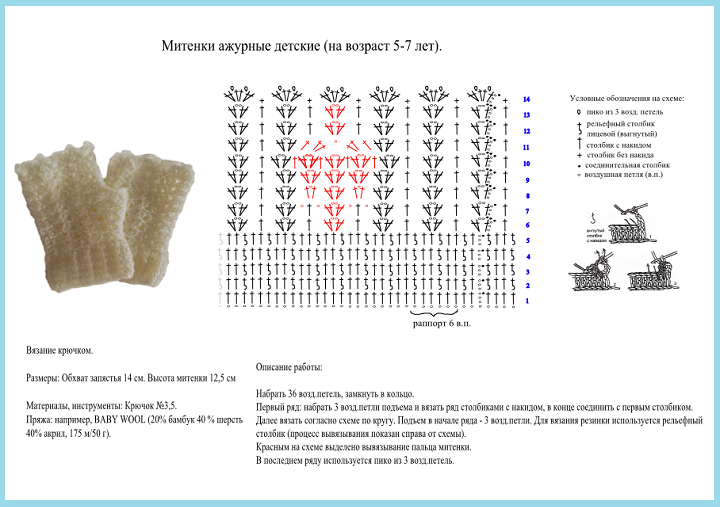
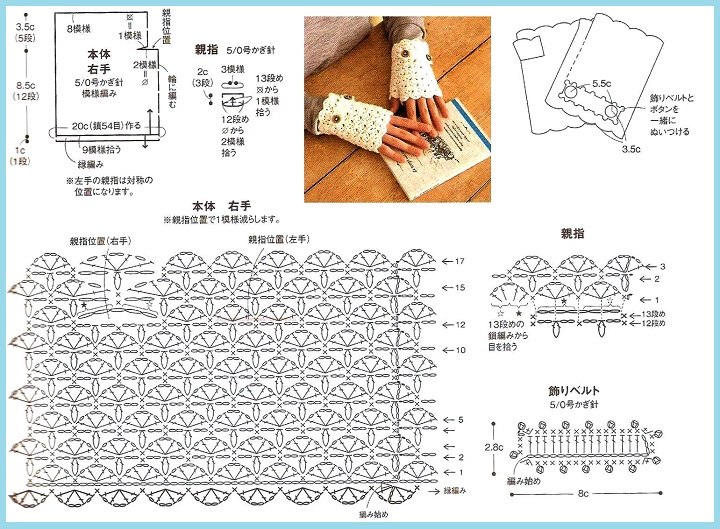
We offer several schemes how to tie the mittens crocheted in different versions:


You will also be interested in the following articles on the topic:
- Men's mittens with knitting needles and hook: schemes and description
- Women's mittens crocheted and knitting needles: master classes
- How to knit a pillow of yarn with knitting needles and crochet?
- Schemes and examples of how to tie an openwork blouse crochet
- How to tie a beautiful children's snood crochet?

