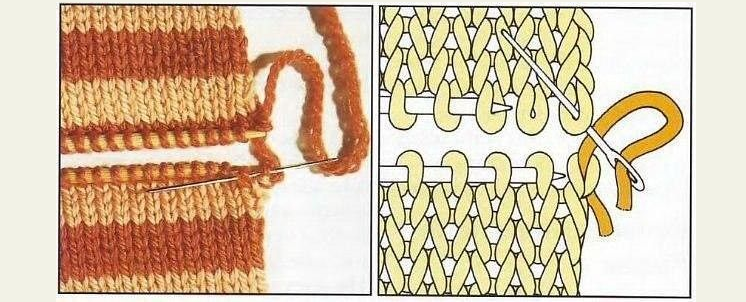
Recommendations that will help sew the edges of the knitted product as perfect as possible.
Contents
- Sewing knitted products with a needle imperceptible seam: scheme, description
- Video: The easiest kettle
- How to make an inconspicuous vertical seam with knitting needles: diagram, description
- Video: Invisible vertical seam
- How to make an invisible shit: scheme, description
- Video: Connection of knitted parts by crochet 3 ways
- Invisible knitwear seam: Ways
- How best to sew a knitted hat with an invisible seam: instructions, tips
- How to sew a knitted scarf-snood invisible seam knitting needles: instructions, tips
- How to combine the snood with an invisible seam hook: instructions, tips
- Invisible seam on voluminous English elastic with knitting gum: scheme, description
- How to sew a fabric of a pantry with an invisible seam: scheme, description
- Sew a knitted sleeve with an invisible seam: instructions, tips
- Video: how to crochet knitted products? The perfect machine seam!
After the end of the creation of woolen things, it often happens that you need to sew related details in one product. It is important to do this imperceptibly so that the front side of the future wardrobe item is beautiful and neat. How to do this correctly, and what methods exist, read below.
Sewing knitted products with a needle imperceptible seam: scheme, description
Needlewomen often use a needle to make knitted parts to make the seam invisible. To combine different parts of finished products, for example, pockets, beek or strips, a ketack seam with a needle is used. It is very easy to fulfill. Here is a scheme with a description:
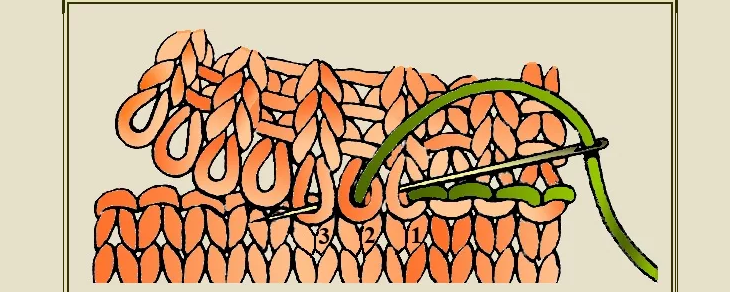
- Insert the needle from the inside into the second Pet.
- Then from above in 1st and then stretch down from the bottom through 3rd Pet.
- After that, enter the needle from top to bottom again into the second Pet. And stretch through 4th Below up.
- So do it until the end of the row, then fix the thread.
Thanks to the use of such a seam, the junction is neat and almost invisible.
Video: The easiest kettle
How to make an inconspicuous vertical seam with knitting needles: diagram, description
All things that are knitted with a pattern are made by separate details. Related parts must be connected to the finished product. You also need to close the loops so that it has a neat look. To sew parts along the edges of the canvas, most often resort to a vertical seam. It is advisable to do this with the help of the thread itself with which you knitted the product, or very similar in color and structure. The most important thing is that it is strong.
A mattress seam is a type of vertical inconspicuous seam, with which the details of one product are connected. Here is a scheme with a photo and a description of the manufacture of a seam.
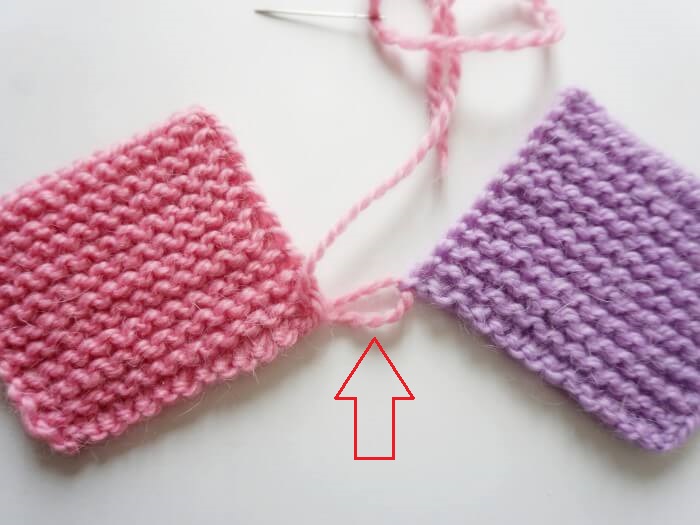
- In order for the seam to be not visible, you need to sew on the front side of the product, starting from the lower edge.
- On the right detail with a needle, grab the thread between the crum and right loop.
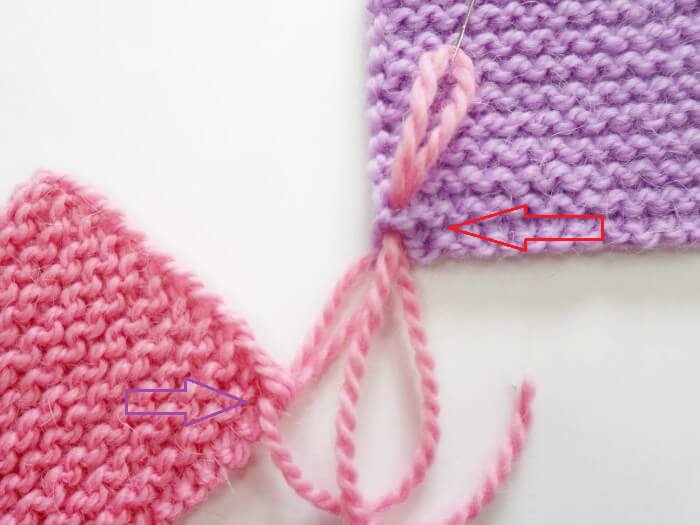
- On the left - between the bromic and the last loop of the knitted edge.
- Then, alternately, continue these manipulations, capturing the loops, then from one part of the broach, then with the other.
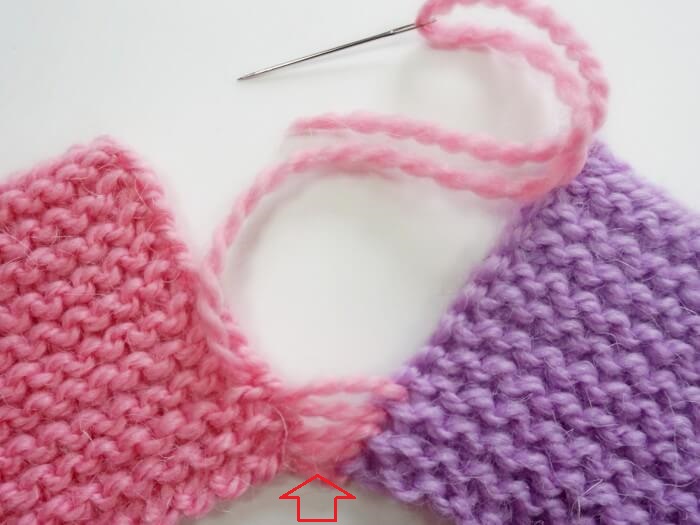
- Try not to miss the ranks, the exception is only the details that are connected by a through pattern, then you can in every second row.
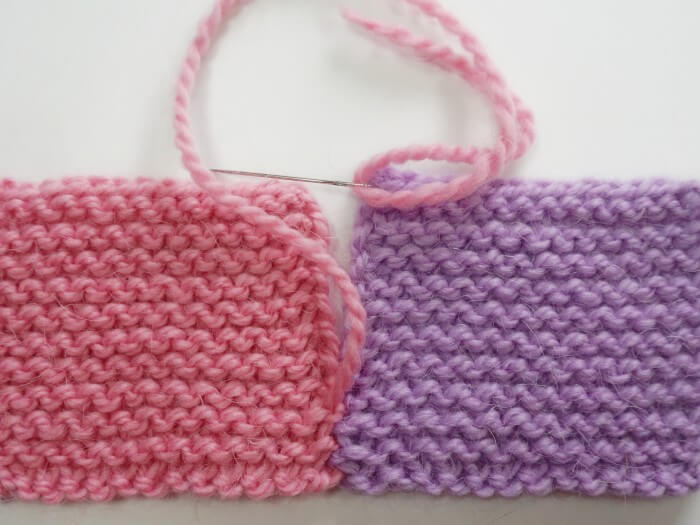
- Do not forget every 2-3 centimeters Tighten the thread so that the stitches are not visible.
Advice: Do not tighten them very tightly, since the seam should remain elastic.
If you follow this instructions, then at the end you will get the perfect seam, which will be almost invisible.
Video: Invisible vertical seam
How to make an invisible shit: scheme, description
The method of combining knitted fragments by crochet is simple and original. The front sides of the details are combined with each other and use various stitches for connecting along the edge of work. Here are the schemes and descriptions of how you can make an invisible seam hook:
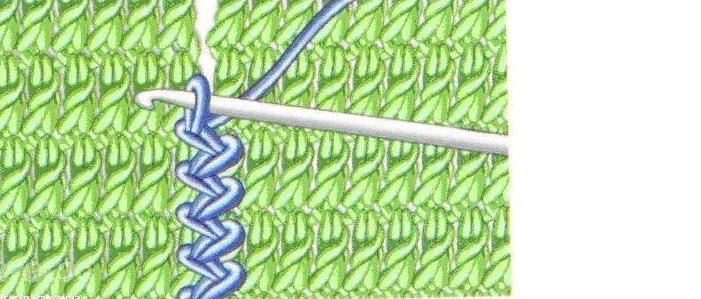
Nakid column. The edges of the details are stuck as follows:
- First, a column is knitted on the first part, then on the second.
- So, moving alternately from one hem to another, all the edge loops are fastened with columns.

Knitted seam:
- The most popular way to combine various parts of knitting.
- This seam is good because, if necessary, it is easy to dissolve.
- Before performing knitting, the outer sides of the product are combined.
- The work is carried out on the wrong side.
- The thread is dragged by crochet through adjacent brown loops belonging to both gripped details, and leave it on the hook.
- Next, the hook is inserted into two neighboring hem and dragged the thread through them and the loop located on the hook.
- A pigtail is formed along the edge of the work.
- When performing the work, it is necessary to ensure that the seam does not turn out to be too long.
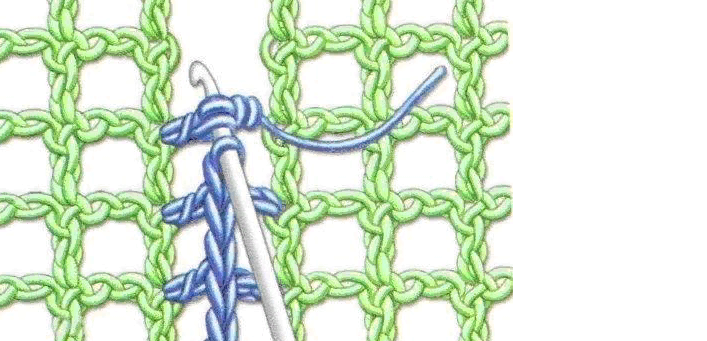
Continuation of the picture:
- A special seam will be required to grind openwork details.
- They must be sewn without violating the overall picture.
- For example, the fillet net is connected as follows: the parts are placed in the face and connect them to a common row.
- For the connecting row, knitting columns with crochet, alternating them with two air hinges.
The connection using the hook is more interesting, original and completely invisible from the front side. Try a few techniques for creating a seam to choose the right one for your product.
Video: Connection of knitted parts by crochet 3 ways
Invisible knitwear seam: Ways

There are many ways of invisible knitwear. One of them - an inconspicuous stitch for combining the edges associated in one direction (higher in the picture). It is performed like this:
- Place the edges of the knit with closed loops face to each other.
- Start with a series of loops over closed loops.
- In the middle of the first loop (half the initial loop is taken). Spend a needle and thread on one side of the stitch, then under the first loop on the next part.
- Put a needle from the center of the same loop from which it left, then in the center of the next loop.
- Spend a thread under a whole loop. The thread must be well pulled so that the seams are not visible.
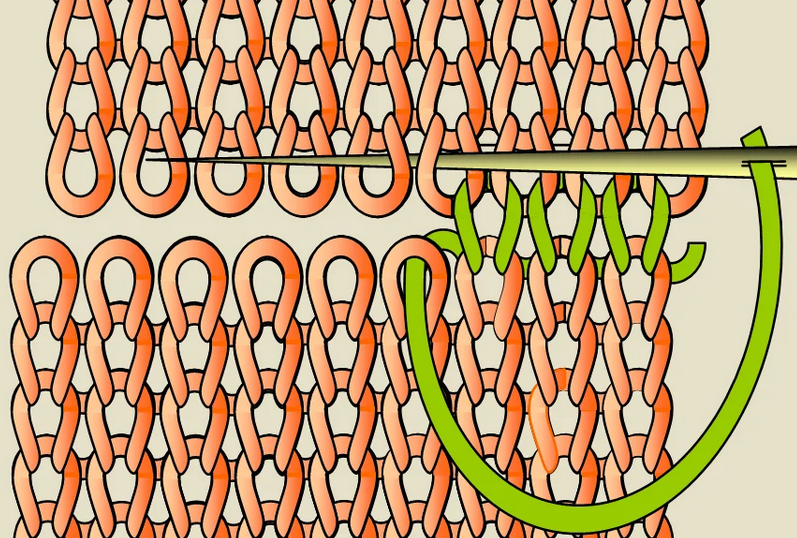
Knitted seam "Loop in a loop" to combine stocking. Swate open loops from two parts, the thread of which knitted the product. The stitch made in this way is practically not visible. This is done like this:
- Attach the thread from the inside of the external knit and draw a needle from the wrong side into the first loop of external knitting.
- Then, on the front side, to the initial mating loop and then from the inside of the subsequent loop of the lower knit.
- Insert the needle into the first upper loop, but on the front side, then into the second upper loop from the inside.
- Next, in the second lower loop on the right side, and then to the third lower loop from the inside to the very end.
Knitted stitches should be the same size as a mating loop, otherwise the stitch will not turn out invisible.
How best to sew a knitted hat with an invisible seam: instructions, tips
The assembly of the product begins with competent preparation of the knitted fabric. To prevent the details of the caps from deformed, you should choose the best option for their fastening. Tips:
- For a connecting seam, a thread remaining from knitting is used.
- Pre -moisturizes are well moistened and ironed.
- They grind the details on a living thread and perform fitting. Having made sure that the product was successful, the details are sewn, trying to make the sewing line inconspicuous.
The following types of seams best mask the junction of the parts and help to beautifully sew a knitted hat with an invisible seam - instructions:
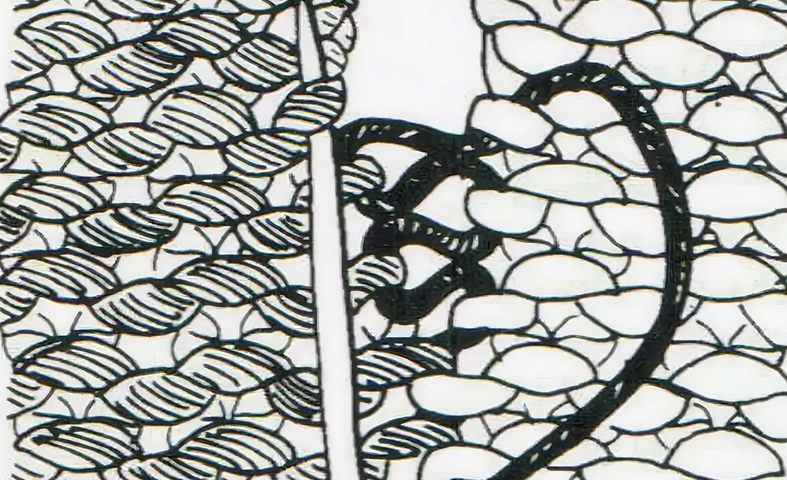
For closed loops:
- With this connection, the stitch line is practically not visible.
- The blanks that should be sewn are placed over the other on a solid surface.
- The needle with a thread is extended under a loop adjacent to the upper part closed by the crum loop, and then the needle is passed into a similar loop of the lower part.
- By connecting several loops in this way, the seam is pulled together.
For the front surface:
- The details of the caps are located on the table parallel to each other.
- The place of fastening is made by the broach between the crum loop and the neighboring front with it.
- They begin by the fact that the thread is passed through the broach of one part and the needle is removed through the stretching broach that is on the opposite side.
- Consistently advanced along the edge, pave the seam.
- From time to time, the thread is pulled together to make the seam more.
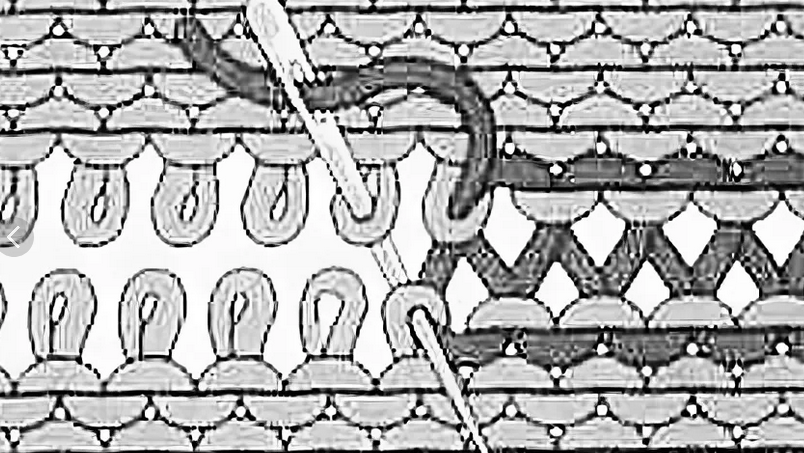
For the wrong surface:
- The wrong surface is sewn according to the same scheme as the front.
- The thread picks up the broach between the extreme loops of one side of the knitting, and then passes in the broach located opposite.
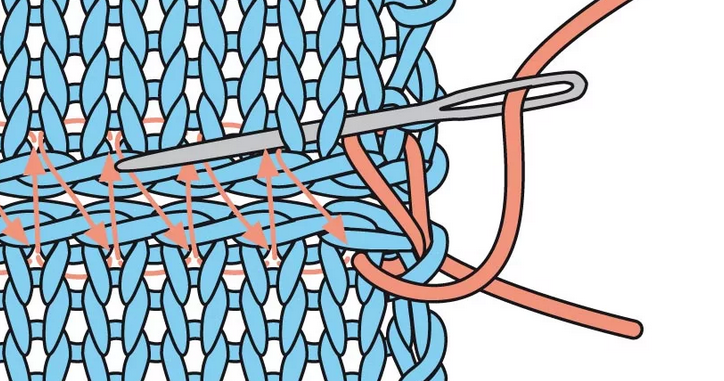
Show line:
- It is easy to perform this seam, and from the outside it is almost not visible.
- The seam is laid at a short distance from the edge.
- The work begins with the removal of the thread between the neighboring loops from the wrong side of the product.
- Next, they perform one reverse stitch and again move the needle forward, trying to make punctures at equal intervals.
It is necessary to occasionally check the quality of the seam on the front side of the work.
How to sew a knitted scarf-snood invisible seam knitting needles: instructions, tips
After the main part of the scarf is connected, and the length and width are determined, you need to carefully finish the product. To do this, there are two ways that are suitable in principle not only for scarves and leave beautiful Kant below.
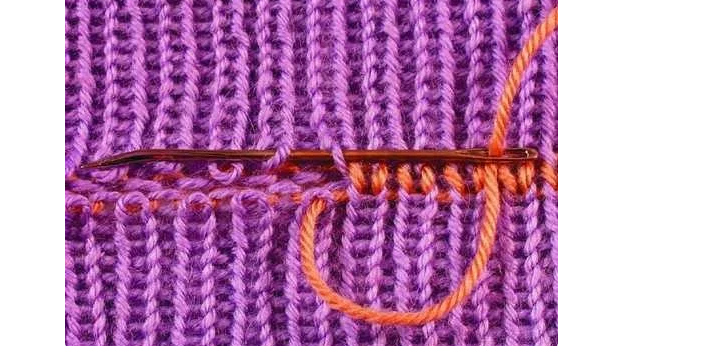
Here are the instructions on how to sew a knitted product with an invisible seam with knitting needles:
- First you need to tie the first two loops with the front side in one, after which one loop will remain on the right, and on the left is a set.
- Transfer the loop to the right to the left row.
- Repeat this action until one loop is left, and then tighten the knot.
Advice: At the end of the knit, tighten the loops the same so that the product turns out to be tidy.
Another way to connect the edges of the scarf into the snood:
- The tail of the thread, which remained during the knitting of the product, prone through the other side, closer to the edge of the row.
- Separating the extreme loops with the help of knitting needles, which the scarf was knitting, weave its ends with yarn.
- Tie a loop and tighten the edges of the product with each other.
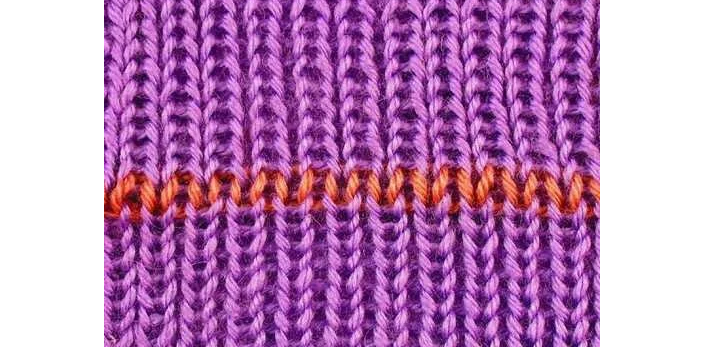
Advice: Try to moderately intertwine the sides tightly, because if you pull it, then the seam will turn out like an accordion. If you follow the instructions for sure, you get a neat and inconspicuous seam.
How to combine the snood with an invisible seam hook: instructions, tips
To combine the snood with an invisible seam, you can use several ways. Below you will find the description instructions.
Combining the loops in half -stolchics without crochet:
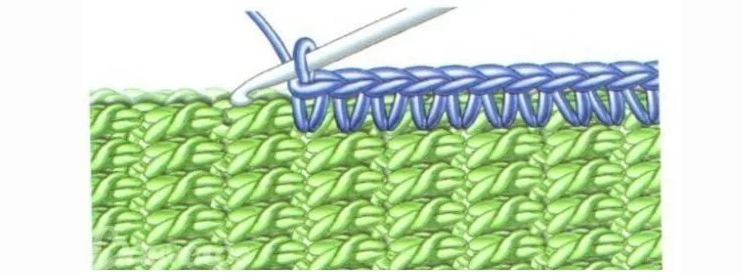
- We attach both parts of the knit to the front sides.
- Crochet the loop in two parts, grab the working thread and draw through two loops, while holding a minimum tension.
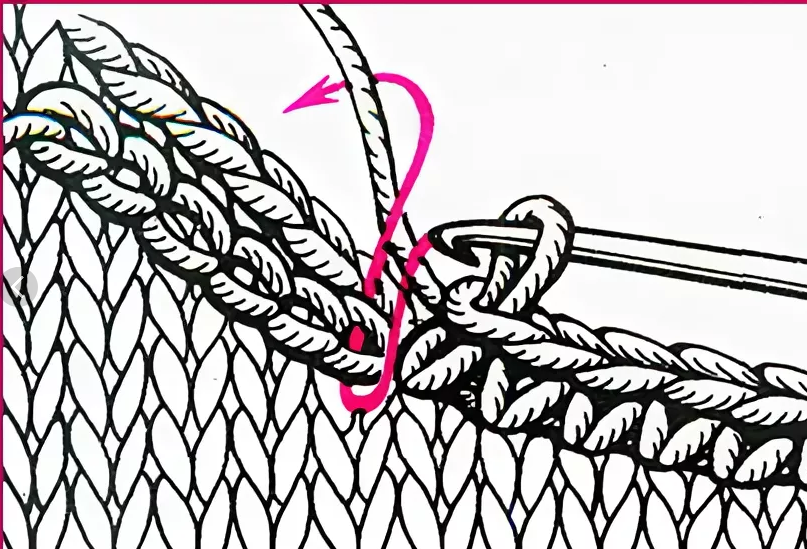
Combining the loops with columns b. N.:
- We apply both parts of the knit with the front or wrong sides so that the seam will be guided.
- The knitting is the same as described in the first case, only instead of semi -columns we take columns b. n.
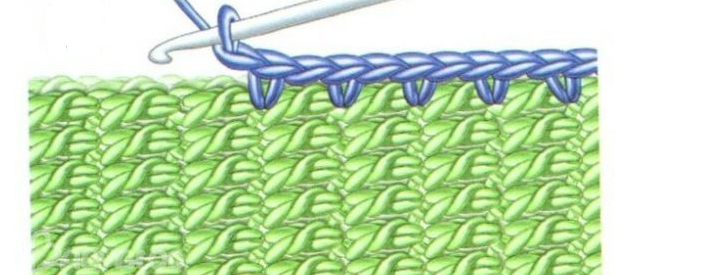
Combining the loops with columns b. n. and air loops:
- One by one b. n. We knit columns and air loops.
- This seam is used when the loops are small in size, and the knitting must have an elastic appearance.
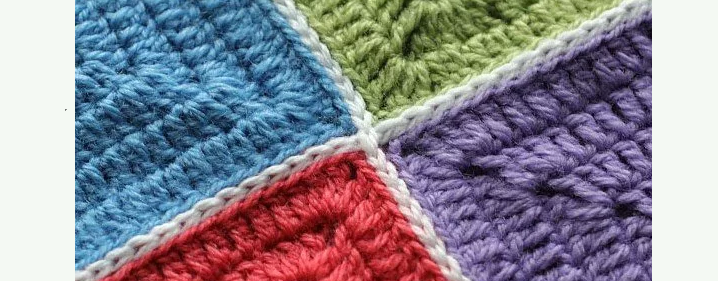
Flat unification of the loops in half -columns b. N.:
- We apply both edges of the knitting one after another the wrong elbow up. Details should lie next to each other on the table in front of you.
- Now knit through the existing loops in half -stolks b. n. Details also remain motionless on a flat surface, and you only work crocheted.
You can use other methods described above in the text. A bound seam for any of the options will turn out to be beautiful and inconspicuous.
Invisible seam on voluminous English elastic with knitting gum: scheme, description
There are several types of rubber bands, but the most popular ones that craftswomen knit - this 1×1 and 2×2. Both of these options differ in their own way. The methods of stitching these elastic bands are also different. Here are a few schemes and descriptions for creating an inconspicuous seam for connecting parts connected by a voluminous English elastic band:
Typically, collars of knitted products consist of two identical halves and they must be sewn. There is a knitting was made in the style of elastic bands 1×1, then sewing them will be quite simple. How to sew English gum quietly 1×1 - Instructions:

- It is necessary to finish both parts of the product with an auxiliary thread. It will turn out about three rows of loops on the front side.
- After that, stupefy the edge well and sail the auxiliary thread.
- After all these actions, the elastic band must be connected on the front side with a “loop into a loop” with a seam.
- The main thing is to skip the wrong loops.
- Having finished the process, turn the thing over in the inside and sew the loops with exactly the same seam.
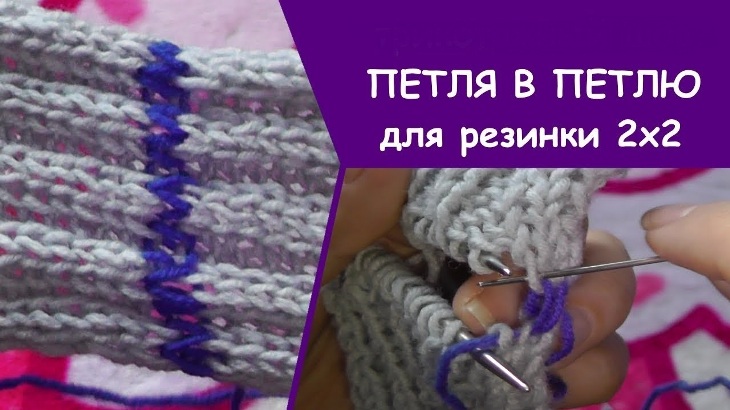
How to sew an elastic band 2 × 2 - Instructions:
- This elastic band must also be sewn on the front side, the same seam “loop into a loop”.
- You need to start with the front loops, gradually reaching the wrong side.
- First, sew the first group of loops, and after that go to the inside.
- Having sewed the inner loops, you need to switch to the front.
- But, if the elastic band was connected in advance (usually the collars are knitted), then the rows of loops are shifted.
If the product is connected in one direction, the rows are in their place.
How to sew a fabric of a pantry with an invisible seam: scheme, description
Everyone wants the product created by his own hand to look perfect. But ugly joints can ruin the entire appearance. It is good that making an invisible seam is very easy, and any of the ways is available to every, even a beginner needlewoman. Here is a scheme and a description of how to sew a fabric of a patch with an invisible seam:
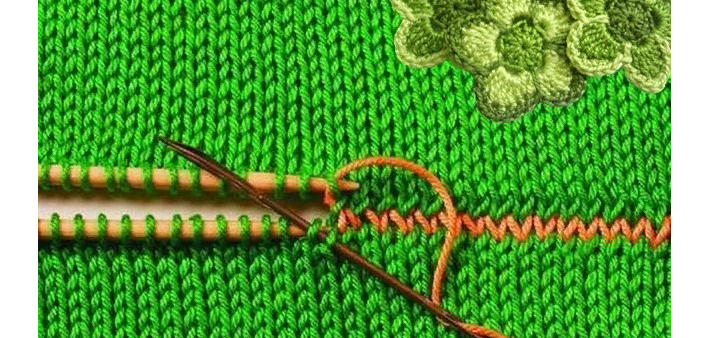
- First step: Enter the needle from the inside of the product, into the first loop from the bottom. After that, you need to walk it from the front side into the first loop of the upper part. The main thing is not to forget to pull the thread.
- Second step: You need to enter the needle again into the first loop from below, but already from the front side, pulling the thread.
- The third step: Enter the needle from the wrong side into the next loop on the bottom. After that, tighten the thread.
- Fourth step: Enter the needle from the wrong side again into the first loop from above, not forgetting to tighten the thread.
- Fifth step: Grab the thread on the front side and insert it into the next loop from the upper part, be sure to pull the thread.
After all this, the steps should be repeated: the second, third, fourth and fifth. This is how easily you can make an almost imperceptible seam for the created fabric of a gastard viscous.
Sew a knitted sleeve with an invisible seam: instructions, tips
Sewing a knitted sleeve with the basis refers to the main part of the creation of a whole thing. For an invisible seam, you can use several options. One of the most popular is crocheting:
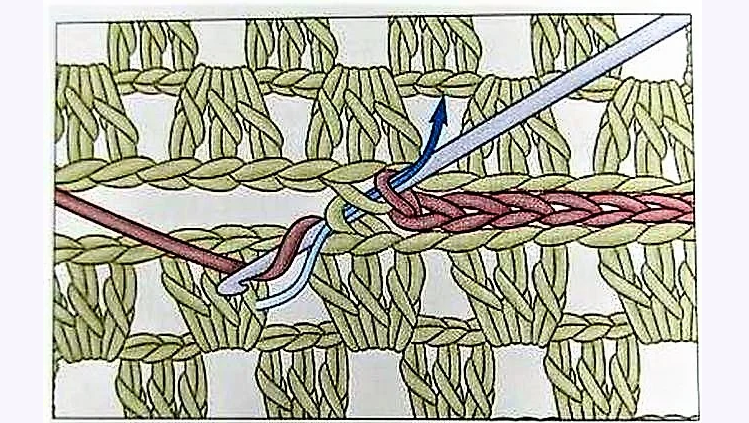
- This method is the easiest to perform.
- But at the same time, its originality is that the edges of the product come out even.
- You just need to retreat from the edge of the sleeve part of the sleeve from the set edge.
- In the sleeve from the wrong side, according to the verticals of its two sides, make loops.
- Then enter the hook between the hinges of the sides of the sleeve and stretch in one thread.
Remember: To connect the sides of the product, you need to use the same yarn, which was used when knitting the sleeve.

