Do not believe that all sorts of puzzles are just an empty pastime. They develop logical thinking, perseverance, will to victory, and simply soothe the shattered nerves.
At any age, you can join the comprehension of the secrets of the world of puzzles. Start - and you yourself will understand how interesting and exciting.
How to assemble a cube of a chip for beginners?
- Stop your choice on this page, and with our help you will learn to easily collect your cube - you only need to think out of everything thoughtfully. In this simple scheme, novice collectors will receive the most detailed instructions on how to act, so that all its faces are quickly formed in color.
- Practice, and soon you yourself will see how easy it is, because the most important thing in this matter is to understand the algorithm of actions to assemble this puzzle. Your friends and acquaintances will be surprised when they witnesses your skill!
- So, it's time to study. Let's quickly start comprehending the secrets of the cube assembly.
What is the 3x3 Rubik cube made of?
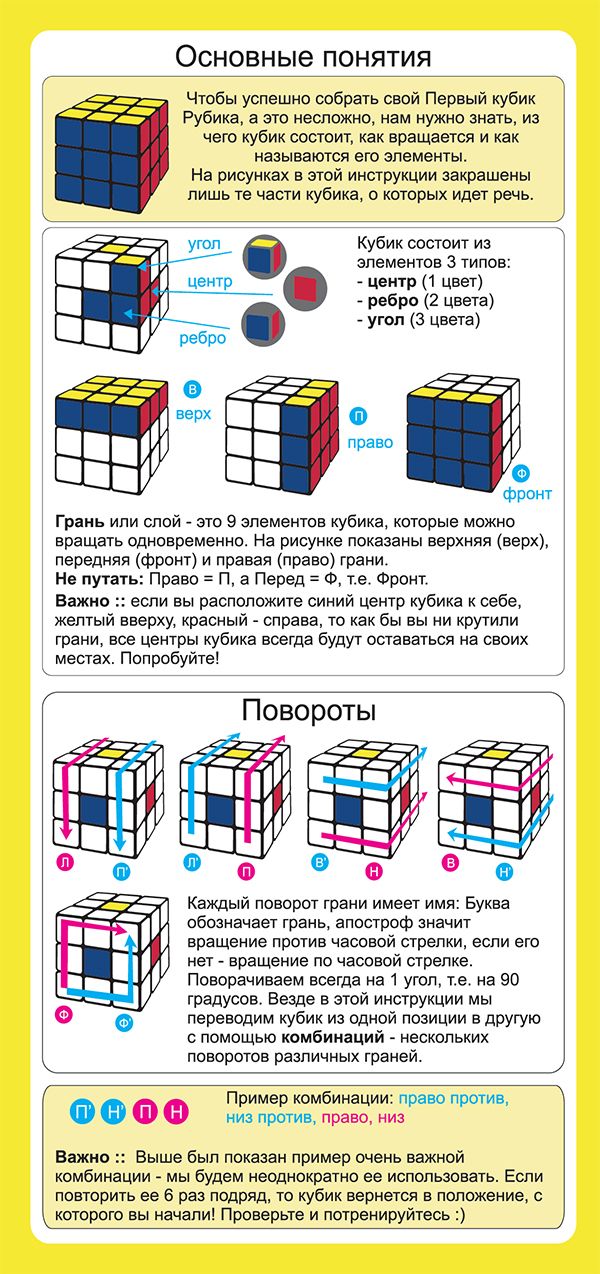
- This puzzle has multi -colored faces in the amount of 6 pcs. Which, in turn, are divided into 26 segments.
- All of them are fastened to each other and have freedom of movement in different directions limited by the parameters of the cube.
The cube has elements of three types:
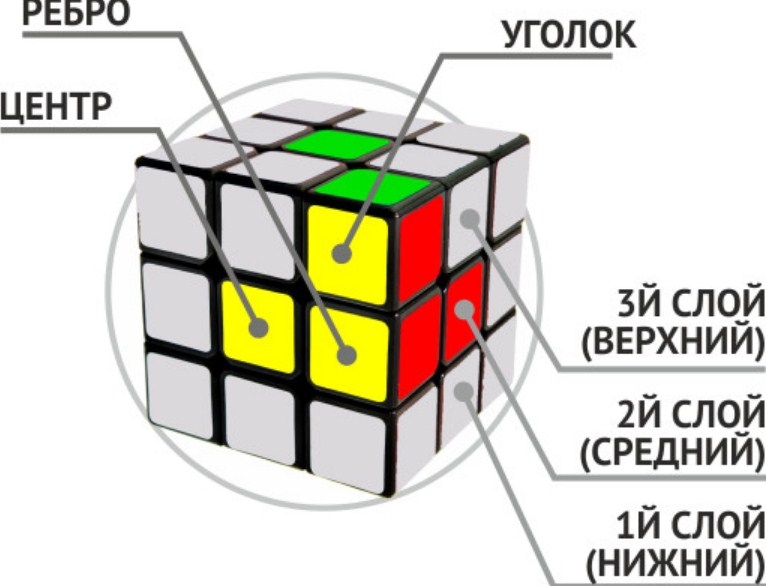
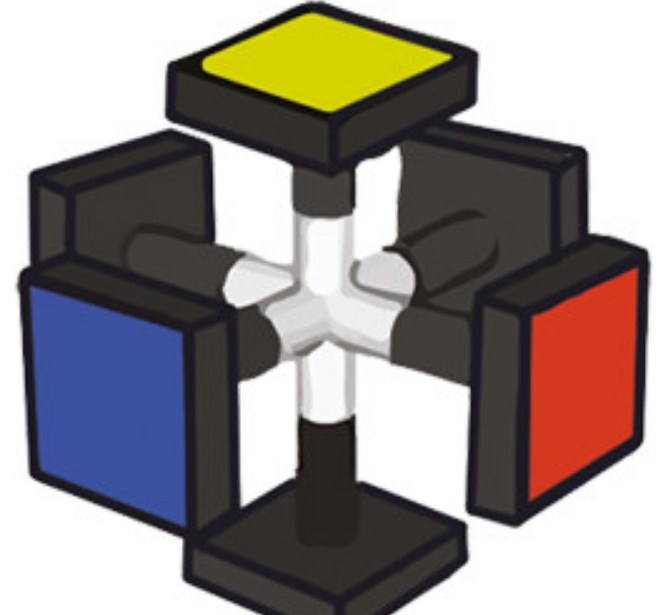
What is this cross of the Rubik cube? This is the internal mechanism to which the cube is attached.
How are the rotation of the Rubik cube?
- It is necessary to understand how its faces rotate.
- When you begin to rotate the Rubik cube, you do not need to turn it in your hands - only the side you need should rotate, but not the cube itself.
- Thanks to the cross, its central units do not shift, and each of them is constantly in its place.

About the formulas of the Rubik cube
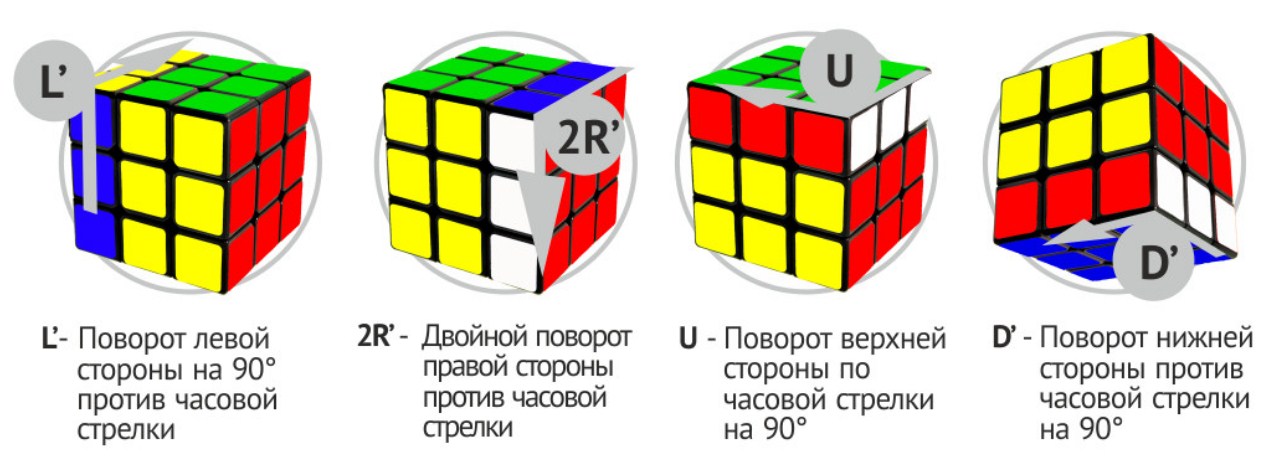
- These are letter designations that imply ninety -sorted rotation by clockwise any of his faces.
- If the apostrophe is affixed near the letter, this means that you need to turn this side counterclockwise.
- The digital designation located near the letter indicates the number of rotations.
- We advise you to practice, making rotational movements and counterclockwise. The fingers need to remember these movements, and the brain - in which direction you need to turn this or that element if the formula is indicated by a certain letter.
- Thanks to training, you will quickly understand the algorithms for compiling a cube.
The start of the assembly
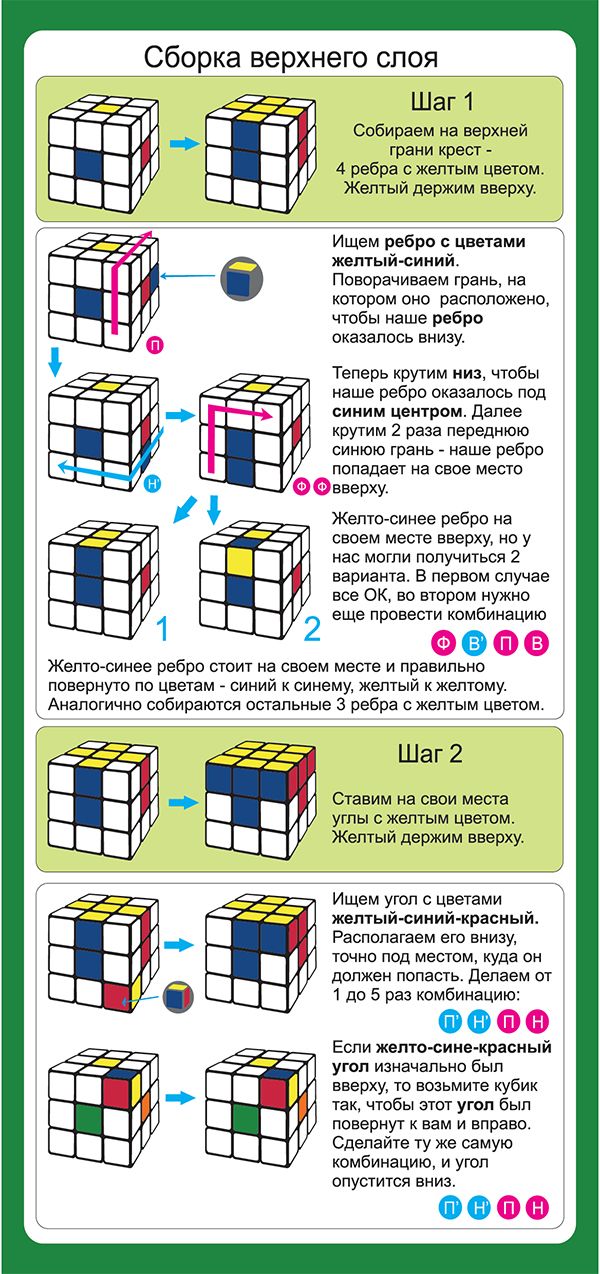
- Start: We collect the first (lower) layer of the cube. First of all, the cross is going. How to do this: take a cube in your hands, study how the centers are located in it. It is necessary to remember the color position above and below the cube. For example, at the underside, it turned out to be blue, and in the upper - green. In this position, it should be held in the hands until the first phase of the assembly.
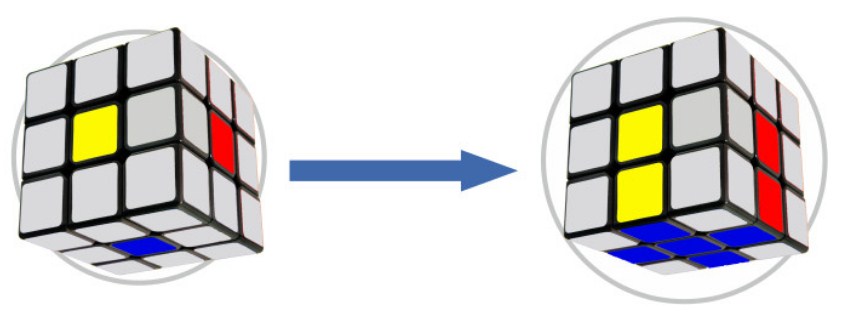
- Gathering a cross, you must find 4 ribs with blue in turn in turn in a cube. Moving them to the bottom with the blue center, combine in such a way that other colors of the faces come together in color with side centers.
- Pay attention to the picture on top: the blue ribs occupied the lower position, and the elements painted with yellow and red color coincide in color with the centers of the sides.
- To assemble the cross, you will not need knowledge of special algorithms, but as examples we will provide you with all kinds of options that you may have during this operation. This will help you understand the simplest algorithms.

- Recall you once again that when you start collecting a cube, you do not need to turn it until the combination is performed.
- Different colors of the faces should be in the original position, for example: the yellow line is opposite you, blue - from below, red on the right side.
The scheme of collecting angles in stages
- We have already collected the cross, so the turn has come to collect corners - this is the final phase of folding the first edge. To do this, you need to take the Rubik cube so that the cross is below.
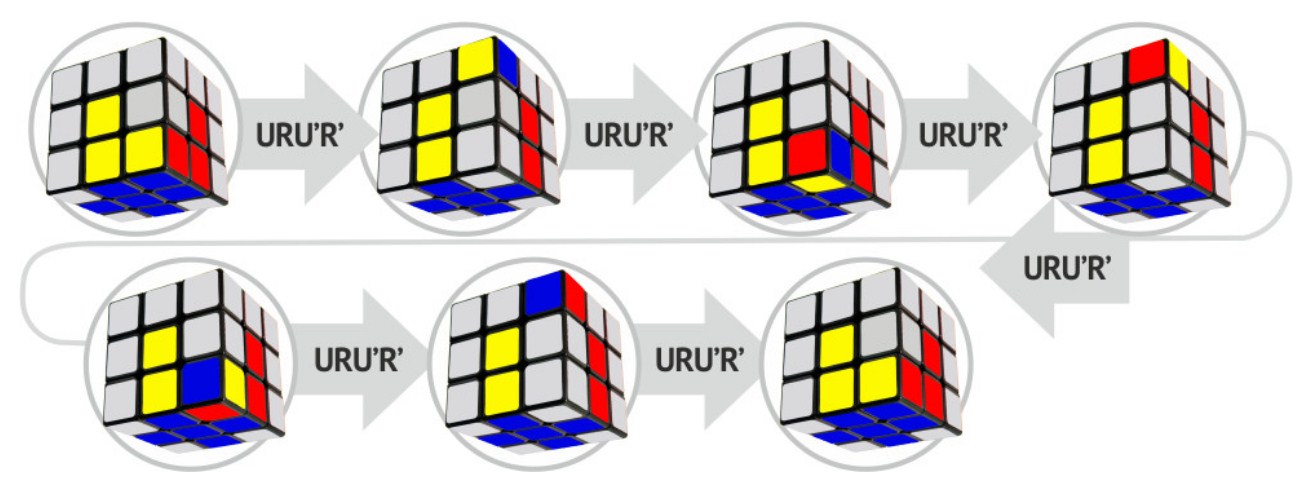
- Focus your attention on the colors of 3 centers-between them there will be a corner with blue, yellow and red colors (in this version). This will be only in one copy. We install it in the upper layer on top of the place where it needs to be omitted, and do the algorithm: Uru’r ’.
- With proper manipulations, the corner will stand in the right place, while coinciding with the color scheme of the centers. Further in line is the next corner, while all previous manipulations are repeated. If the first time you will not succeed, you must use the same algorithm until the corner takes the proper place.
- You will be interested in knowing that after the cube is already in the assembled state, and this algorithm is URA’R ’to use 6 times, then it will be mixed up at first, and then it will turn out again as it should.

- For a complete understanding, you should see how the corner reacts to each algorithm.
- There can be several variations - as shown in our picture.
How to assemble the middle layer?
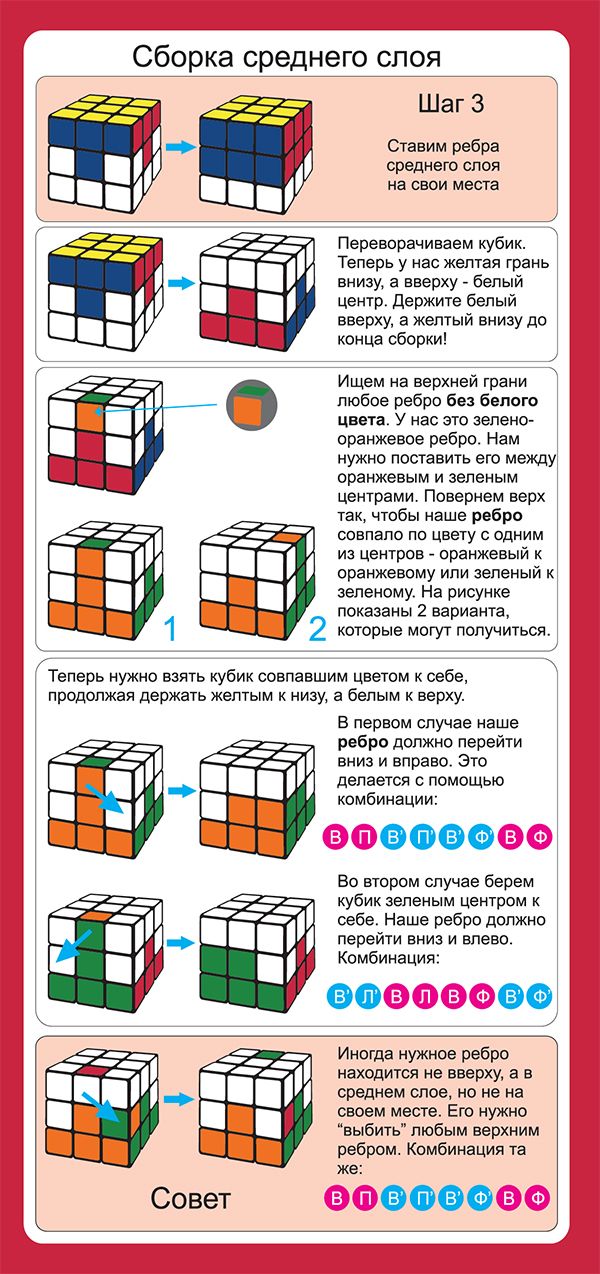
- This layer develops during the second stage. At the same time, it should be kept so that the blue-green edges are below and at the top, respectively.
- To fold the second layer, you need to use only one algorithm. Before performing it, the cube is prepared. Two situations are possible ( you see them below in our picture) from which you need to choose one.
- Study the upper layer by finding a rib in it without green segments. The upper layer must be turned like that (algorithm u or u ’) so that the side lines (rib and 1 center) coincide.
- After this manipulation, you should take a puzzle in such a way that at the same time the center of the coincidence is turned to you, and it is lowered with a blue facet. Using as a guide our example, you will find rib with yellow and red color; The lateral rib will be yellow.
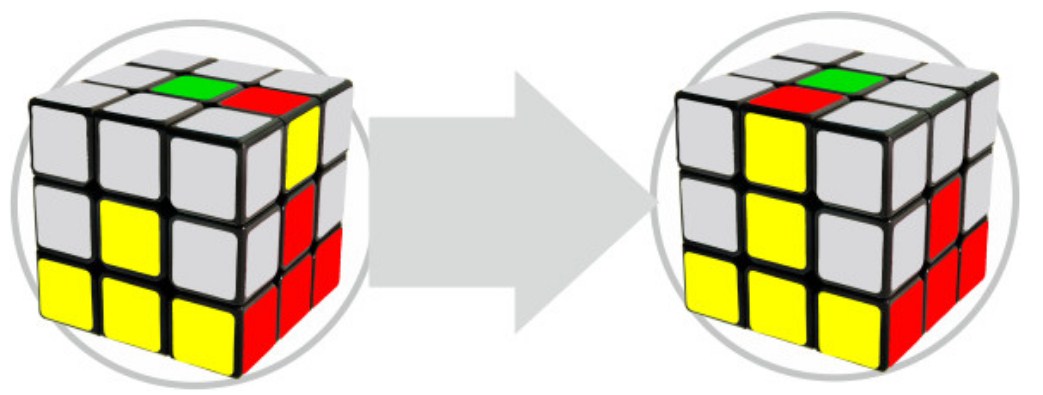
- Then it remains to combine the rib with the center of the yellow color by turning the upper layer. The option is possible when the red rib is combined with the center of the same color, and the yellow rib will remain from above.
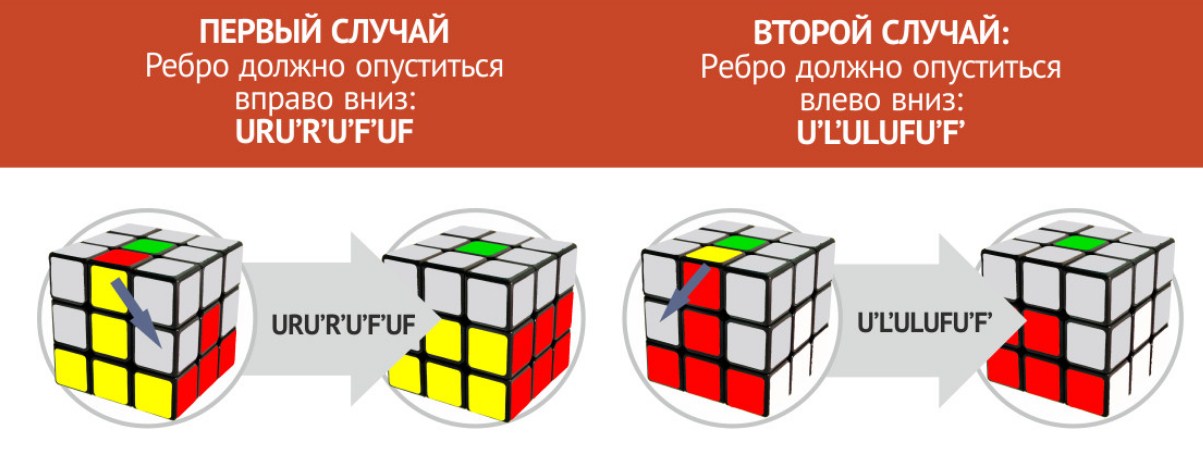
- What to do in a possible third case? Taking a cube with a yellow or red side to yourself, carefully consider it. In addition to two of the above, the third case may also form.
- The rib turned out to be twisted, although it already occupied the niche that was appropriate to him. It is replaced by any of the ribs with green color (you need to use the upper layer), which will lead to two options that we talked about earlier.

How to assemble the upper (third) layer of the Rubik cube?
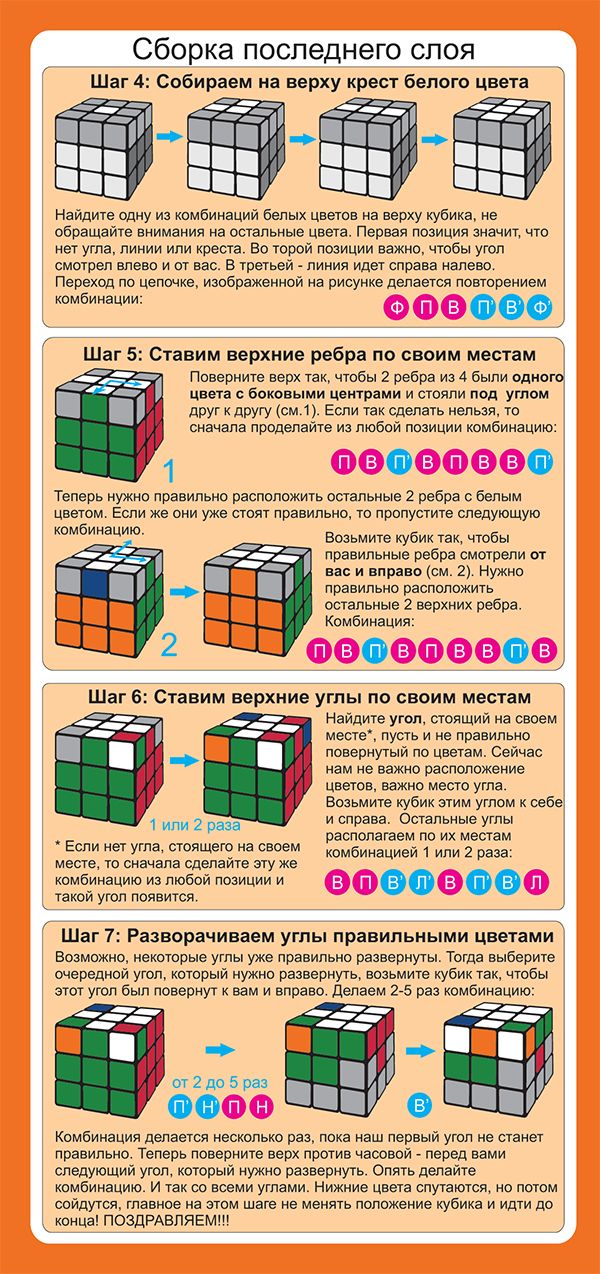
- Put the ribs along the upper layer so that a green cross is made of them. In this case, one of the options demonstrated in these 4 drawings should be formed:

- Check them out with the case that has formed with you, and with the help of the FRUR’U’F ’algorithm, get the desired cross. Starting your manipulations from the position “Point”, step by step proceed to the construction of the cross.
- Starting to perform the algorithm, you should keep the Rubik cube in the position, as shown in the drawings - otherwise your assembly will tolerate Fiasco.
- After receiving the pattern at the top of the cross, then the colors of the side ribs with their centers should be combined.
- It can be done, turning the upper line (u or u ’) - At the same time, there should be complete coincidences of all colors. If this does not happen, do not despair, but repeat the attempt: to begin with, put the third layer in such a way as to be a coincidence in at least two ribs.
- If you have not achieved such a result, you should use the algorithm as in the photo, and again look for the coincidences of the ribs.

- In order to successfully continue the assembly, you need to keep a cube in your hands so that 2 side coincided with colors (we have red and white colors) are on the right.
- With the collected cross and correctly set ribs, the corners can be put in place.
Corner arrangement
- When assembling, the corners can be twisted, so you need to check whether they are right in their places. The most basic, they should be the same color as the centers between which they are located. If everything is in order with this, this assembly phase can be skipped and proceeded to the next operation.
- What needs to be done so that the corners are correctly placed? Take the cube in such a way that the angle with the right location is located on the right side of you.
- And then, with the constant position of the cube, take care of the algorithm: U r u ’l’ u r ’u’ l. If you have not taken its right place in your corner, then after this operation, at least one corner that has risen in its correct place will appear.

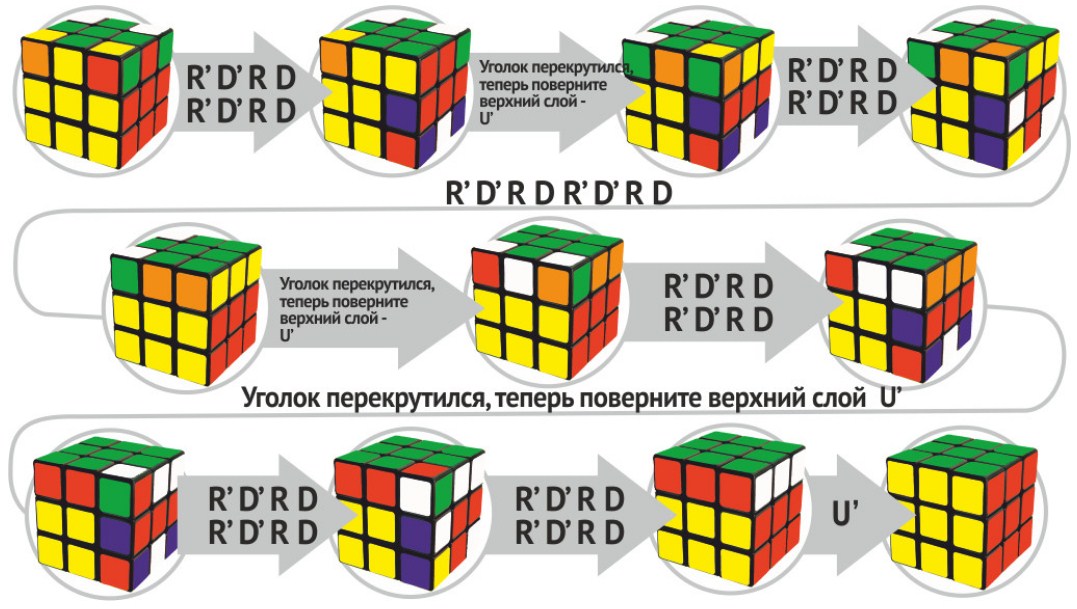
- We will engage in twisting the corners. You can twist from two to four corners. They can be put in place with the help of the simplest algorithm: R ’d’ r d r ’d’ r d.
- Remember the important point - in this case, only one corner that is located on the right side is rebuilt to the algorithm. Let us tell you about this secret: after this angle is located correctly, the upper line is turning through using the u or u ’algorithm - and then the corner of another will appear in its place, which also requires twisting.
- With this algorithm, it is permissible to use from two to five times, and sometimes it may even seem that the cube has become mixed up again. But do not worry - it will gradually be assembled. The most basic requirement for this is not letting it out of your hands and do not turn it over until all the algorithms are done by you.
- Study in our drawing a case that is the most difficult - it has four twisted corners:
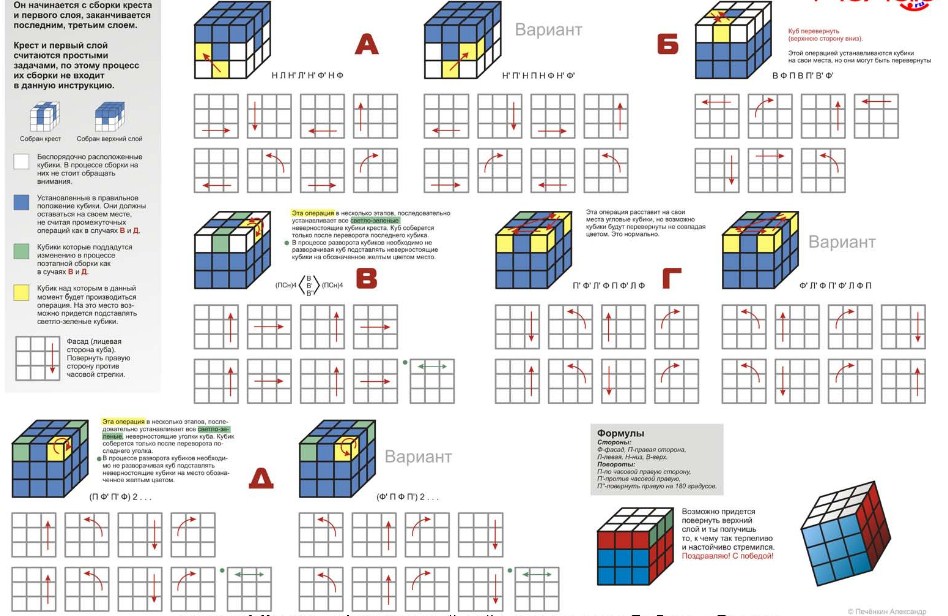
Our Rubik's cube is collected! Do not spare time, sit longer over this detailed instructions, so that at the most crucial moment do not forget about the necessary algorithms. Practice, rotating the edges of the 3x3 cube, and soon you will comprehend secrets enclosed in other, more complex mechanical puzzles. We wish you good luck!
We also offer to see several pictures where all stages are compactly collected:
We will also tell you how to make:
- Flowers from paper for decorating the hall
- Lipstick for lips at home of different colors
- Volumetric snowflake from paper
- Origami from money with their own hands

