Our article will be useful to those people who like to create beauty with their own hands. We will teach you how to make boxes for gifts of various shapes and sizes.
Contents
- DIY gift box - schemes for gifts for gifts
- DIY gifts from cardboard-master class with your own hands
- Video: Cardboard gifts box
- DIY box for a gift with a lid - instructions with a photo
- Video: Box Origami from paper
- DIY square box for gift
- Video: DIY Square for gifts
- DIY wooden box
- Video: DIY Wooden Gift Boxes
- Beautiful gifts for gifts with your own hands: photo
- DIY Box with candies as a gift: step by step
- DIY wedding boxes - instructions
- Birthday gifts, anniversary
- DIY gift box for girls, women
- DIY gift for a guy for a guy, men
- Video: with your own hands
- DIY gift for a child for a child
- How to decorate a gift box: tips, photo
- Video: How to decorate a gift box?
DIY gift box - schemes for gifts for gifts
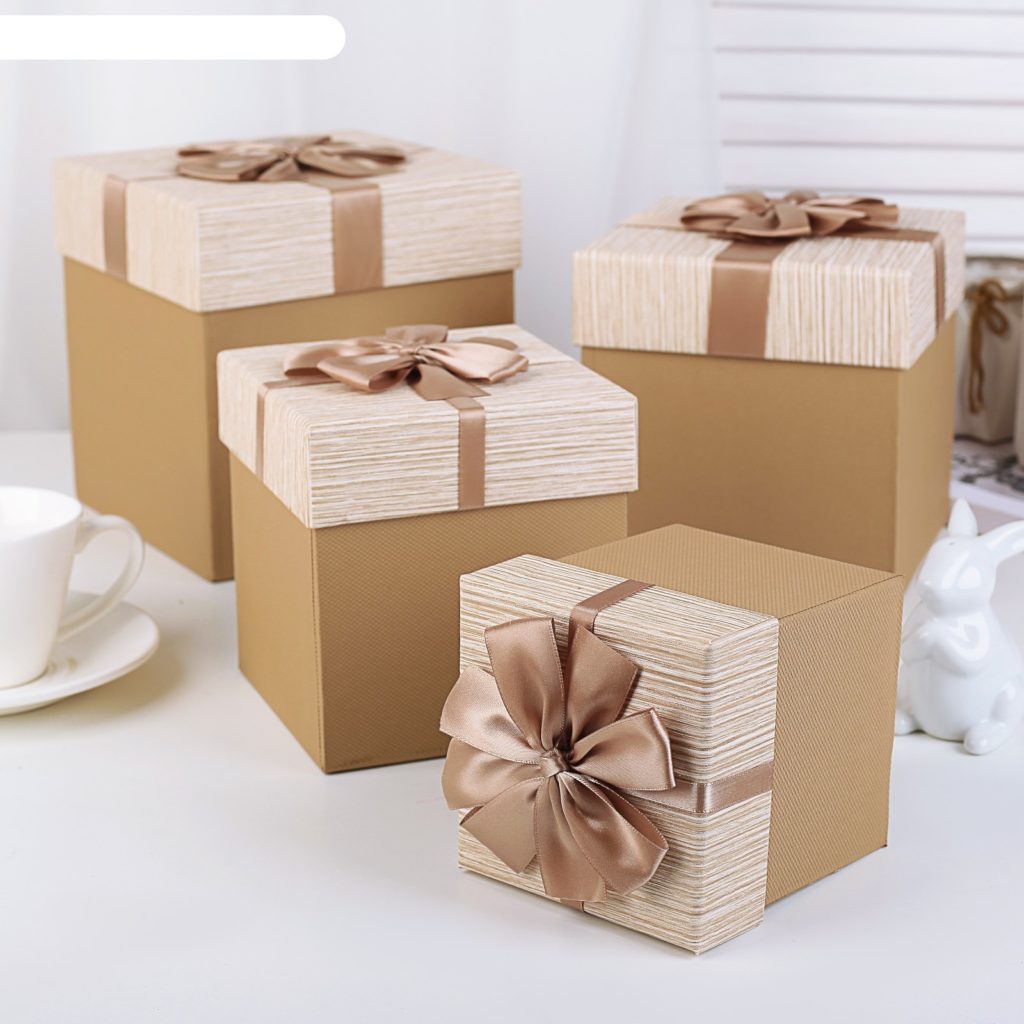
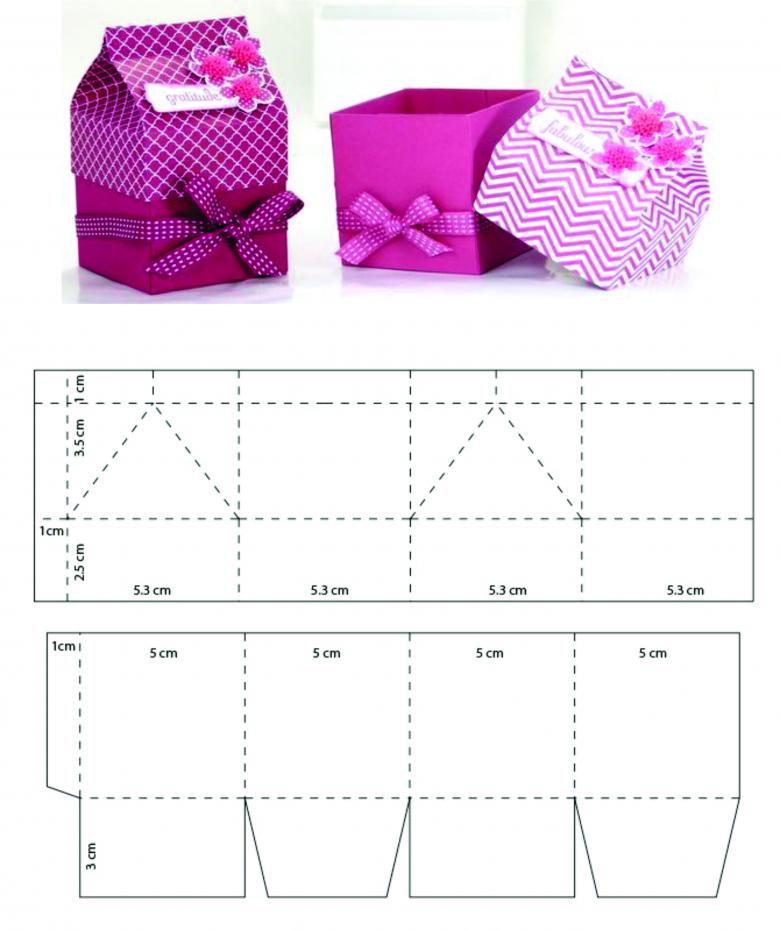
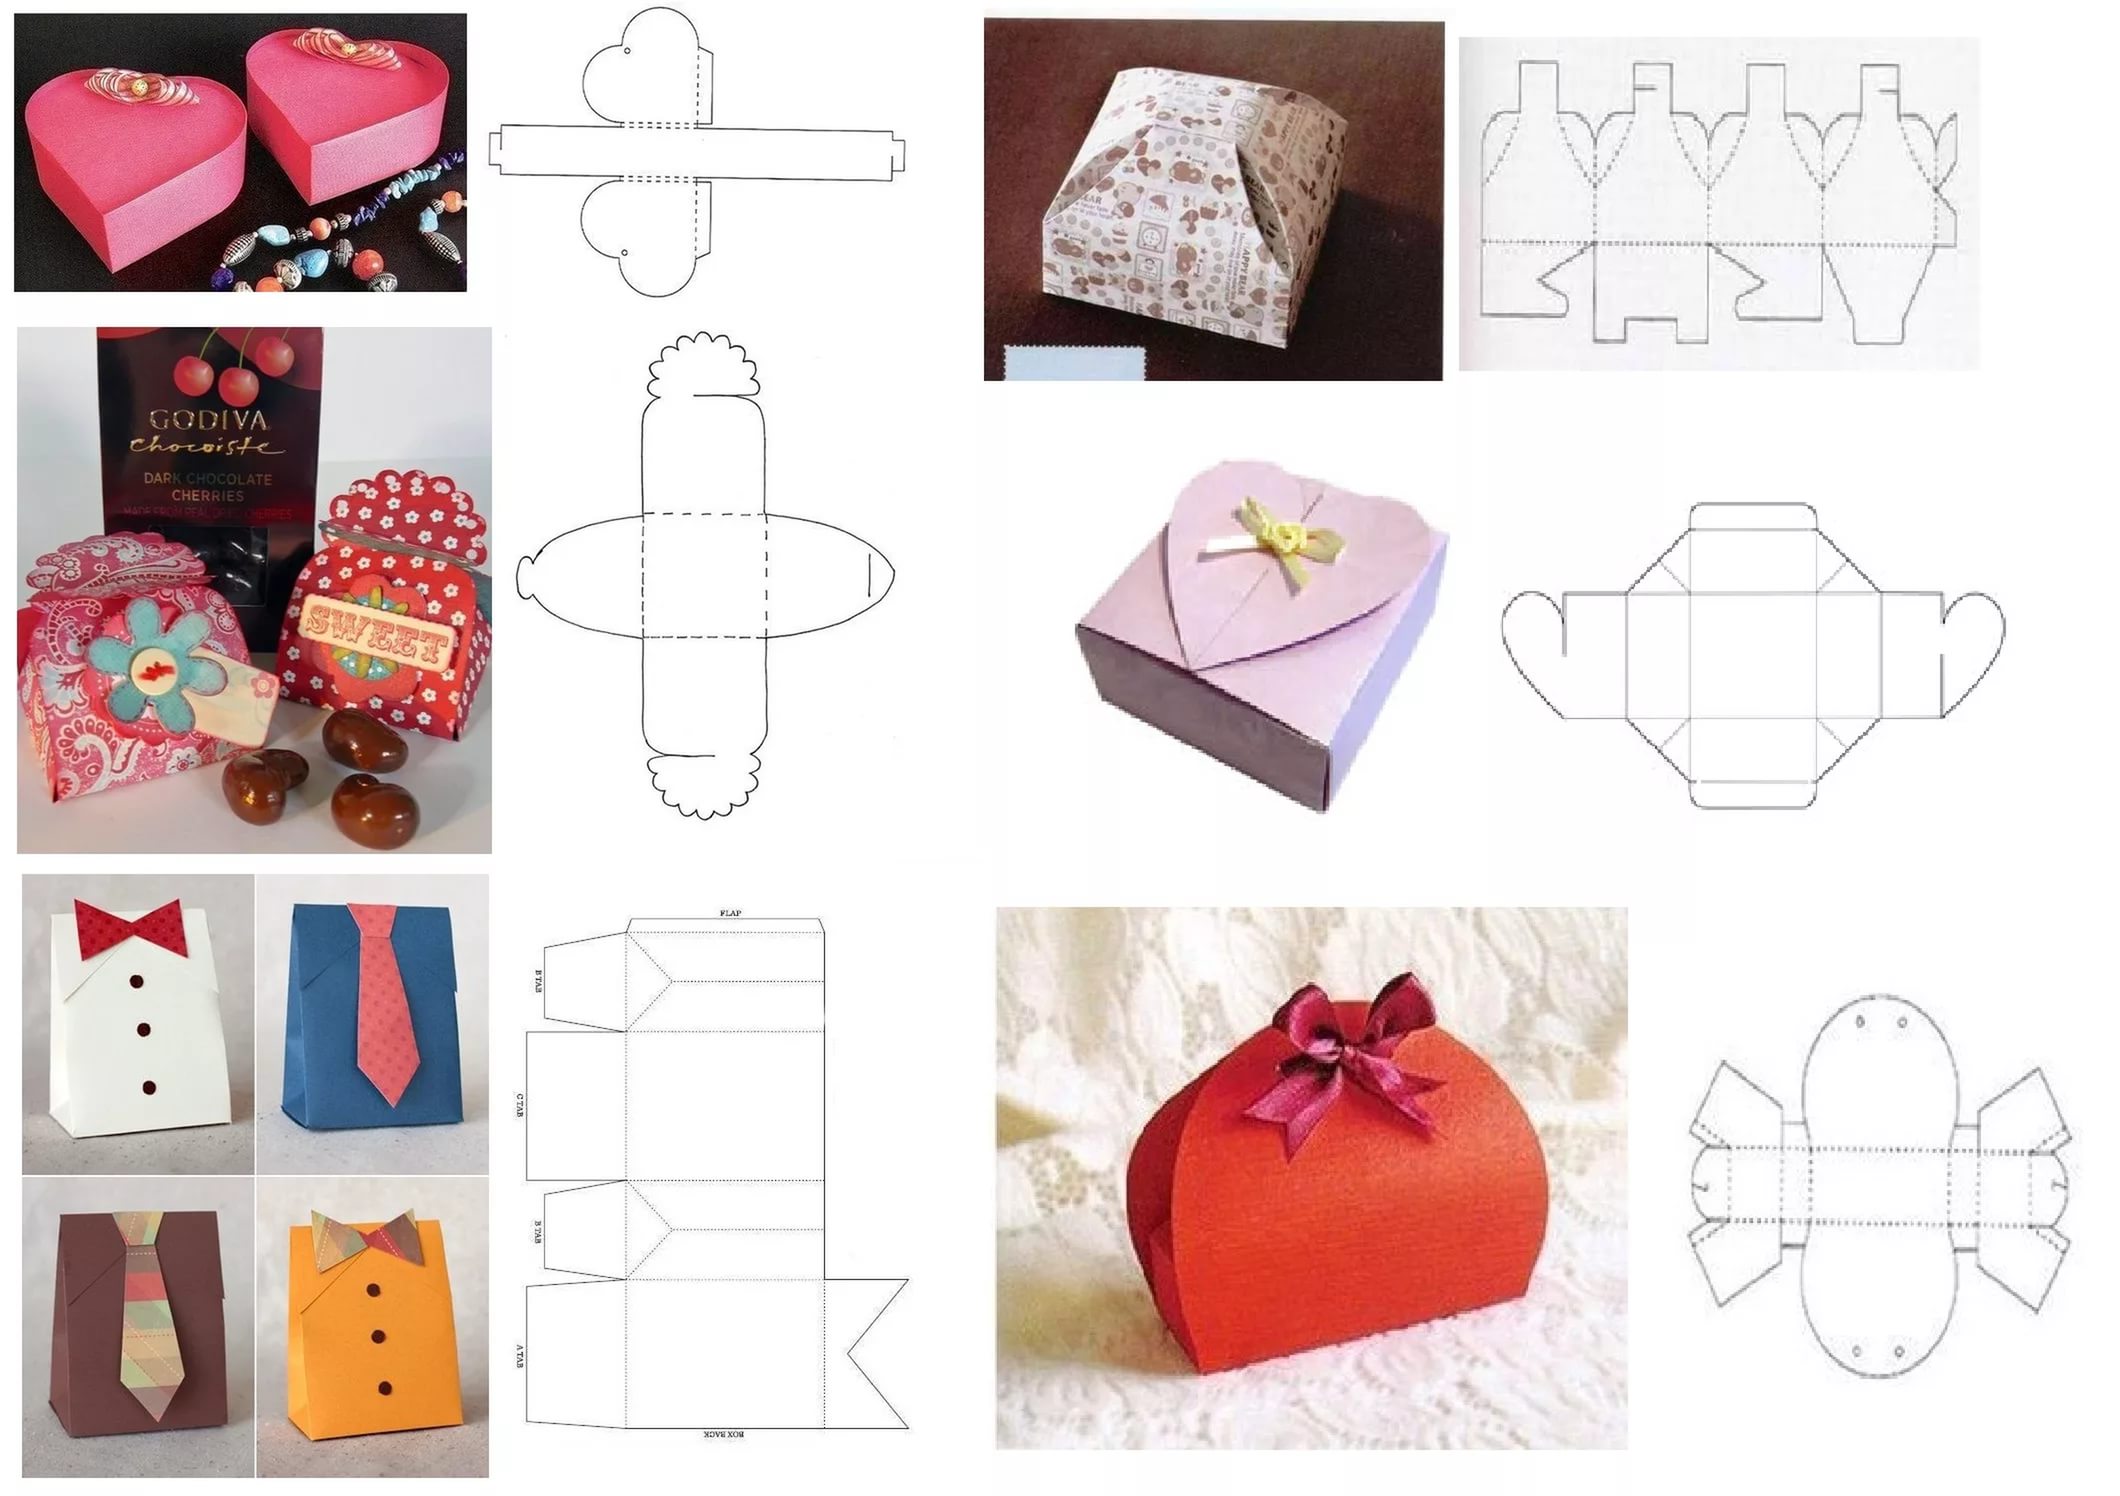
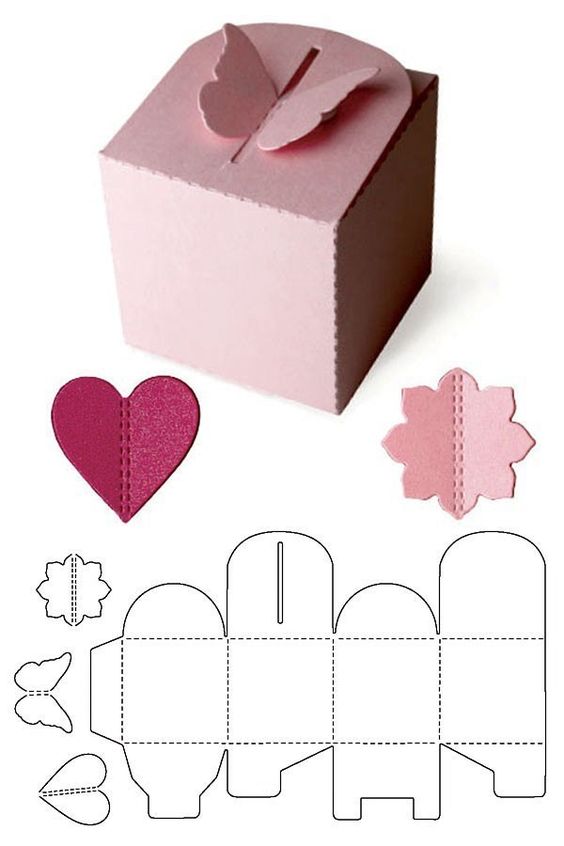
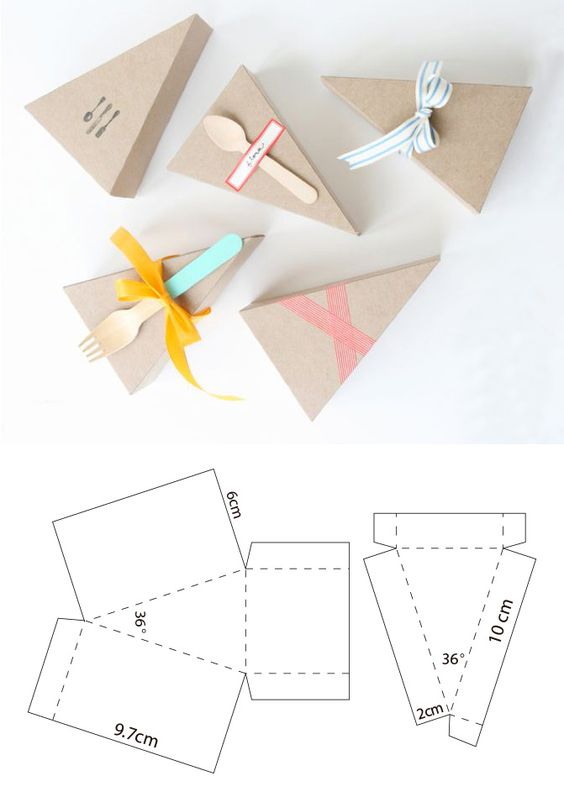
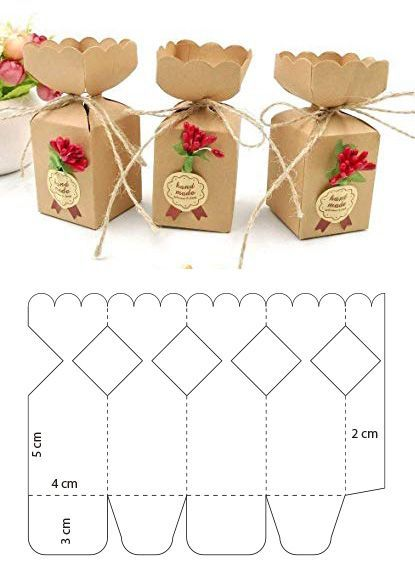
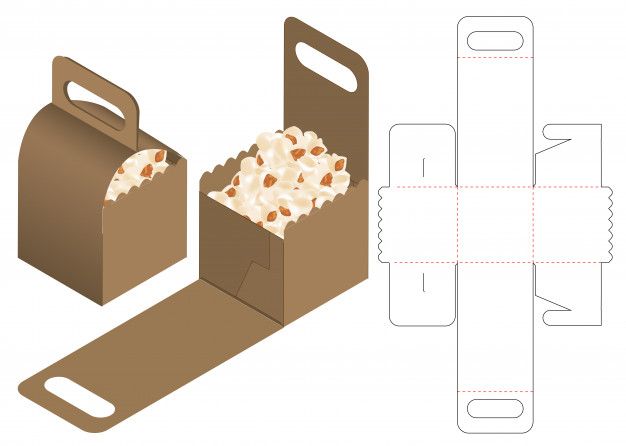
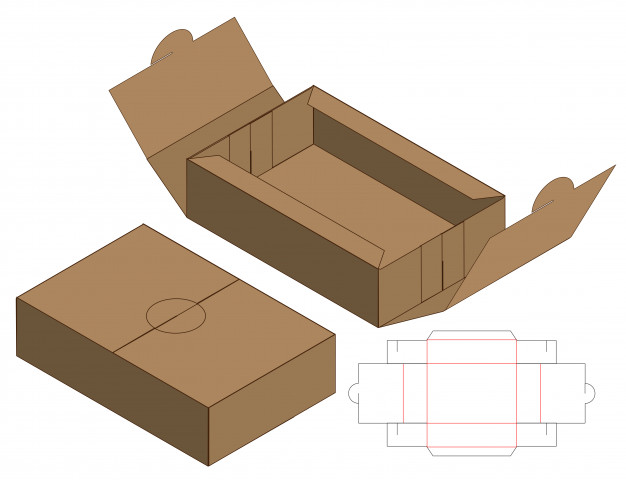
A gift is a thing that every person will be glad. And it is not particularly important whether it was received during some holiday or just like that. But what is the most important thing in this case? Of course, this is an exciting sense of unknown. After all, a person will be delighted even a small trinket, if everything is prepared properly. And a box in which you will hide your little surprise can help in such a case. You can always buy a box, but it is better to make it yourself, because you can put a piece of your soul into this product. Below you will see several options for schemes for your future gift packaging.
Gift boxes for gifts:
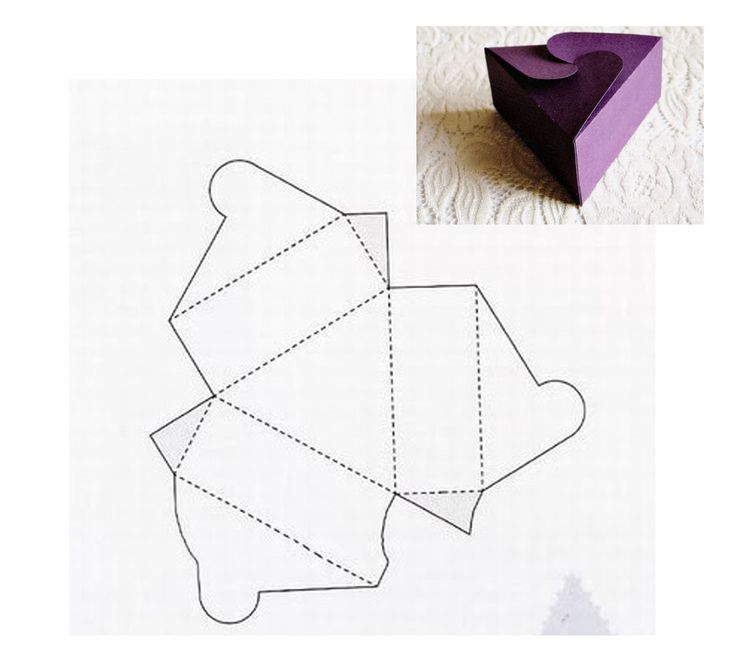
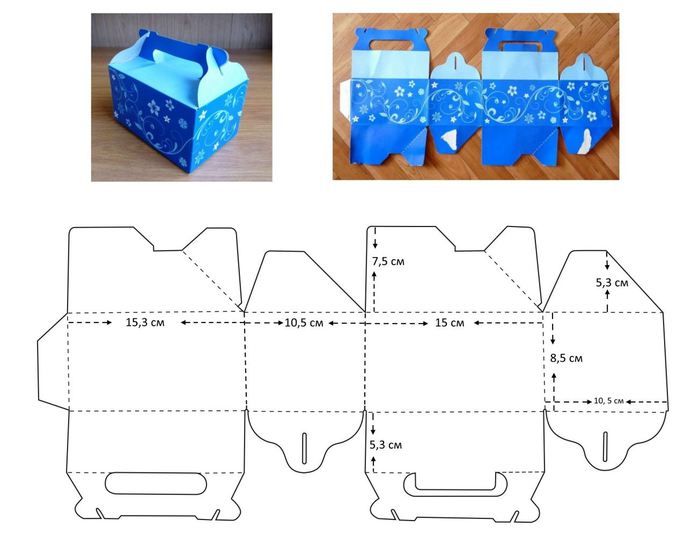
DIY gifts from cardboard-master class with your own hands
The first thing that comes to the head comes to is a box of dense cardboard. The material is inexpensive and, if something goes wrong, you can always try again. Also, this material is easy to use, and some special skills are not necessary for this. All you need is cardboard itself, scissors, or something sharp and capable of cutting, and of course glue.
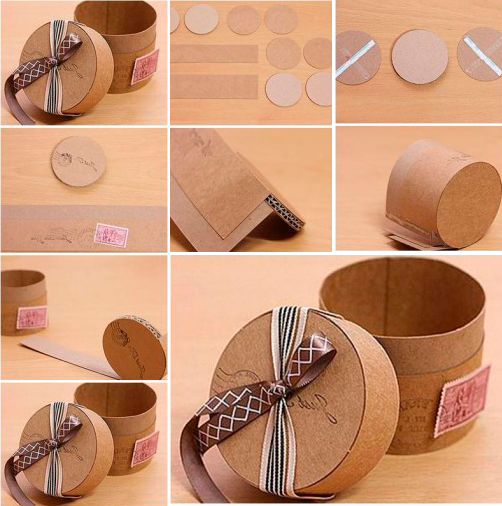
DIY gifts from cardboard - Instructions:
- First of all, we take dense packaging cardboard and cut out 4 circles, two of which should be slightly smaller in size - these are blanks for the bottom and lid.
- We cut out two strips from beer cardboard, one wide, narrow friend. The size is slightly larger than the very circles
- Now, with the help of glue or bilateral tape, we glue our circles to each other
- Those mugs that are smaller in size will be the basis of our future box. We take glue and apply it on the side faces of this workpiece, and glue a strip of cardboard. If you are not entirely sure of the strength of this design, you can glue another strip
- We also act with a circle of larger diameter, it will be our lid.
- You can decorate such a miracle using different ribbons, for example, make a bow. So that the ribbons hold well, you can glue two ends to the inside of the lid
Video: Cardboard gifts box
DIY box for a gift with a lid - instructions with a photo
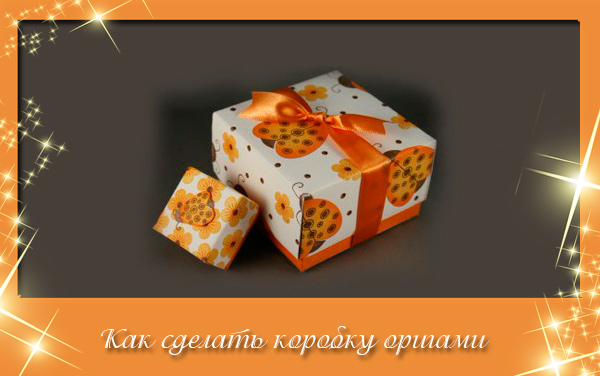
Of course, square boxes closed by a lid are most common. But you can always stand out and create something special. In our case, you can make a box with the help of origami technique. Such a product is suitable for those who do not want to glue something and spend time preparing the desired templates. And the result will be no worse.
DIY box for a gift with a lid - Instructions:
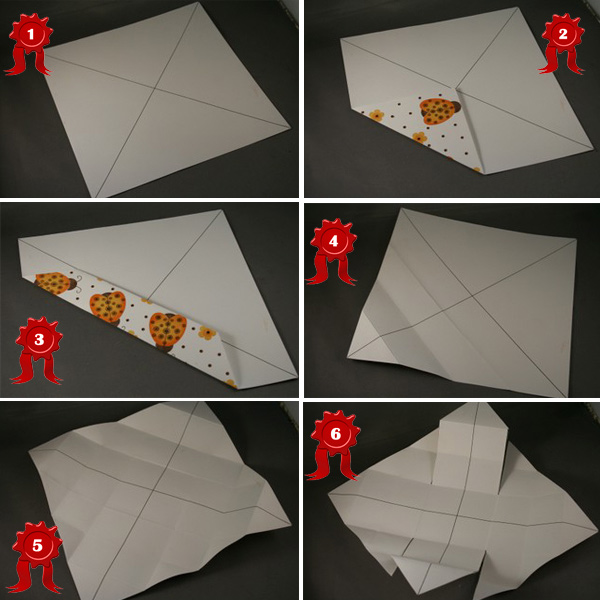
- We take two sheets of square paper, one of them should be slightly smaller in size somewhere for 2-3 centimeters
- Using a pencil and line, we draw two intersecting lines from the corners of our square
- Bend the corner below so that it falls exactly into the center, and then bend the same side in half (See photo 3)
- Repeat this procedure with each angle
- Next, using scissors, we make two parallel cuts in the upper and lower corner (See photo 6)
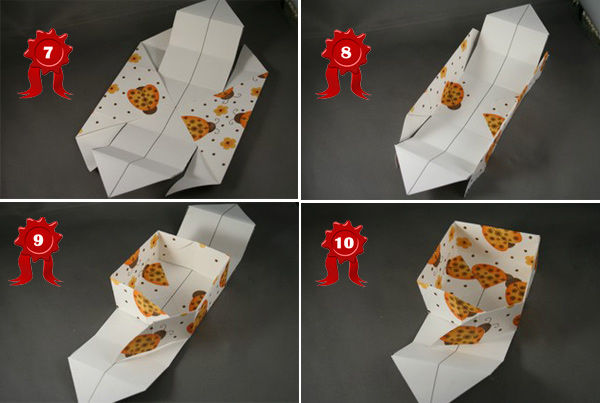
- We bend the left and right parts of our workpiece to the center (See photo 9)
- We wrap these same sides so that they form the walls of the future box
- Next, in the depths we wrap the upper and lower parts, over this design we apply the left and right wall
- We repeat this process and with a different sheet of paper
- Now they are easily connected to the box, since these two parts of different sizes
Video: Box Origami from paper
DIY square box for gift
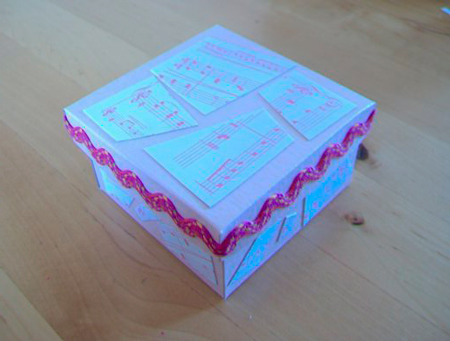
As many thought, the easiest way to make a square box. And this is true, because such a product does not take much time, and there is almost no need to decorate such a miracle. You can just choose a beautiful material as the basis of your box, and all you need to add is a beautiful ribbon to make a bow.
DIY Square for gifts - Instructions:
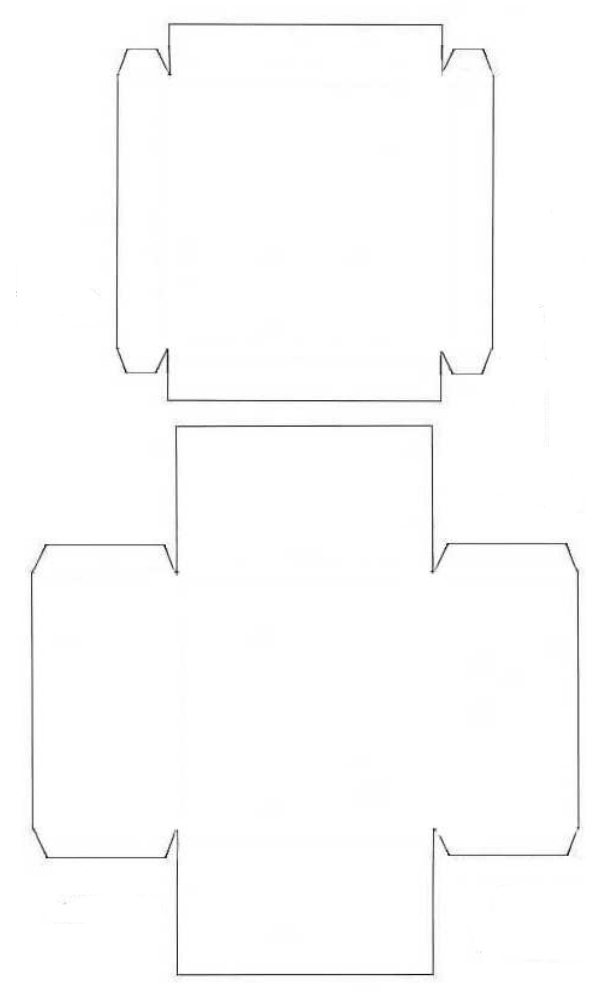
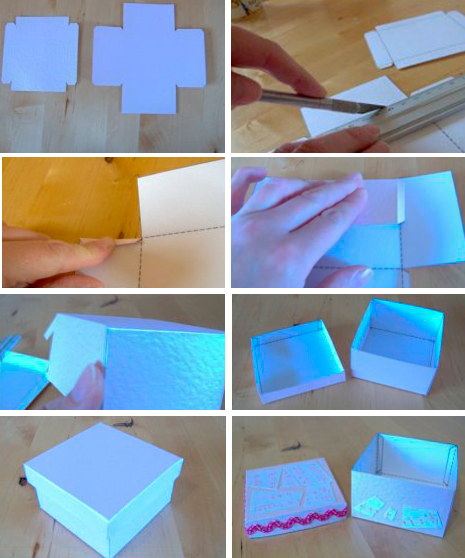
- We take beautiful cardboard or thick paper and transfer the template to it, you could see it above the instructions
- Cut our workpiece with scissors. Try to ensure that all lines are even
- Now we bend the sides of our box. First of all, you need to bend the details similar to the wings, and only then form the box entirely
- We connect the parts we need using glue
- You can decorate such a box with a decorative ribbon by gluing it along the entire edge of the lid, you can in several rows
Video: DIY Square for gifts
DIY wooden box
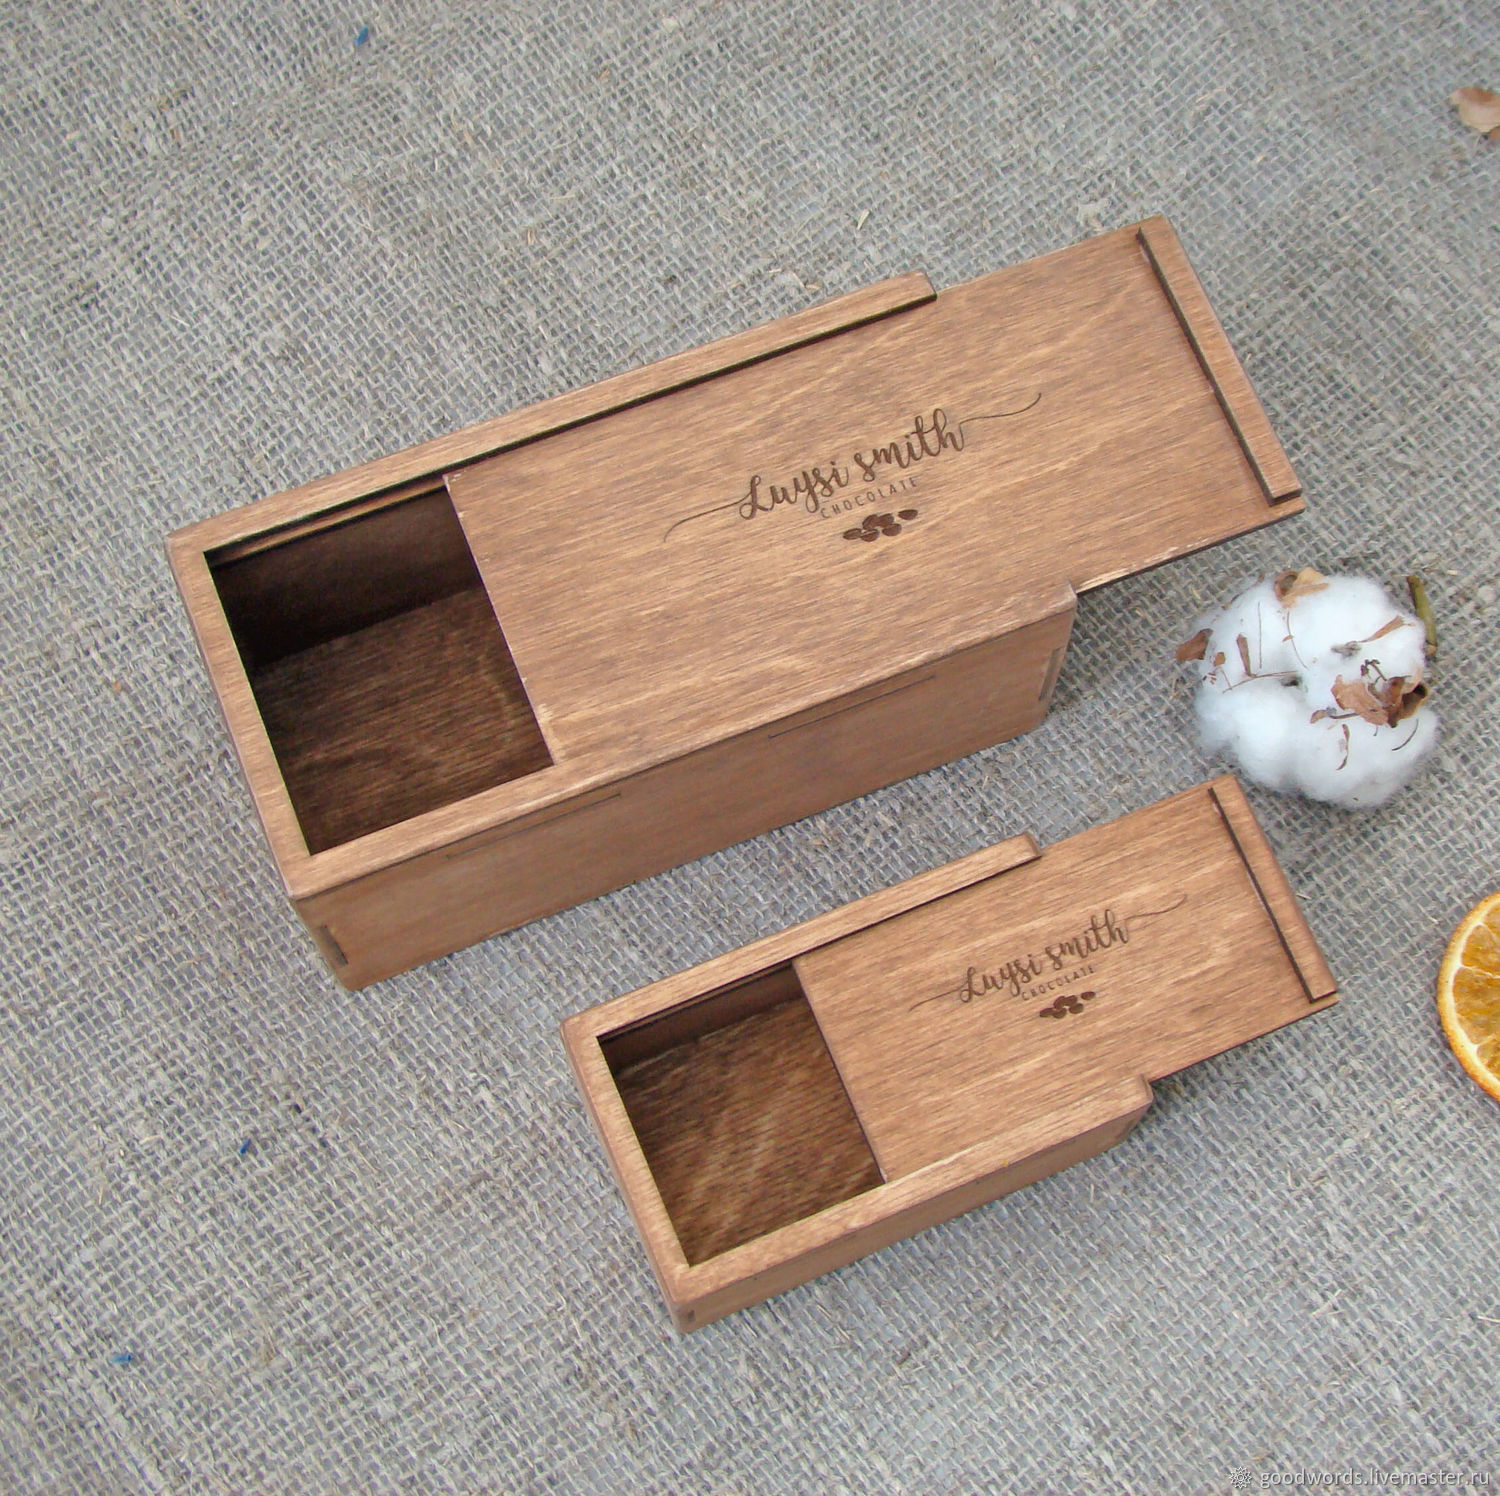
At first glance, any box you do will delight you dear to you. And it is not very important that it is made of improvised materials. But you can always move from ordinary paper and cardboard to something more premium. For example, if you have enough time, and persistence in your blood, you can take a chance and try yourself in working with a tree. Such a product will be stronger and a tree will help to give your creation for something solid.
Do -it -yourself wooden box - instructions:
- First you need to choose the material. It is best to get a plywood somewhere.
- We draw future details on a piece of wood and cut them out.
- Next, you need to fasten our details together, in the upper parts of each part you need to make recesses for the cover using a chisel.
- You need to combine the walls, this can be done in several ways. Of course, you can always use glue, but you can also cut out small grooves and collect our box as a constructor.
- Next, it remains to deal with the lid. It should open easily if you calculated everything correctly. If the cover moves too tightly or cannot fit at all, no need to lose heart. You just need to remove a little material from the edges and everything will fall into place.
You will learn more about the manufacture of such crafts from the video a little lower.
Video: DIY Wooden Gift Boxes
Beautiful gifts for gifts with your own hands: photo

If you came to your mind the idea to independently make a gift box, then why not try something unusual. If there is proper perseverance and a sufficient amount of time, you can always try to conquer a new peak. And such an original idea can become, for example, some unusual form of the box itself. Consider several such examples.
The first box in the shape of a pyramid is the first in turn. You can’t put much in such a lot, but the appearance fully compensates for this drawback.
Beautiful box in the form of a pyramid for gifts - Instructions:
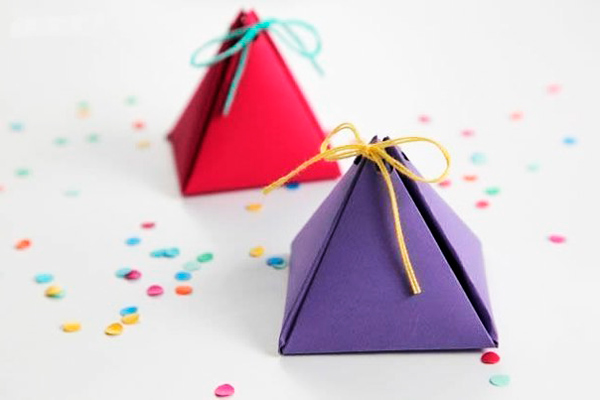
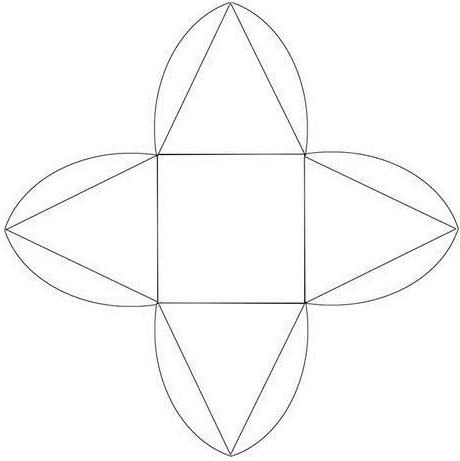
- Print or redraw the template of the future product

- Cut our workpiece
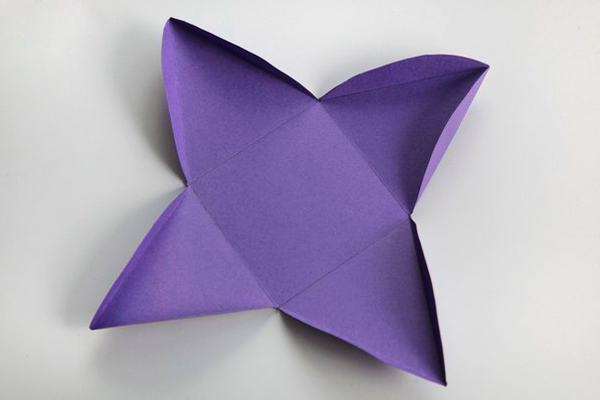
- We bend the petals so that you get four sharp corners
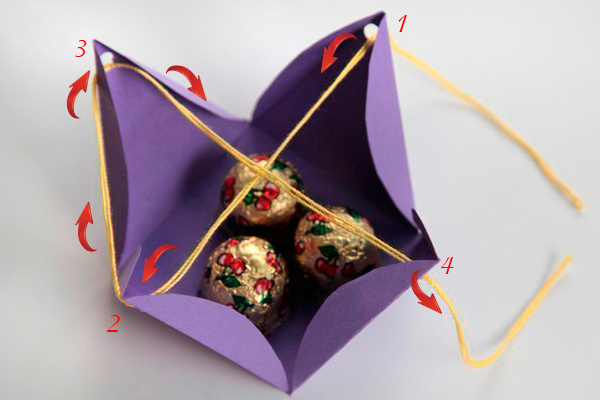
- We make holes on the tops of our corners, for this you can use a hole punch, and at the end we fasten everything with a beautiful thread or rope
Also, as an option, you can create a closing box. The cover of such a model is not needed, but even so it performs its main function quite well.
Beautiful closing gifts for gifts - Instructions:
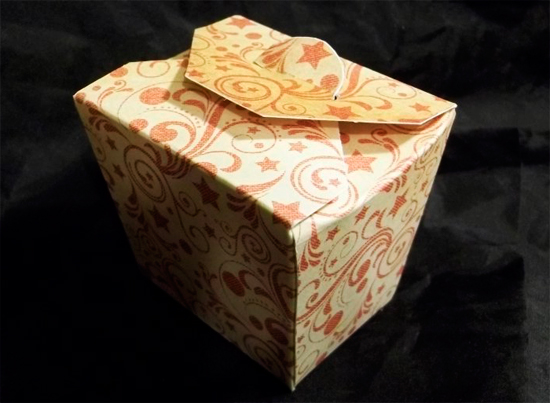

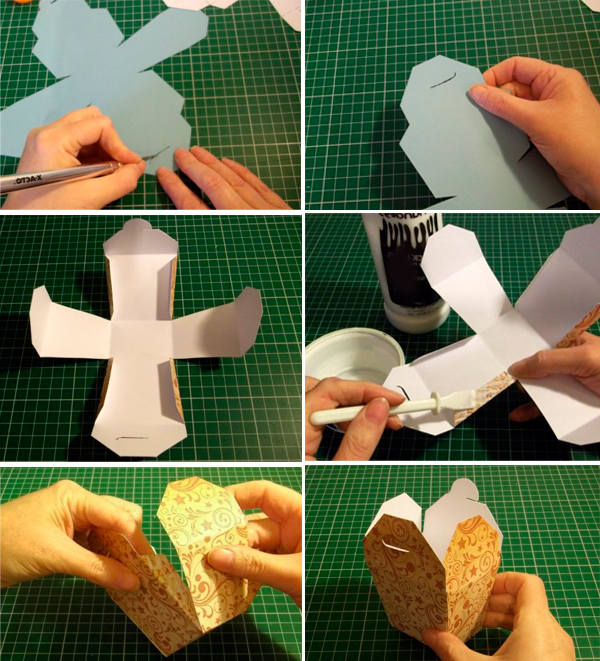
- Print a finished template or make it ourselves
- We make incisions and holes in the allotted places
- Bend all the selected parts
- We form the box itself and glue the edges
- You have to put your gift and close the box
A small envelope in the form of a box also looks pretty beautiful. This is used for small and compact gifts. It is best to give some jewelry in it, they are precisely placed in such a package.
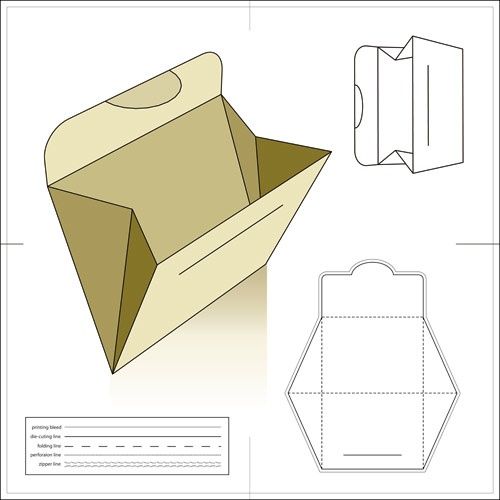
Do-it-yourself gearbox-Instructions:
- We take thick paper
- We transfer our scheme to it and cut out with scissors
- We bend our lands alternately
- We decorate our box with a colored ribbon, you can apply sparkles to decorate at the edges of the petals
Another way to make a festive craft:

DIY Box with candies as a gift: step by step
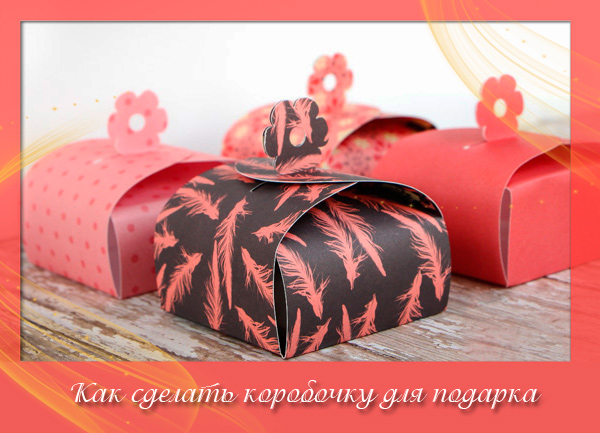
Almost all people in the world love sweets, but if a small food product seems to you not a very presentable gift, you can always change the attitude to the present itself with the help of beautiful and original packaging. And in this case, even ordinary sweets will cause someone's joy.
DIY candy box as a gift - Instructions:
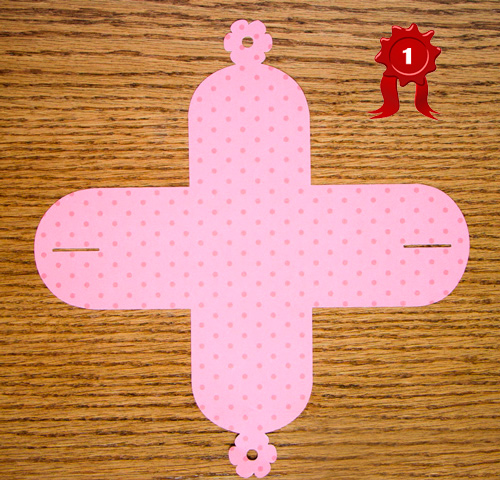
- Print the workpiece, or draw it and cut it out of thick paper
- Now we cut out the longitudinal strips that are marked on the template by lines, it is best to do this using a stationery knife
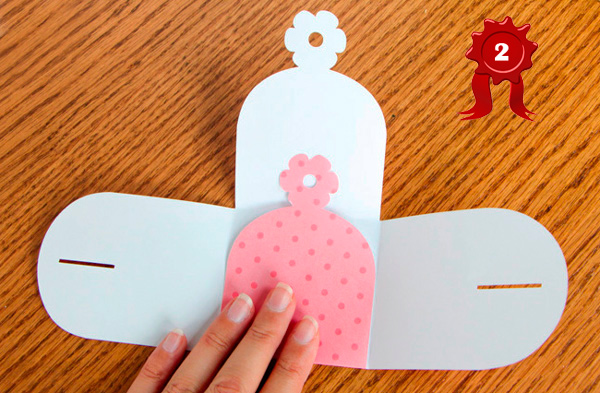
- Bend our “leaves” to the center of the future box
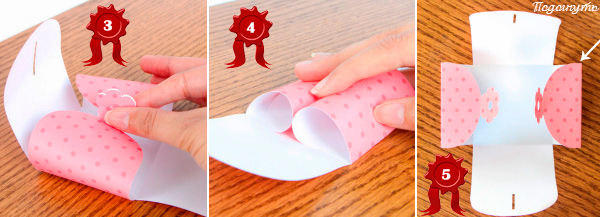
- Now we take two petals on which there are small flowers, and press them to the center. We do everything as shown in Figure 3. This is done in order to round the box.
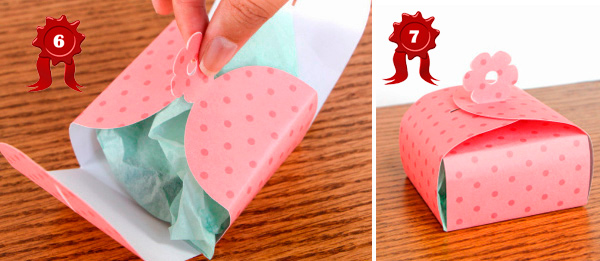
- Now we take our sweets and put them in the center of our design. We take rounded petals, and stick the flowers into the early slots made
DIY wedding boxes - instructions
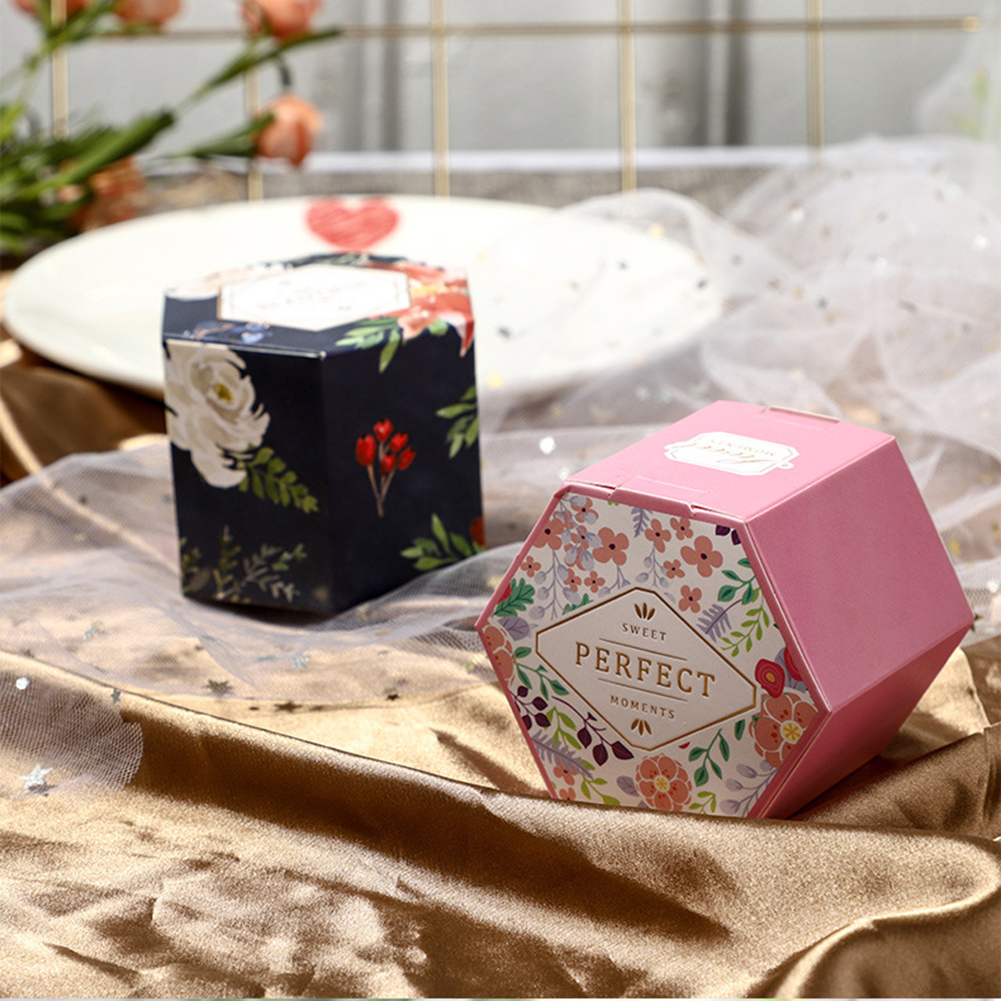
Wedding gifts are a small test. After all, you need to please the new cell of society. And if you most likely be able to please someone alone, then the tastes of another person may not be so well known to you. Of course, you can hold a couple financially, but a small present will also not be superfluous. And you can improve the opinions of others about yourself by inventing an unusual form of your gift.
Hexagonal box for wedding gifts with your own hands - Instructions:
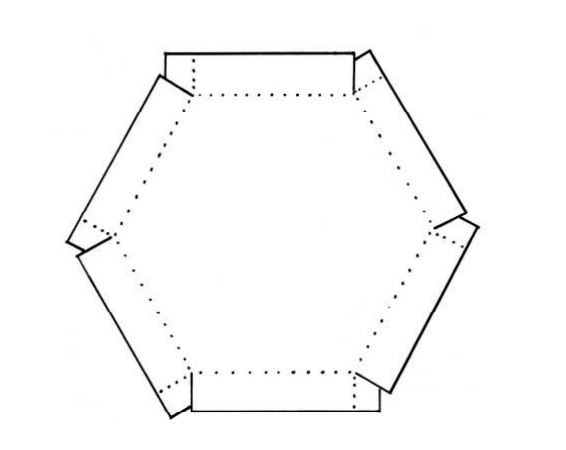
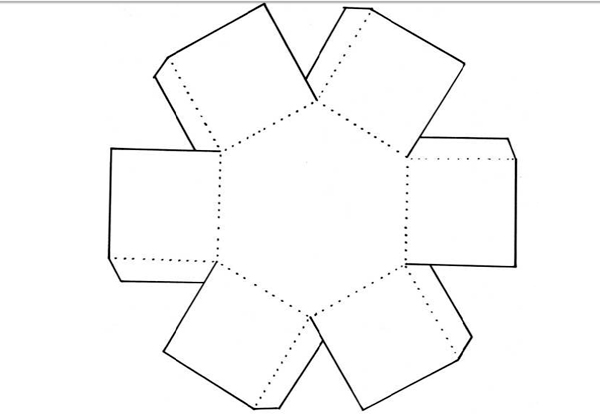
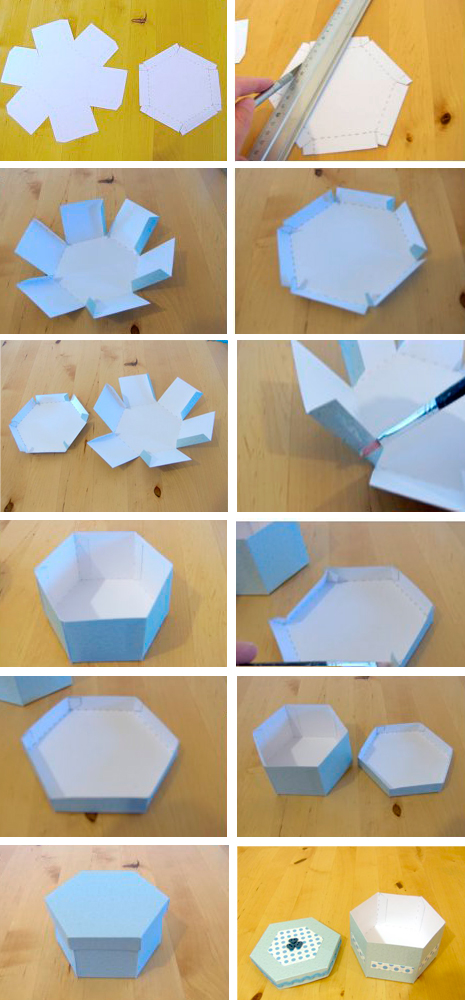
- We print the template we need, or draw it ourselves
- Cut this workpiece
- Pre -bend all the places of future gluing, they are highlighted by a dotted line
- Now we wrap the necessary parts and fasten them with glue
Birthday gifts, anniversary
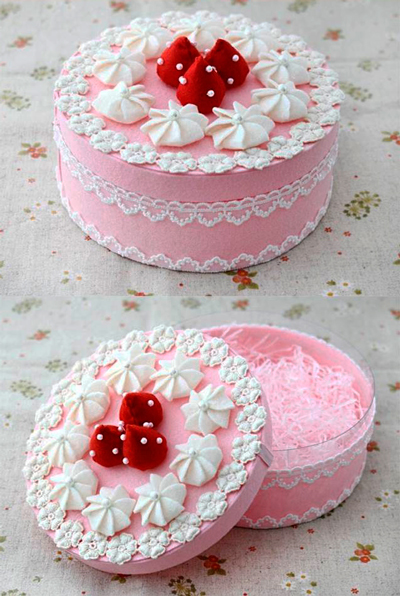
Birthdays and anniversaries most often celebrate in the circle of their loved ones. And in such cases, people most often pleases the very attention to the idle. But even in this case, you do not need to miss a chance to please a person. Better yet, do something unusual! After all, everyone knows that usually such holidays end in drinking tea with sweets. Therefore, in this case, you can create a small illusion. It is in this case that we can make a box in the form of a cake.
Birthday gifts, anniversary - instructions:
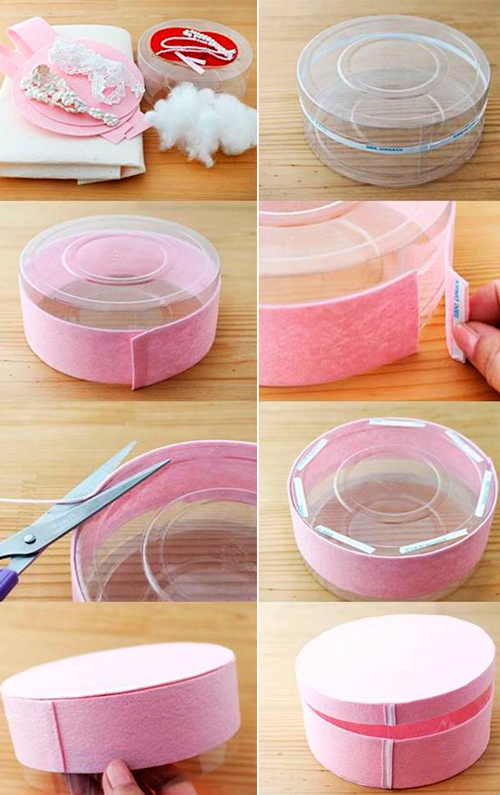
- First we need to get a plastic container of a round shape, it is the boxes from purchased cakes that is best suited
- From felt we cut a strip of the size of our box
- Glue our strip to the side
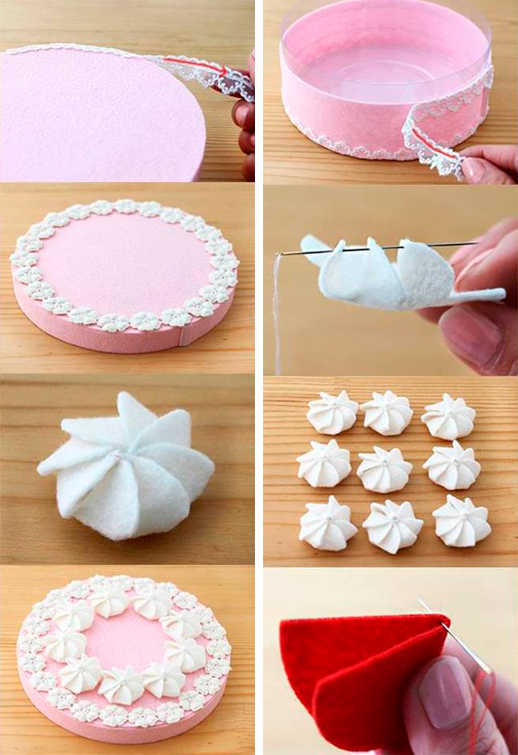
- On top and bottom, we also glue round blanks made of felt
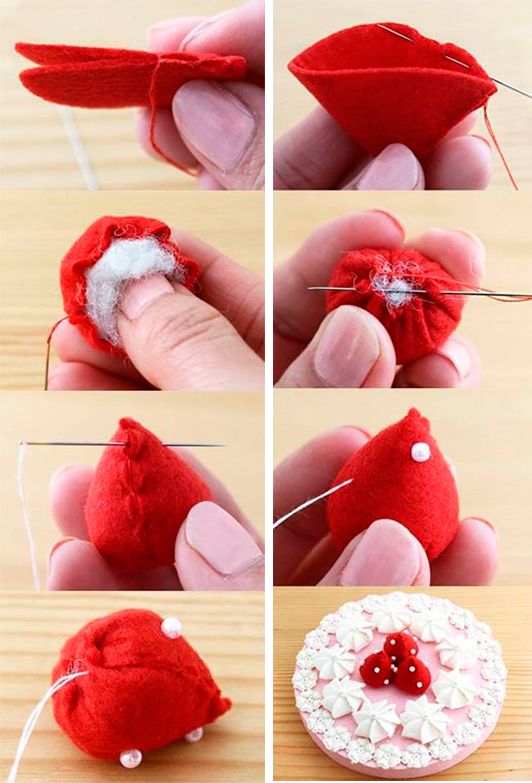
- For decoration, we use braid and decorative strawberries, you will find a photo instruction on their creation below
DIY gift for a girl for a girl, women
Gifts for girls and women are most often carefully selected. Therefore, beautiful packaging or box always includes a plan. But you are not always satisfied with what you find? Then it is best to engage in the manufacture of beautiful packaging for the presentation yourself. Look for two interesting ideas a little lower.

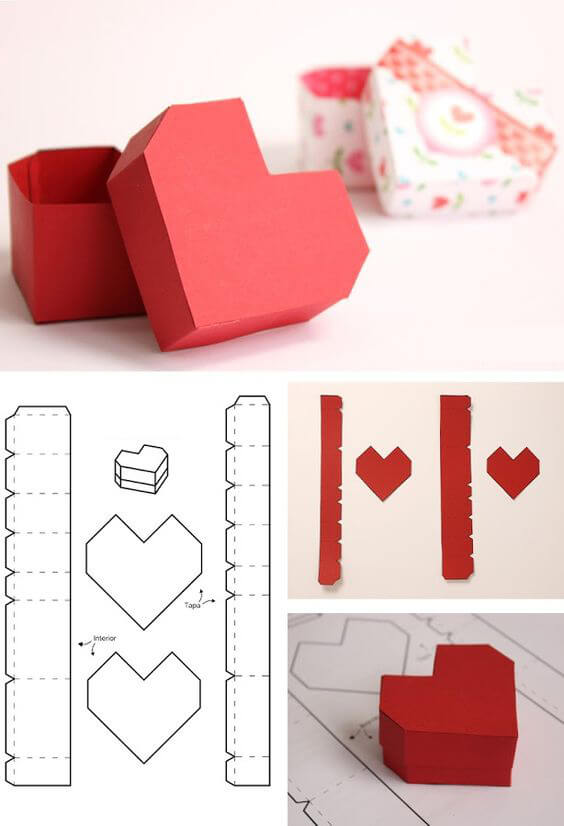
The first craft will be a heart -shaped box. Such a product is suitable for any significant date or an important holiday. An ideal choice to please your soul mate.
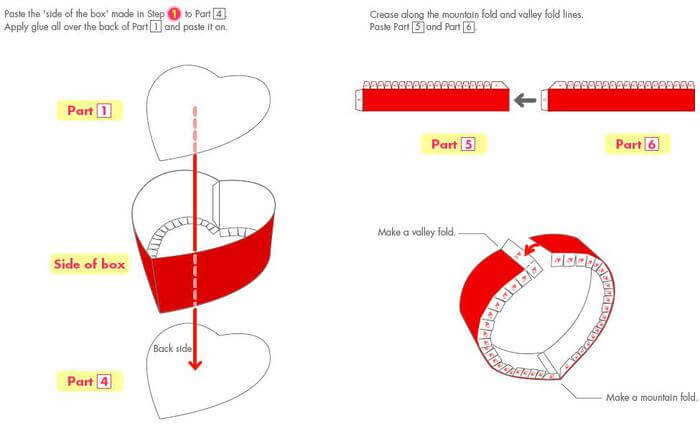
DIY heart box - Instructions:
- We take a dense cardboard and draw our base, then cut out the blanks with scissors
- We draw the lateral parts, and do not repeat a frequent error depicted in the diagram, is necessarily needed. Without them, the side walls of our box will not be even.
- We glue all the parts - it is with the help of cloves that everything will glue as firmly as possible.
- Next, make the lid. Its scheme is simply slightly larger in size than the base, and the height of the walls is 2 centimeters.
- When everything is ready, you can do decoration. It is best to glue the box itself with gift paper, and further jewelry is made at your discretion.
Another interesting way:
If you crave something unusual, or you want to impress some fashionista, then this is your only right choice. The shoe box will emphasize the hobby of the girl, and most likely become the center of the attention of many people.
DIY shoe box - Instructions:
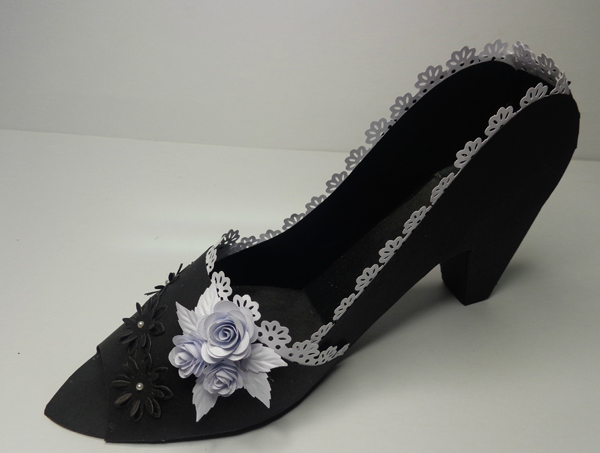
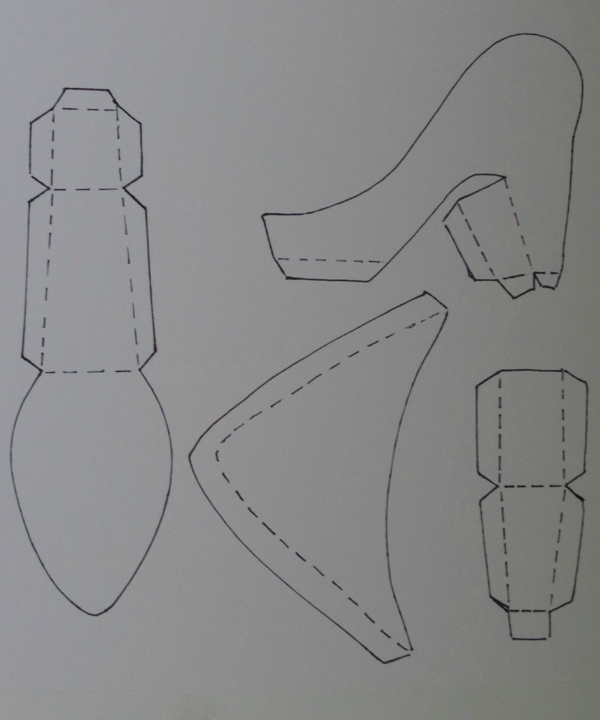
- Print or draw details
- Cut all the parts, bend the selected parts and glue them together
- We are engaged in decoration
If your gift is some kind of decoration, then this box will definitely suit you. It can even be called a small hint on your part to the gift itself.
DIY BRALLIST BROACK-Instructions:
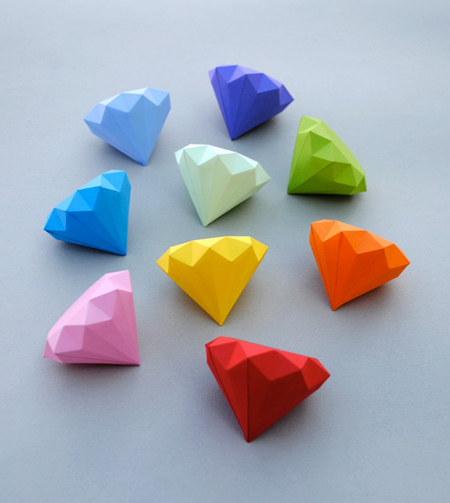
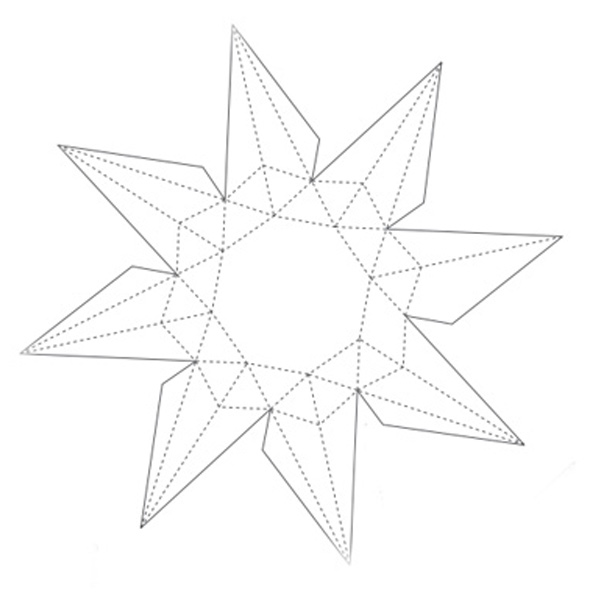
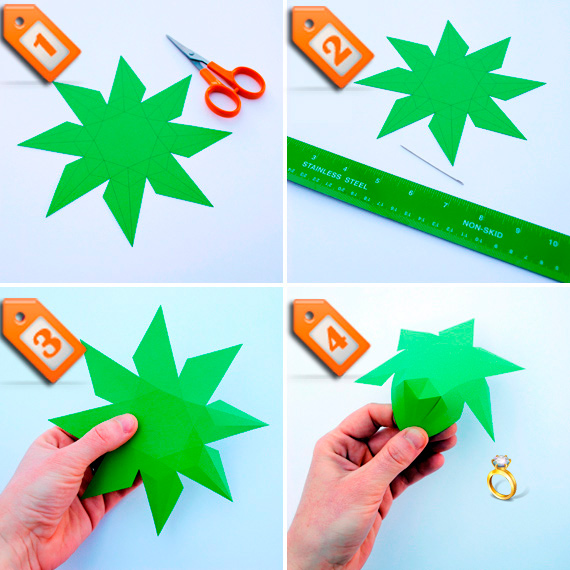
- We need to transfer our scheme to colored paper
- With a needle or not writing a pen, draw the edges along each line of the template, without this action, your product will never take the form of the correct precious stone
- Now you have two ways to fasten your box. You can use both glue and bilateral tape. You need to place them on the edges of pointed ends.
- First fasten about half, then place your gift, and after that fasten all the remaining parts
DIY gift for a guy for a guy, men
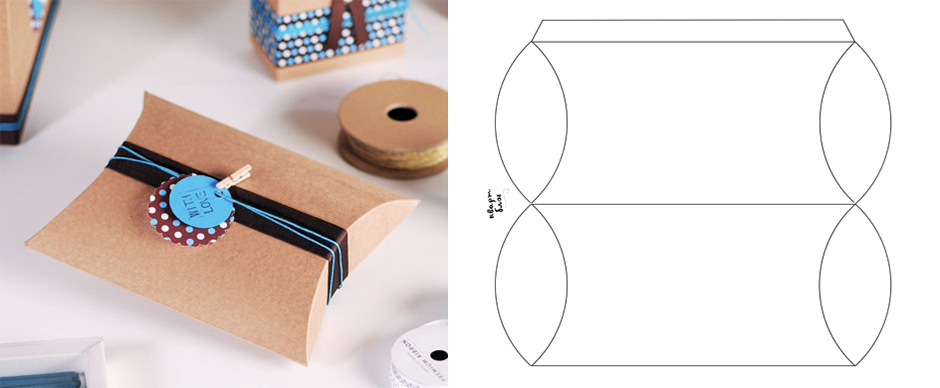
Men love gifts no less than anyone else, although some of them try to show with all their appearance that this is not at all. Therefore, you need to conduct at least minimal preparation. For example, consider a punch box. A pillow -type box has an unusual shape, and it is not so difficult to make it. Although it is small, but something like an unusual lighter or wristwatch may well fit in it, since it greatly resembles a case with its shape.
Do-it-yourself gearbox-Instructions:
- First of all, you need to prepare the material, the pastel paper is best suited
- We need to draw our template, and to circle all the places that you need to bend the non -writing handle. This is necessary in order for the product to come out even, without which the rounded side sides will be almost impossible to turn
- We cut out our template and begin to form our case
- It is best to tie this box with a ribbon, since it is almost impossible to fasten it with glue
Video: with your own hands
DIY gift for a child for a child
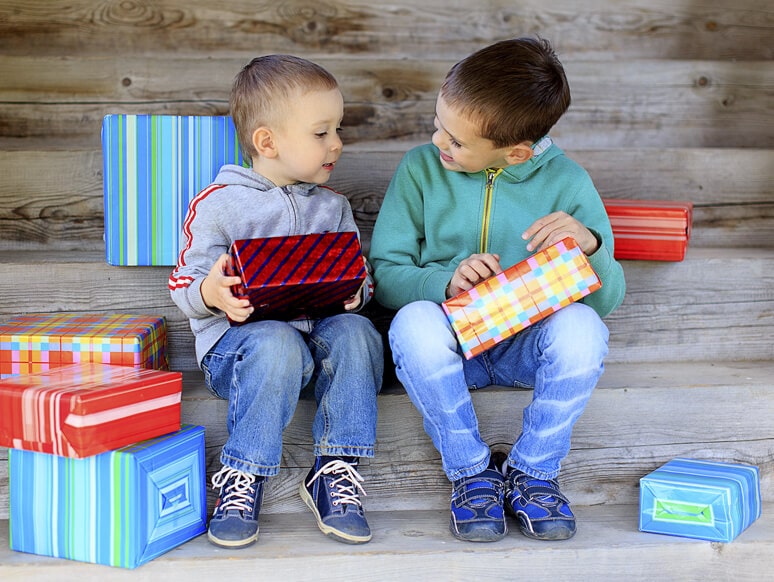
The child is most awaiting to himself precisely your attention, not a gift. Children after a while can no longer rejoice at a new little thing, but they will remember bright memories for a long time. Therefore, first of all, you need to arrange a small show that will make an indelible impression on the hero of the occasion. Best for such a thing is a box-breaker.


DIY gearbox-instructions for creating a more complex option:
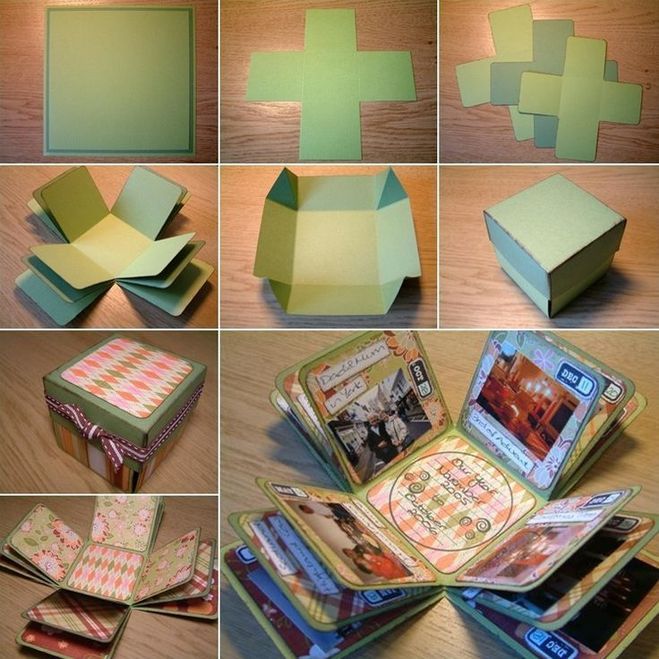
- From the very beginning, you need to decide on the size of all the boxes. The easiest thing is to solve at first what size will have the largest box, and then just make each next one 2 centimeters less
- We take four identical sheets of cardboard, make the blanks from them as in the photo.
- We fasten the resulting structure with two sides with paper tape, or glue
- Glue the bottom of the box with double -sided tape and attach wrapping paper
- Next, you need to make the lid. We take a basis that should be 1 centimeter larger than the size of the parts to the box itself
- We fasten the joints with tape and bend them. They are also fastened with paper tape
- We decorate our lid with exactly the same paper that was used earlier for the outside of the box
- You can attach drawings or wishes to the inner walls of fake boxes
Everyone knows such fun as Lego. Many children like it madly. After all, it makes it possible to collect a small model of something and just have fun. And at the moment, an element of mechanics has been added to such toys, which has produced a new wave of popularity among children. Therefore, why don't we make a small box in the form of Lego?
Do -it -yourself league - instructions:
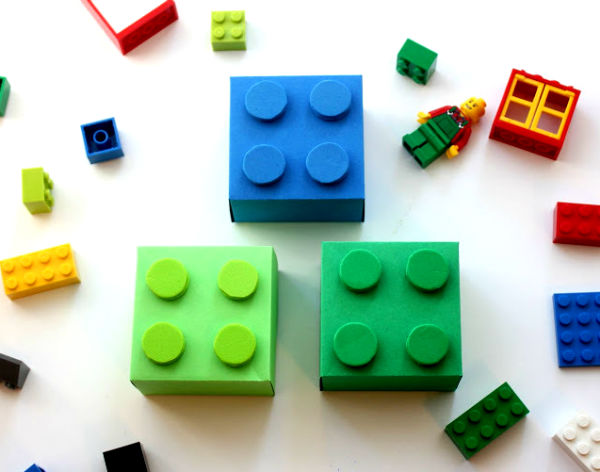
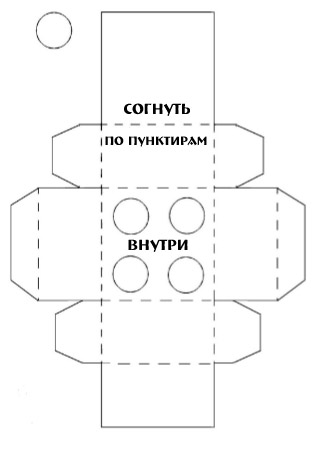
- We take the cardboard and transfer our scheme to it
- Cut the workpiece with scissors
- We turn all the necessary coals and glue them
- To make Lego real, you need to glue four circles on the upper part. To maintain the effect of a real 3D-figures, you can glue 3-4 mugs, and only then place them on the box
How to decorate a gift box: tips, photo
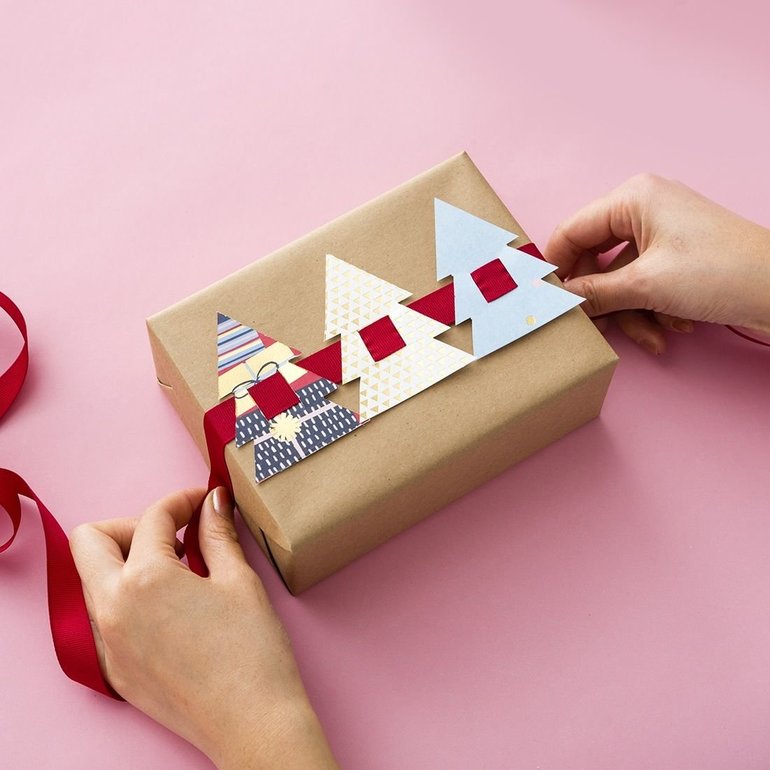
- After the craft is made, a new dilemma appears before many, how to decorate this man -made miracle. And most importantly in this matter, not to be afraid to experiment.
- You do not interfere with just adding a multi-colored ribbon, but it is better to add something personal, so that it is clear that you have put your positive emotions into this product. If you are good in the visual arts, you can paint your craft.
- If this is a gift to a rather close person, you can emphasize your whole path with him by simply adding several memorable photos that mean a lot to you. To the same ribbon, for example, you can attach a small toy or origami.
- And in the end, you can write a small congratulation on the lid or attach it on a small leaf to the box itself.
How to decorate a gift box - photo:

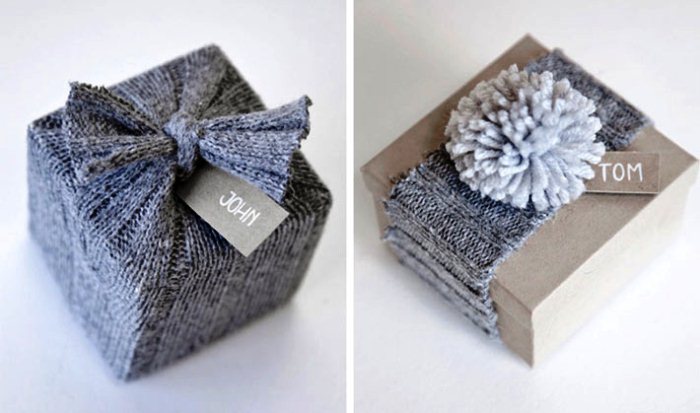

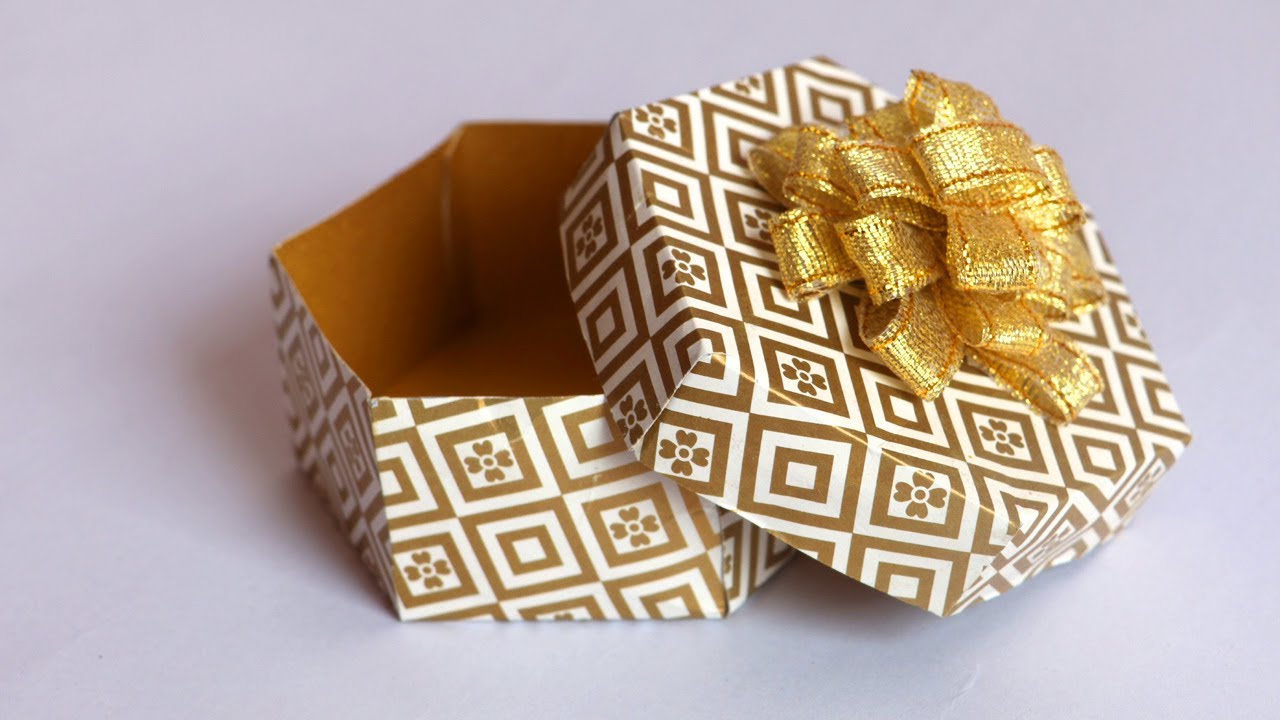
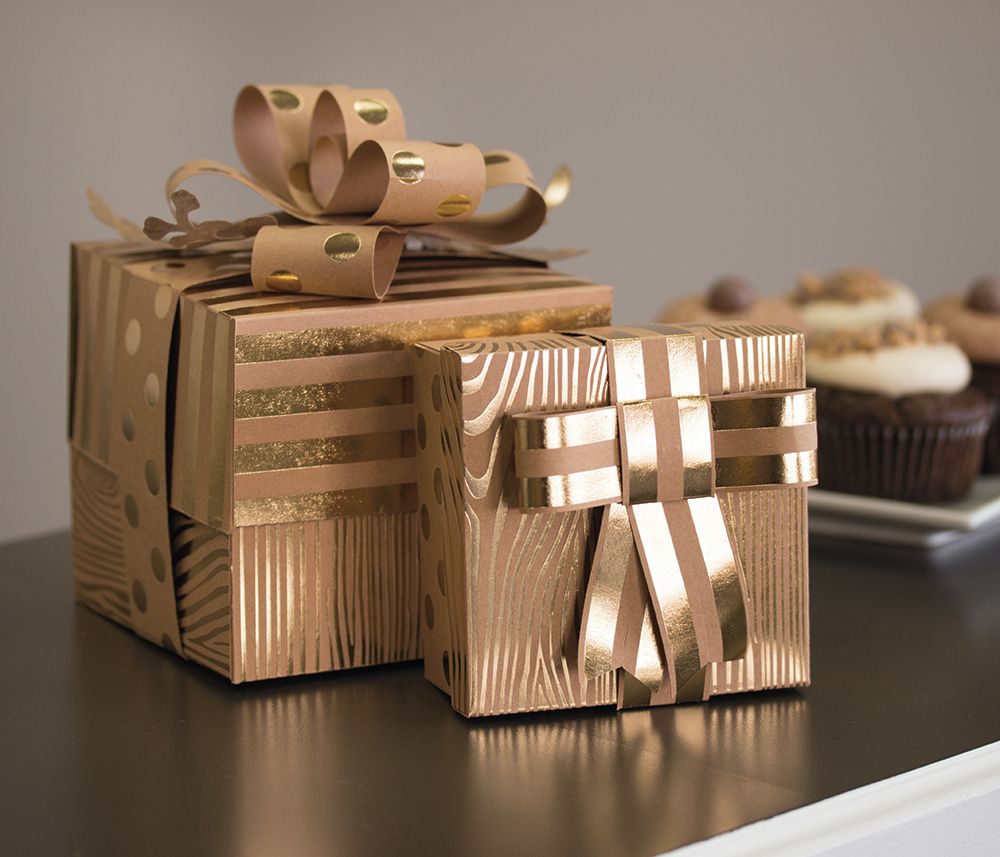
Video: How to decorate a gift box?
Read also on our website:
- Paper flowers for decorating the hall-tips, master classes, ideas for inspiration
- Envenue for "open when" with your own hands
- Origami from money with your own hands: scheme, video, photo
- DIY phone case - ideas, tips
- Board of desires, visualization correctly with your own hands: template, scheme
- How to make a beautiful shelf on the wall with your own hands: Instructions


