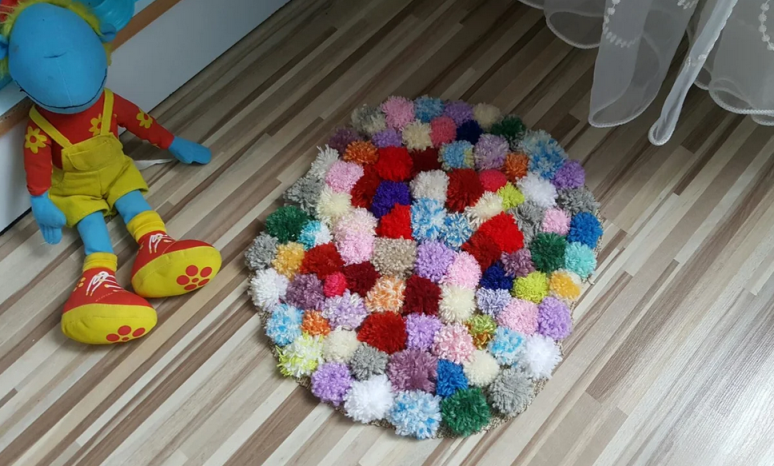
Thanks to master classes in this article, you will learn how to create rugs from old things.
Contents
- Knitted mat with a pigtail from old things with your own hands-how to make: a master class on weaving, photo, video
- Video: 3 outstanding ways, how to make rugs with your own hands
- Video: DIY mat from old t -shirts without hook
- DIY homemade mats from old things-how to sew: master class step by step, video
- Video: Fabric shred mats. Fast and just for the lazy
- Fluffy, beautiful children's rug from old things from pompons: master class, video, photo
- Video: pompons rug
- Knitting a rug from old things with your own hands Crochet: Master class, video
- Video: Crochet a rug from unnecessary things - with your own hands knitted tape
- DIY, home-made homemade rug from old belts-how to make: master class
- Terry round rug with your own hands from old towels-Knitting with your hands: Master class
- DIY original mats from old jeans: master class litter on the floor from jeans pockets
- How to weave your hands woven gang of old things, threads and laces: a master class
- DIY pantyhose mats from old tights: how to do it, video
- Video: How to knit a rug from old tights?
- A circular knitted rug from old knitwear, with your own hands - hook and hands: how to weave?
- A bright rug of patchwork pompons with your own hands - how to make: step by step, video
- Video: DIY pompons rug. Soft mat from fabric. Children's bedside carpet
- DIY soft braid rug of old fabrics: master class, photo, video
- Wicker rug of shreds from old things: master class, video
- Video: DIY shaggy rug
- Video: We knit rugs with our hands without knitting needles and hook
Often, residents of city and private dwellings are forced to change carpets in the house several times a year. The cause of damage can be anything. True, the budget for many is not rubber. That is why people found a way out - to create masterpieces on their own from unnecessary things. How? Below are several examples and master classes. Read further.
Knitted mat with a pigtail from old things with your own hands-how to make: a master class on weaving, photo, video
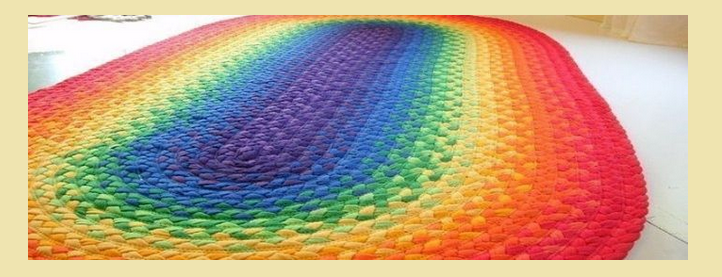
Even those who are far from needlework can do such a product. The technique is quite simple. In addition, the braid allows you to make absolutely any shape of the future carpet. So it all depends on the imagination of the master and the design concept of the interior. This product is created from braids from any cotton or chintz clothing. How to make a knitted rug with a pigtail from old things with your own hands? Here is a master class on weaving:
Materials:
- Wondered T -shirts
- Fat threads
- Scissors
Production technology:
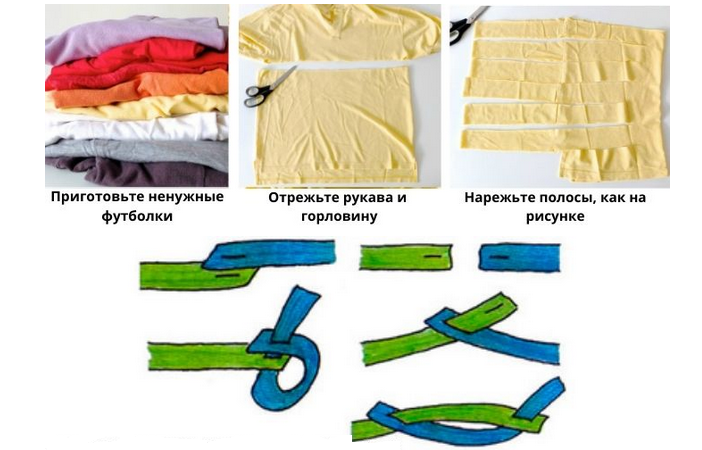
- Training. From clothes, cut a flat piece of straight line. Forms, remove the rest. Make stripes from it (the denser the material, the narrower ones they will). Hand the blanks with your hands.

- Connect the ribbons into the ball (make holes and insert one into one).
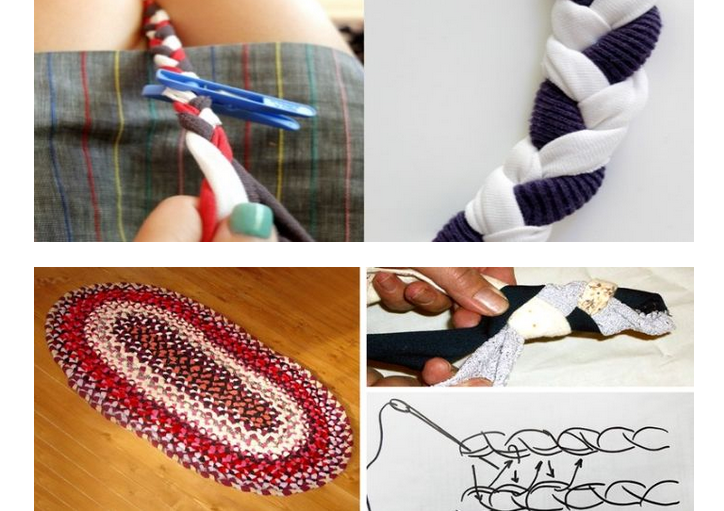
- Start braiding the pigtails like on your hair, as shown in the photo. And at the end of one, fasten the other. It should be noted that for a square (straight -up) rug will require a lot of such blanks.
Next, the capture of the carpet itself begins. There are two variations, depending on the form (oval or square).
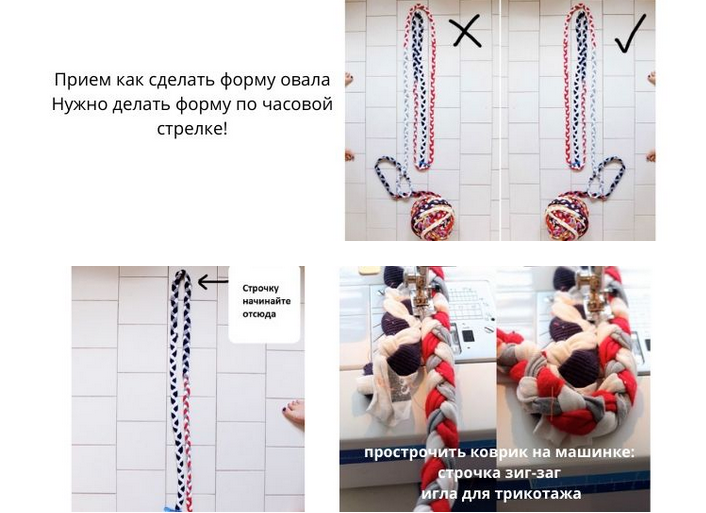
For oval:
- Turn it from the cos in a spiral, tightly pressing the elements to each other.

- Sew the resulting circles from the inside.
For a square:
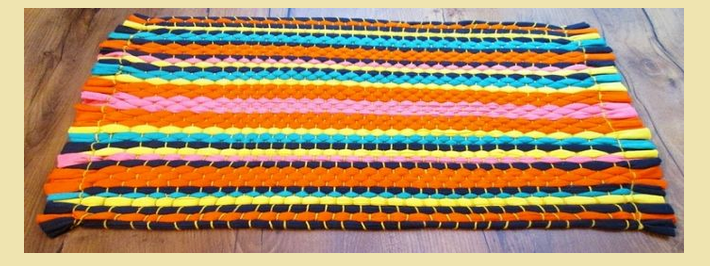
- Here you need a patch.
- Roll up the material and go carefully at the seams.
- Take the braid carefully according to the specified scheme.
The carpet is ready. Make a few of these and lay not only in the bedroom, but also the living room. Look below in the video videos, how the craftswomen weave beautiful paths with their own hands.
Video: 3 outstanding ways, how to make rugs with your own hands
Video: DIY mat from old t -shirts without hook
DIY homemade mats from old things-how to sew: master class step by step, video
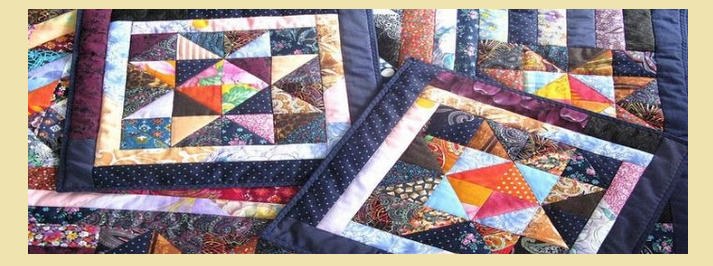
Here is the idea of \u200b\u200bcreating an interior item from patches. Such patchwork sewing of fabric residues or old things called - technology patchwork. In this case, you get a rug that is better to put at your bed on which you sleep. How to sew it? Here is a master class on making homemade rugs with your own hands from old things:
You will need:
- Clean small (identical) fabric segments, or remains
- Basic material (fabric with parameters with future crafts) or building
- Thick colored threads
- Needle
- Pins
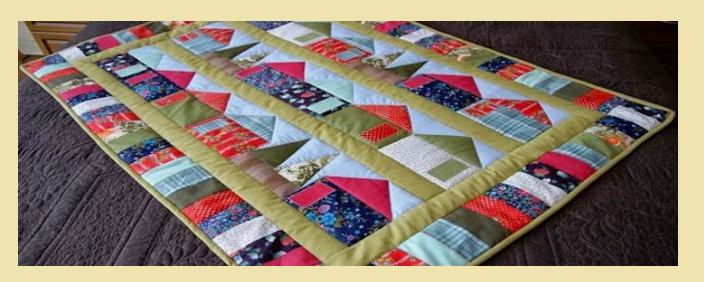
The art of creating:
- Put the base.
- Place evenly fabric pieces on it and pin it with pins.
- Stitch all the shreds. It is best to start with the edges.
- Remove the pins.
Ready, you can use. Above the link you will find many different patchwork techniques. Try to do it yourself. You will definitely succeed. It is beautiful and unique. Watch the video how the craftswoman sews a patchwork rug.
Video: Fabric shred mats. Fast and just for the lazy
Fluffy, beautiful children's rug with your own hands from old things From pompons: master class, video, photo
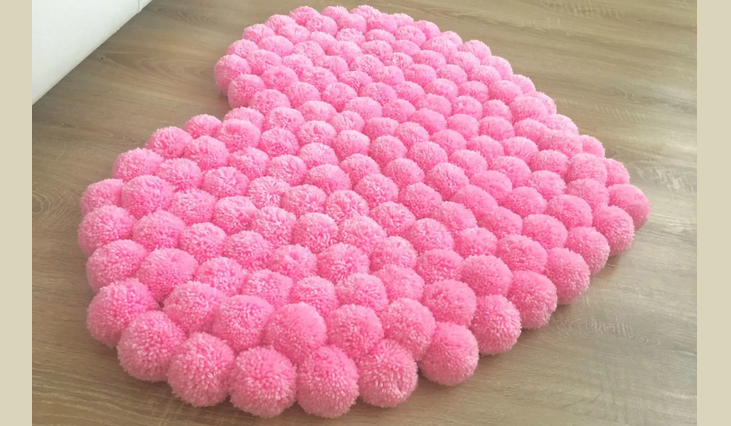
This product is based on threads of threads - pompons. Often old knitted products or tangles of threads simply gather dust at home. The craftswomen found their application, they do surprisingly tender things - the kids like it. You can perform a plain mat if you have many threads of the same color, or you can weave from different shades. See how interesting it looks:
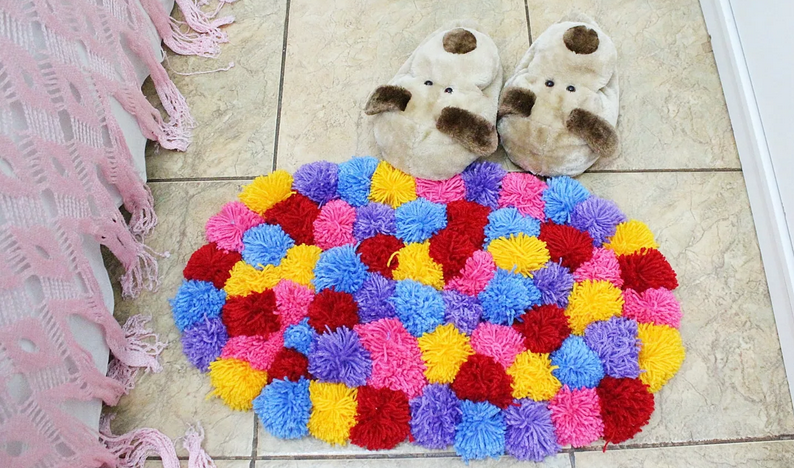
So, here is a master class on making a fluffy, beautiful children's rug with your own hands from old things from pompons:
Here's what you need:
- Yarn
- Scissors
- Building or a special litter of rubber with holes
Production technology:
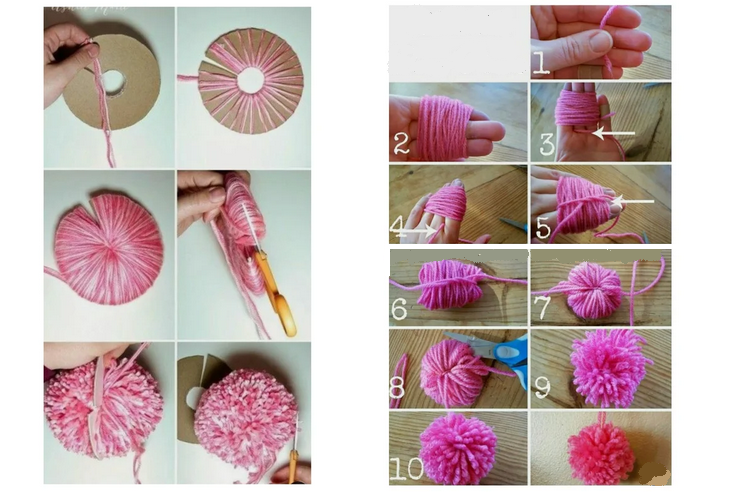
- Perform “fluffs” by one of the methods, as in the photo above: tightly wrap the thread in the palm of your hand or sleeve. The larger the diameter of the sleeve, the thicker wrap it.
- Prepare another thread for dressing.
- Gently remove the layers from the fingers. Die and make a strong knot.
- Cut the ends on both sides.
- Do the points 1-4 several times.
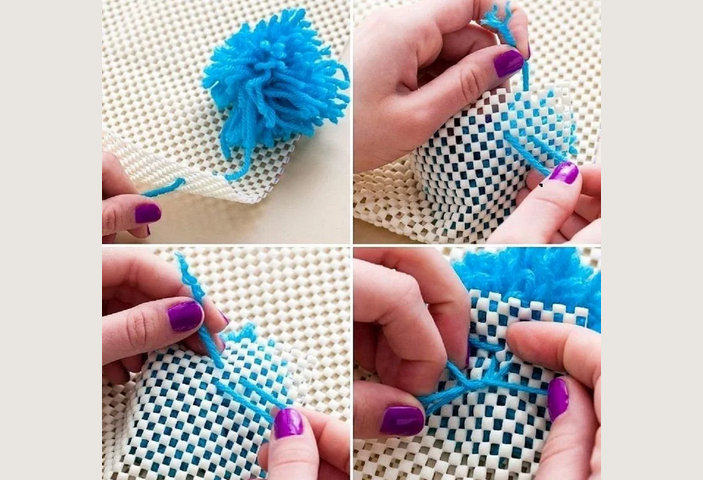
- It remains to wrap them to the openings of the grid. Cut the extra strings.
- For strength, glue the threads to the base on the back.
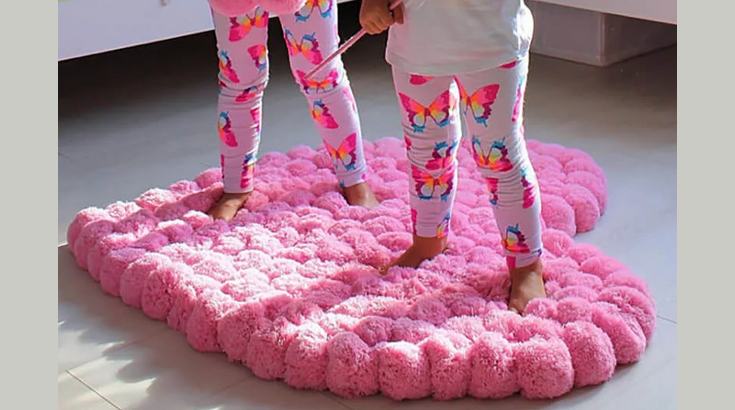
The product is made and prepared for use. Watch the video how the needlewoman makes such a product.
Video: pompons rug
Knitting a rug from old things with your own hands Crochet: Master class, video
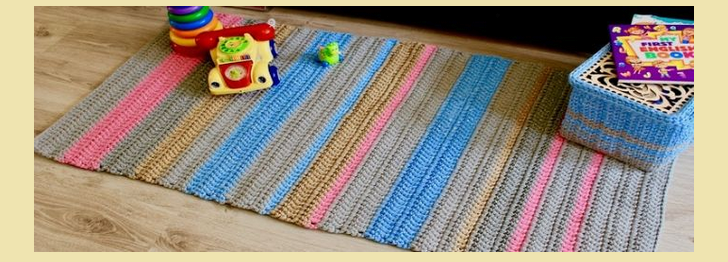
Fully unnecessary things are used here. Knitting such a product is simple. It will be a great addition to interior design and, besides this, you can get rid of trash. Here is a master class on knitting a rug from old things with your own hands Crochet:
Here's what you need:
- Stone knitted things
- Hook for knitting
- Special adhesive tissue gel
Do this:
- Cut things into ribbons width 1.5-2.5 cm.
- Create threads from shreds, stretching the ribbons with the help of hands.
- Turn into a glomerulus. You can take thick threads from a well -worn and already loose sweater or other little thing.
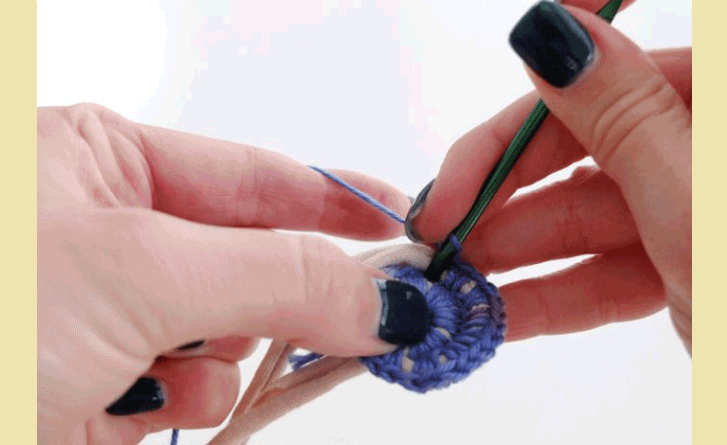
- Using the hook, start knitting: pick up a chain, click, make a row pillage. With nak. In each Pet. (should turn out a semicircle), then tie it.
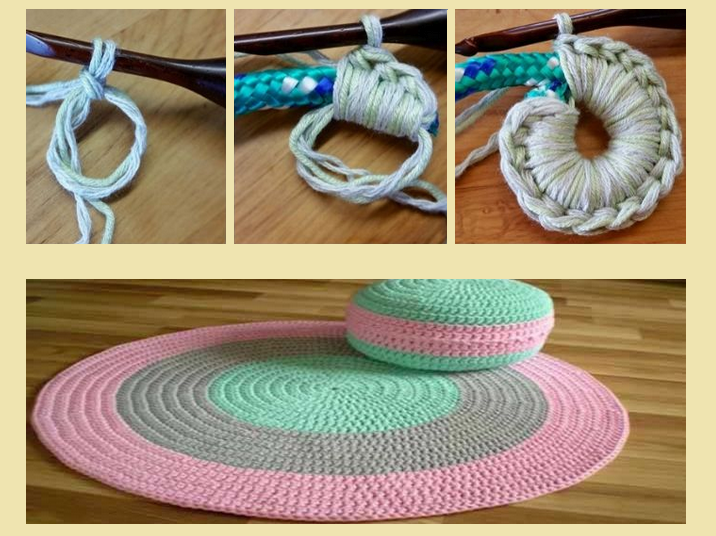
Beginning in knitting will be very simple. Watch the video below - everything is much easier than it seems.
Video: Crochet a rug from unnecessary things - with your own hands knitted tape
And if it doesn’t work out, do not be upset. After all, there are many more ideas for creating your own rug. Read further.
DIY, home-made homemade rug from old belts-how to make: master class
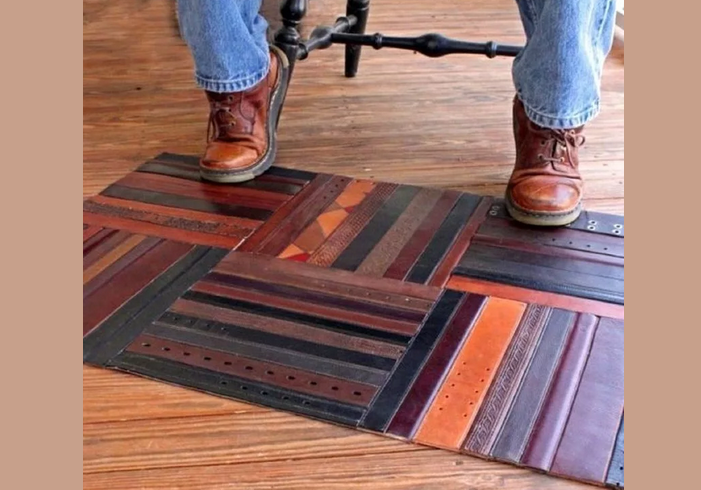
See how the decor looks unique. The basis for such beauty is belts. Who would have thought that they are ideal elements for decorating, which will perfectly decorate the interior. How to do it? Here is a master class on the manufacture of a gender home-made rug of old belts with your own hands:
Materials:
- 10-15 belts
- Awl
- Dense rope (can be changed to twine)
Technology - do this:
- Prepare the main elements: remove the buckles and align the length (it should be the same for everyone).
- Along the edges of each, approximately retreating 2-3 cmMake holes.
- Sew along with the help of an awl and ropes.
The rug is ready. It is better to put it into the corridor or on the loggia.
Terrier round rug with your own hands from oldtowels-knitting with hands: master class
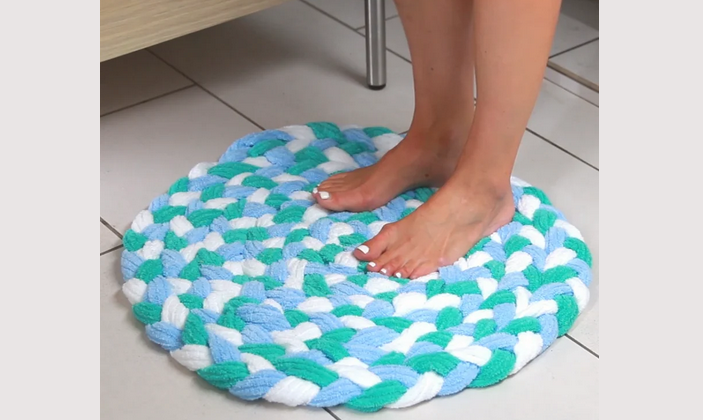
The towels used for many years can also be a unique material for decorating a bathroom, kitchen or living room. Over time, the fabric wear out and becomes soft, suitable for crafts. You will make such a little thing in a couple of hours - simply and quickly. Here is a master class on the hands of a terry round rug with your own hands from the old towels:
Would need:

How to do? The technique is simple:
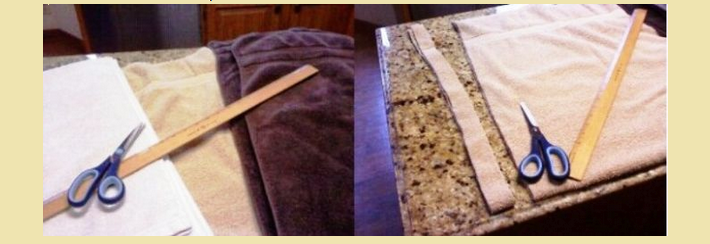
- Cut the ribbons width 3 cm.
- Attach 3 strips different shades.
- Send them at the beginning for better attachment of the future pigtail.
- Make an interweaving.
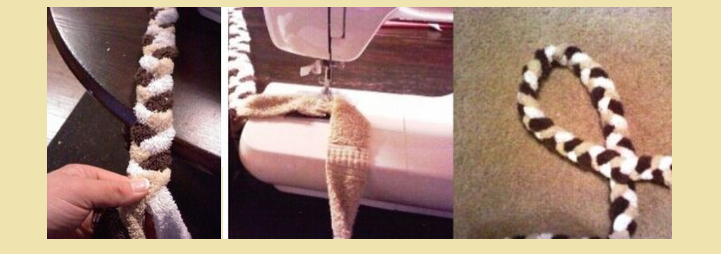
- How the stripes end, go again. As a result, you get a long braid of used towels.
- Wrap the spiral.
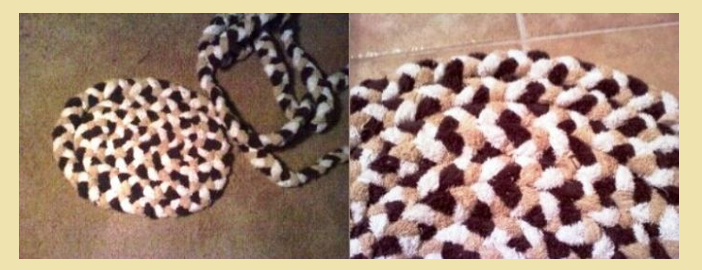
- Sew the resulting circles from inside.
The product is ready. By the way, it is convenient to use it as beds for four -legged pets.
DIY original mats from old jeans: master class litter on the floor from jeans pockets
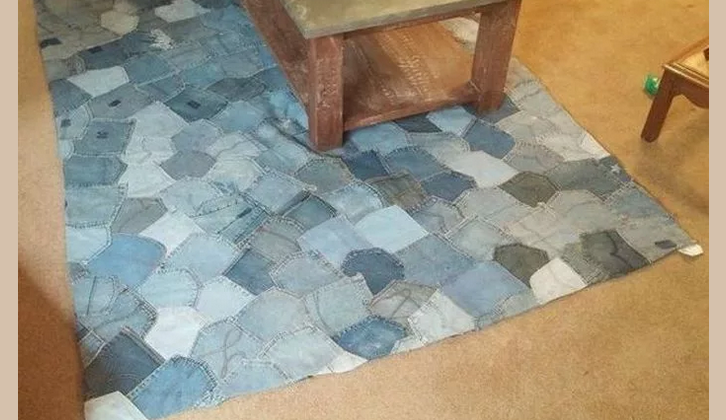
Another original idea. In the world, probably there are no people who would not have jeans in the closet. However, an unnecessary thing does not want to give or take it to the trash. And do not do this, pockets from them can become the basis of the future masterpiece. You will get an original mat with your own hands from old jeans. Here is a master class of litter on the floor from jeans pockets:
Here's what to prepare:
- The basis is the used rug, builds. mesh or special frame
- All worn jeans trousers
- SHV. Machine
Technology:
- Cut or reproach the rear pockets from all things. If they are not, then they can become an alternative - flaps from this clothing.
- Put the elements on the base.
- Stitch.
Ready, there are many options for creating a product. It all depends on the capabilities of the needlewoman.
How to weave your hands woven gang of old things, threads and laces: a master class
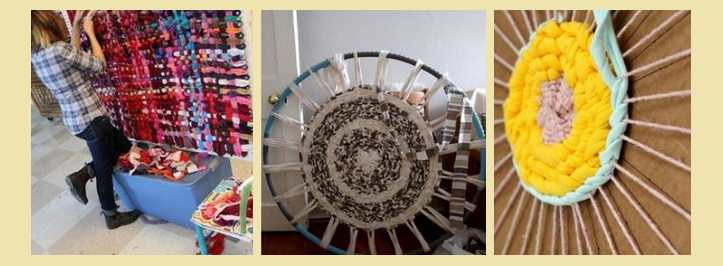
This rug is great for any space. The simplest technology and unique design. How to weave with your hands a woven gang of old things, threads and laces? Here is a master class:
Materials:
- Cardboard circle
- Circle for the waist
- Hula Hup
- Scissors
- Multi -colored balls of threads
- Laces
- Worn -out yarn
Technology:
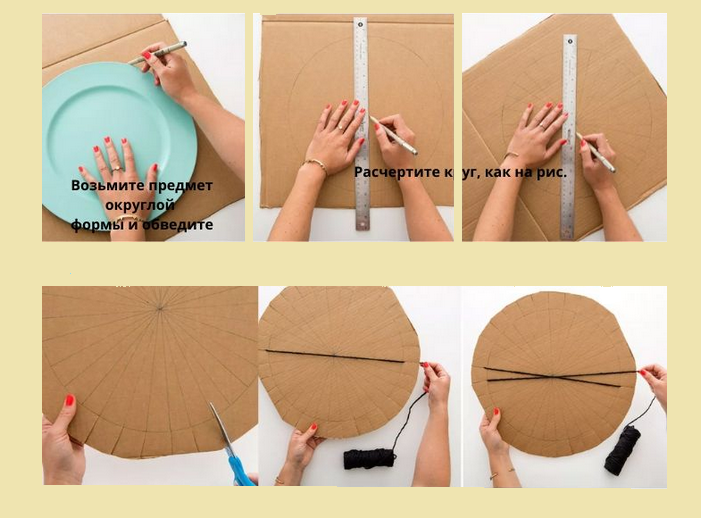
- Prepare the shape of the cardboard and make the marking according to the scheme.
- Alternately through the cardboard, pass the threads.
- Then do the same with circles.
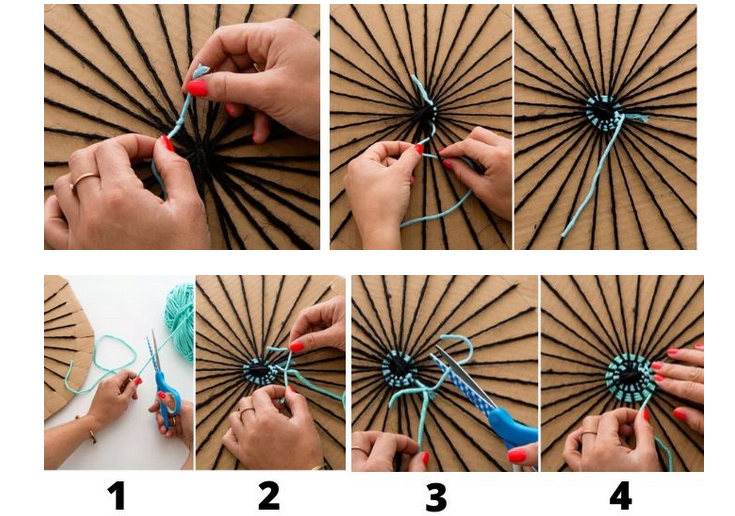
- Continue weaving alternating threads and rings.
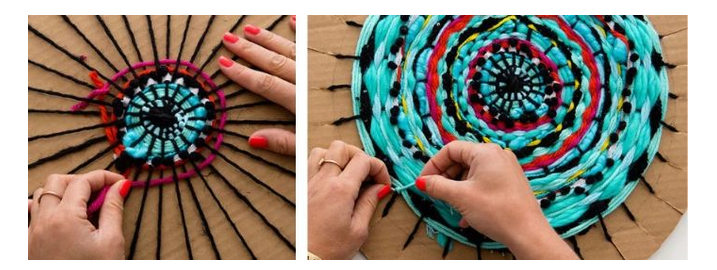
The rug is ready. By the way, they can beautifully decorate the wall.
DIY pantyhose mats from old tights: how to do it, video
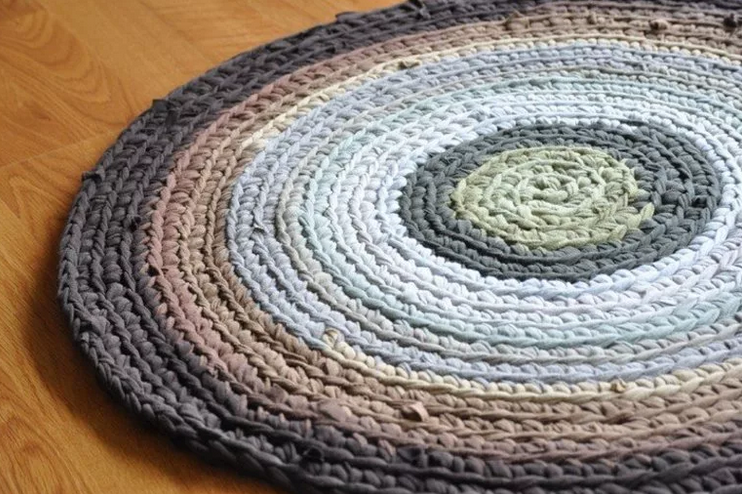
In this case, tights become the basis. Kapron things are important items in the wardrobe of every representative of the fair sex. Only now they have one drawback: they instantly break and lose their beauty. However, for ruling, this is the other way around the plus. How to make a mat from old tights with your own hands? Here's how to do it:
Prepare:
- Tights
- Scissors
- Threads and needles
Technology:
- Party and dry the tights.
- Cut the top (shorts) and nasal element.
- Turn the rest in half.
- Cut into pieces 3-5 cm. Get out a little.
- Fold the tape in the ring. Wind around the fingers eight. Do the other in the same way.
- Weave the loops.
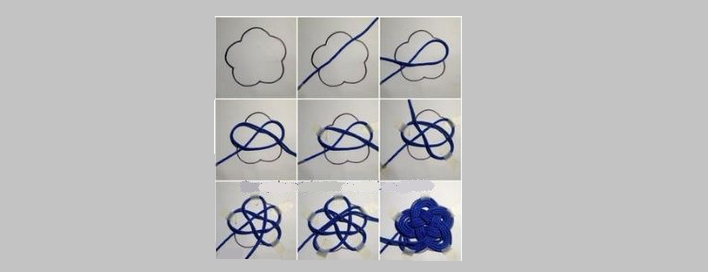
- Twist in a spiral.
- Go threads.
As a result, a unique and soft interior decoration is ready in a short period of time. Watch the video below. In it, the craftswoman weaves such a product and tells everything in detail.
Video: How to knit a rug from old tights?
A circular knitted rug from old knitwear, with your own hands - hook and hands: how to weave?
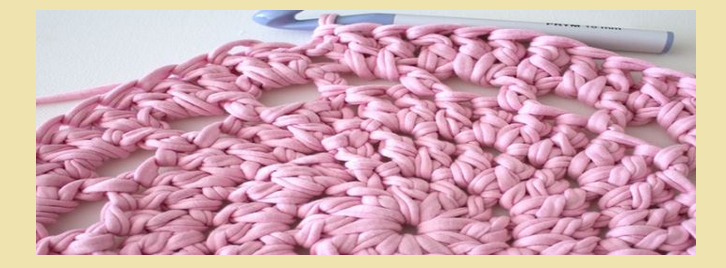
Another variation of decor from worn gizmos - T -shirts. Technology: Crochet and with its fingers. Moreover, only the ability to recruit is needed. loops and make a pillar. crochet. How to weave a circular knitted rug from old knitted things with your own hands? Here's the instruction:
Prepare:
- Ribbons from worn things
- Hook
- Scissors
Technology:
- Make threads - stripes of cut worn things. Tie and wrap in a glomerulus.
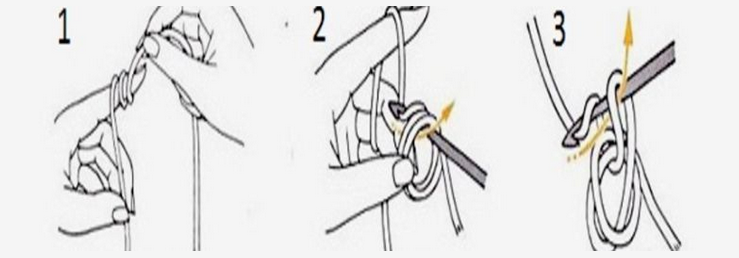
- Perform the 1st ring by wrapping a ribbon 3 times Around the fingers.
- Remove the thread, and insert the hook into the resulting pass. Pull the slave. a thread.
- Pull the yarn - you will get freedom. Loop
- Stitch 11 poles. crochet.
- Next in each loop, knit two s/n.
- Again increase the amount by 12 loops.
- Combination: 1 pillar. crochet, 2 Pet., Skip 1 column., 1 column. crochet. Continue so further.
- Further, 2 rows by analogy with the initial.
- In the next, repeat the 8th point.
- Continue to do up to 18 row.
- Make the jewelry at the end: 1 lifting Pet., Pass 2 column., 6 column. crochet. For the end, weave a half-stop into the lower Pet., Passing a pair of Petes.
That's all - the rug is ready.
A bright rug of patchwork pompons with your own hands - how to make: step by step, video
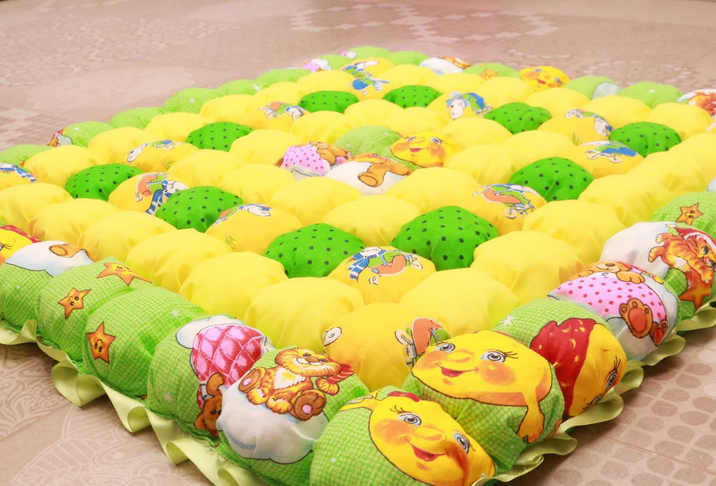
Another patchwork variation. Many needlewomen with the help of this method create children's blankets and bedspreads. Let's make a rug in the children's room today. Be sure to be bright and soft. How to make a patchwork rug with your own hands? Here are the instructions step by step:
Materials:
- Old bright knitted things (even old diapers are suitable)
- Base - compacted fabric, cardboard
- Scissors
- Needle
- Threads
- Glue gun
- As a filling - old pillows, blankets or jackets
Manufacturing technology:
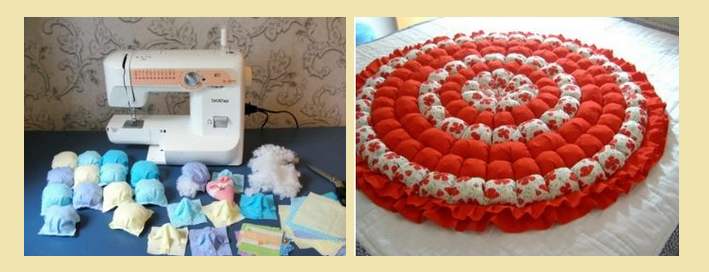
- Perform a mug from the matter, more than the necessary parameters of future “balls”.
- Stitch the prepared elements in a circle.
- Place the filling in the middle and pull the thread.
- Similarly, do these manipulations for other "balls".
- First, glue the resulting balls to the base, and then sew for reliability.
You will get a cloud -shaped rug. In structure, it is very light.
Video: DIY pompons rug. Soft mat from fabric. Children's bedside carpet
DIY soft braid rug of old fabrics: master class, photo, video
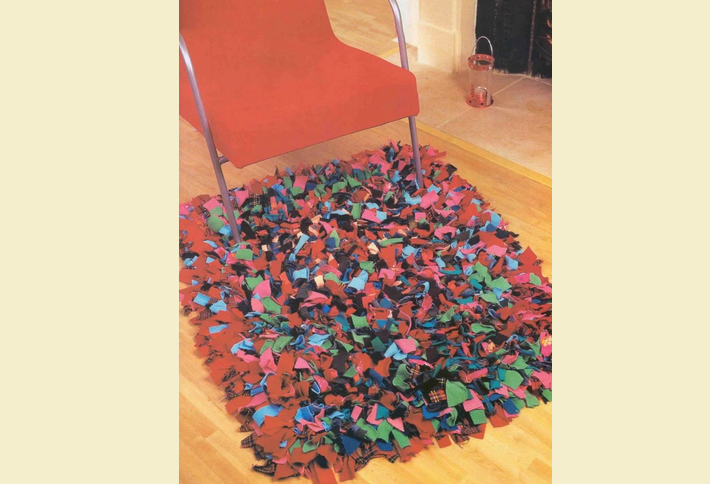
Another simple option for beginner craftswomen. Here is a master class on making a soft wicker rug from old fabrics with your own hands:
Prepare:
- Rubber rod with holes
- Scissors
- Old things
Technique:
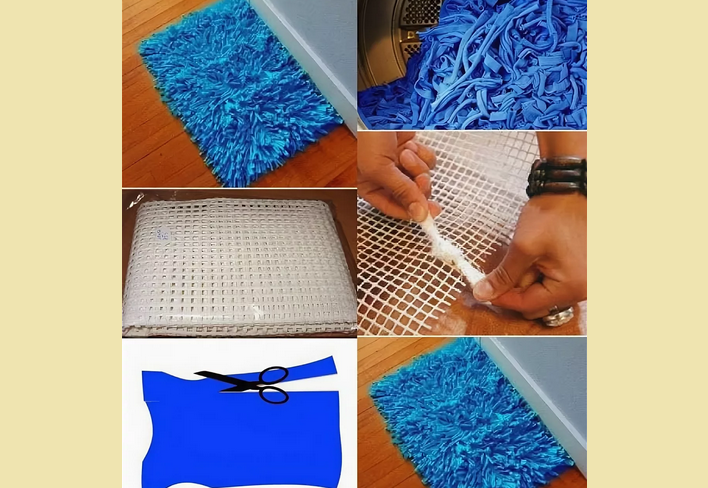
- Cut the old worn clothes into shreds.
- Spend the fabric strips through the holes at the base. Now take the tweezers and with it pull the ends. Ordinary eyebrow tongs or a knitting hook will also help to do this.
- Tie the knots.
The original rug is ready.
Wicker rug of shreds from old things: master class, video
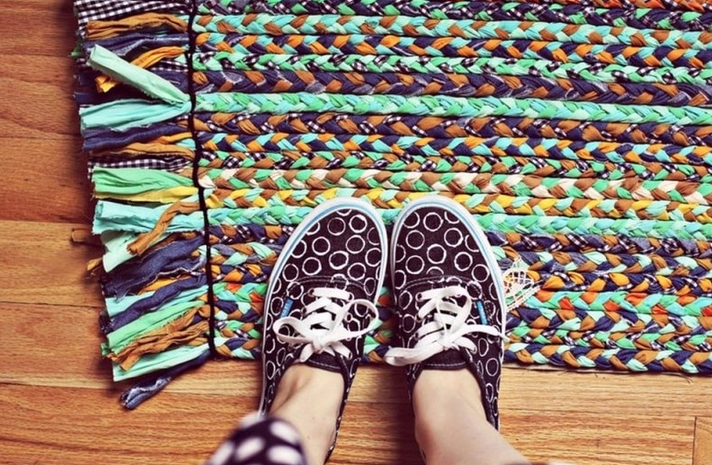
Another glossy version. The rod is simple, but looks very unique. Here is a master class of such a wicker product of shreds from old things:
You will need:
- Black threads
- The basis for the carpet
- Pieces of fabrics
- Needle
- Scissors
- Special glue for fabric
- Glue tape
- Protective aerosol (optional)
Execution technology:
- Prepare the basis of a suitable size.
- Cut the stripes from matter. They should be longer on 6-7 cm The main part of the basic coating.
- Make the beams on 3 elements. Start weaving pigtails. Fasten the ends with adhesive tape.
- Dimmer with glue on the base.
- Put the blanks on the base coating.
- Fix them with needles and threads.
- Remove the adhesive tape and cut exactly the ends.
The rug is ready. Watch in the video another option for making a beautiful shaggy rug.
Video: DIY shaggy rug
Do not rush to give unnecessary things to other people or completely throw it away. Perhaps they will come in handy in the future to create their own rugs. The main thing is fantasy, accuracy and perseverance, and then old things will sparkle with new bright colors. Good luck in creativity!

