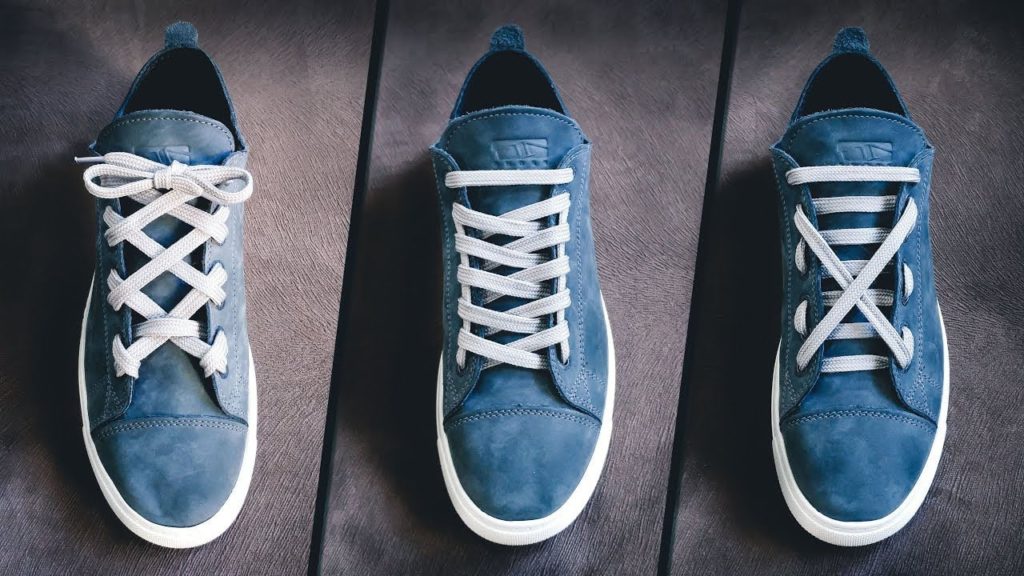
For many decades, sneakers have not gone out of fashion - this convenient practical shoes have been loved by absolutely everyone, and for quite some time she ceased to be an attribute exclusively athletes. Literally everything began to walk in the sneakers - both youth and people of respectable age, and if earlier they served mostly for hiking or suburban rest, now the designers have created such a diverse models of sneakers that they began to fit organically in the evening and in business style clothing.
Contents
Undoubtedly, these shoes are very comfortable. But there is always a certain “spoon of tar in a barrel of honey”, it may happen that at the most inopportune moment the shorish sneakers will untie, and this will lead to some embarrassment moments. To avoid such troubles, let's move away from the traditional way of tying laces on a “bow” and learn to do this in a completely different way. Believe me, it will look fashionable and stylish, and walking in them will be absolutely safe.
15 ways to tie laces on sneakers
- As you already understood from our subtitle, there were quite a lot of methods of tying laces. Make diversity in your style, trying to tie your shoes in different ways.
- How to do it? Yes, very simple! We will tell you about this in stages. So, try to tie the laces on the sneakers sneakers with the indicated methods.
Grate
It has become fashionable to bind the lacing with a “grille” - it looks pretty if your shoes have six or eight lacing holes.
So, we take for the "lattice":
- The tips of the lace must be put from the inside into the lower cells.
- Followed by crossroads They are introduced outside into the 4th slots.
- Remove one tip through the second hole from the inside along the same edge of the lace row, and then from the outer part - in the fifth.
- The other end of the lace must be done from the inside of the sneaker through the second hole along the same edge. Next, draw it from below the lacing that formed the first cross, and insert it into the fifth hole opposite.
- The first end is to pass the third cell (ibid., Inner part). Then pass it over the first cross and below under the second, insert it into the 6th cell, moving to the other side (inside).
- Half of the battle has been done! Now it remains to do the same manipulations with the second tip and tie a knot.
Spider Web
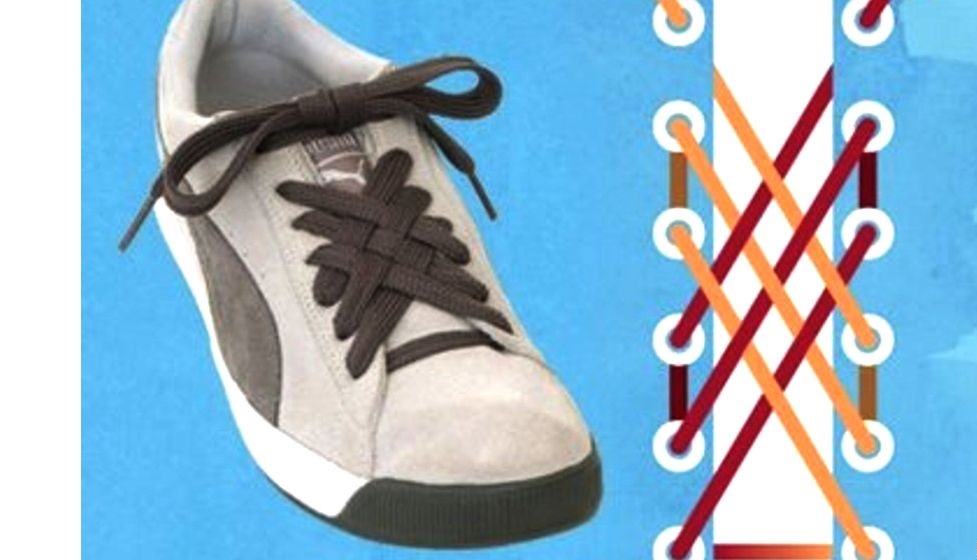
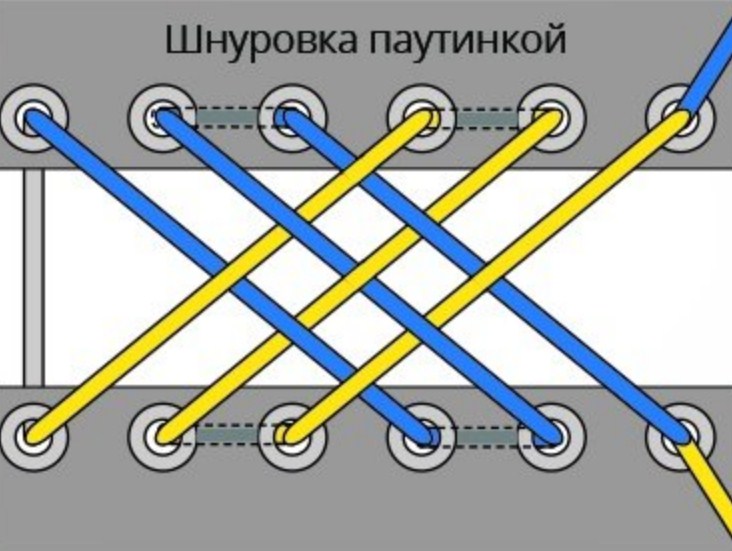
- The web has just a beautiful view, and even with a long wear she retains its shape. This lacing is not easy, but if you manage to do it, then in this case your sneakers will comfortably and tightly sit on the leg.
- Put the lace along the inside of the sneaker through the second pair of holes.
- We go through the first pair of holes on the same side on top.
- Cross and skip According to the inside through the third pair of cells. The lacing will fall with a cross, which should be on top of the first longitudinal stitches.
- Pass under the first loops, cross And stick along the inside in the 4th pair of cells. All subsequent crossings should be performed on top of the previous ones.
- Pass under the second pair of stitches and stick from the inside in the fifth pair of cells on the other side. In the same way, do with a couple No. 6.
Direct lacing with shortened tips
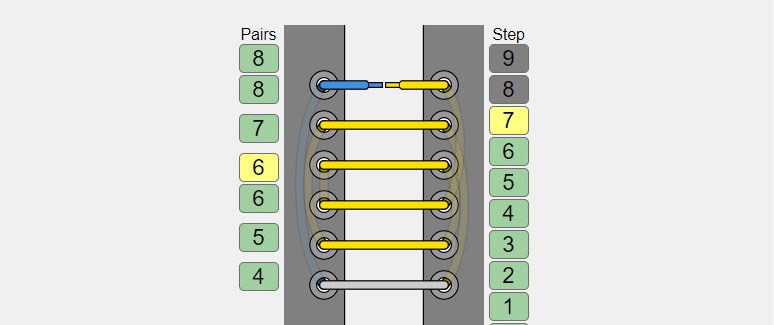
- Such a lacing - direct lines, internal zigzag are absent. It may be suitable for sneakers with an even number of instant ills, otherwise it will not look very organic. It is enjoyed by the military, extremals and athletes, since when you get an injury, direct lacing is quickly cut, and the shoes are easily removed from the leg.
- Pass the lace on top through the lower pair of holes, leaving one of the ends longer than the second.
- Without changing the side Pass the shorter tip of the lace through the sixth hole - this must be done on the inside of the boot. At the same time, a small end will remain free - so that with its help, a bundle of a bundle will subsequently begin.
- The second end, longer, pass through the fifth hole on the inside of the boot, and from the outer - through the pair to it - on the other side.
- In the same way - at first on the inside, without changing the sides, and then - on the outer side of the other side to draw the tip of the lace through the second, fourth and third pair of holes.
- Pass the lace on the inside of the boot through the sixth hole, without changing the side, and tie up with the second end with a knot.
Double multi -colored lacing
- If you plan to use this particular lacing method, get four laces to start - two of them should be of the same color, and two - the other. It is desirable that the colors are contrasting, and the laces themselves are not long to make the bow on the eyeballs not too big.
- First you need to insert the first pair of laces from the inside of the lower holes. Having crossed, pass through a couple of third holes.
- Repeat the same with the second pair of laces, but you need to insert them into the second pair of holes, and crossing them into the fourth.
- After crossing the first laces, walk along the inside through the fifth pair of holes.
- Make the same manipulation with the second pair of laces, but extinguishing them through the sixth pair of holes.
- As a result, four lacing ends will appear, which can be tied with one creative knot or make a couple of ordinary ties from them with a “bow”.
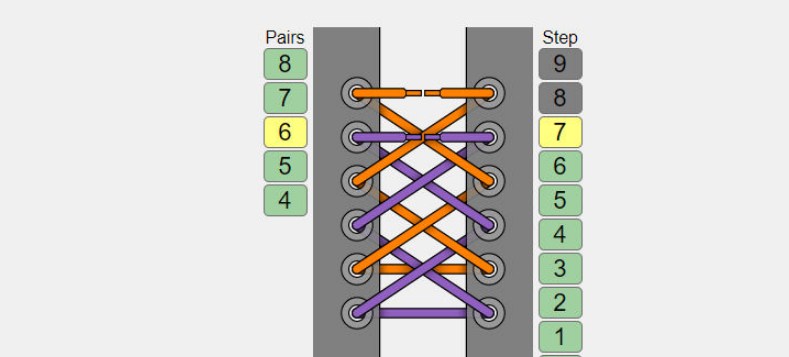
Wide crosses
- This lacing is delayed and weakened with difficulty. If you often take shoes, then you should not use in this way. But the advantages of this lacing include its original appearance.
- Insert the lace into the first pair of holes using the outer part of the shoes.
- Cross and walk along the inside through the fourth pair.
- Make another overlap and skip through a couple of third holes along the outer part.
- To bring both ends of the lace under all the stitches of the lacing, throw them crucial and pass along the outer part through the sixth pair of holes.
- Tie a knot.
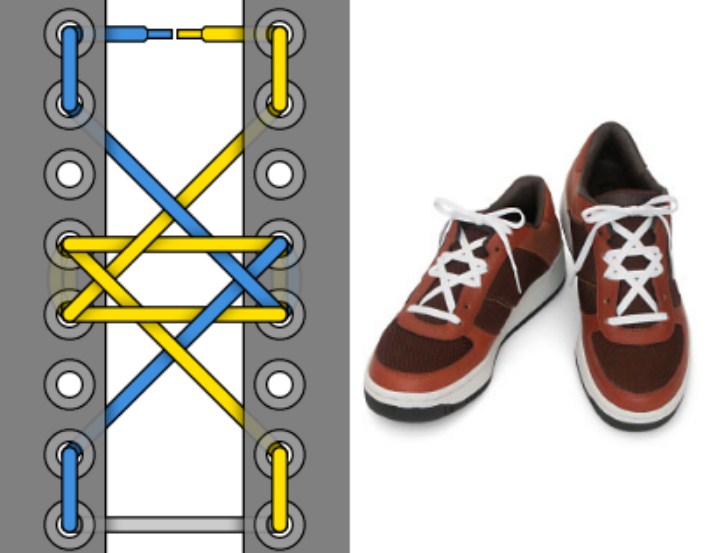
In the form of a hexagram
- It cannot be blocked very tightly. The leg in such lacing will be free, but her appearance is super original, because her units are used. Try this method both you and you will have a chance to be known as a real fashionista.
- Insert the lace along the outer part of the sneakers in the first pair of holes.
- In the outer part, how to pass the ends of the lace in the fourth pair, having previously made a overlap.
- Insert the lace into the third pair of holes using one side (its inner part).
- The first end of the lace to draw on top of one edge of the first cross, and after this manipulation, bring it under the second intersection and pass it into the third hole along the outer part opposite.
- The first end to pass through the fourth hole along the inside of the boot, then through its pair on the other side (the already outer part of the shoes will be used here), and then you should pass it through the third hole (inner part). With properly executed all these manipulations, the ends of the lace should hang from the slots located in the third row.
- Make a overlap from the ends of the lace, having carried out one of them under the first intersection, and put on the longitudinal stitches into the sixth hole from the inside. Put the remaining end over the first cross, under the horizontal stitches and over the first end, and insert the edge into the sixth slot (use the opposite edge).
- If you want to be known as original, certainly use this way.
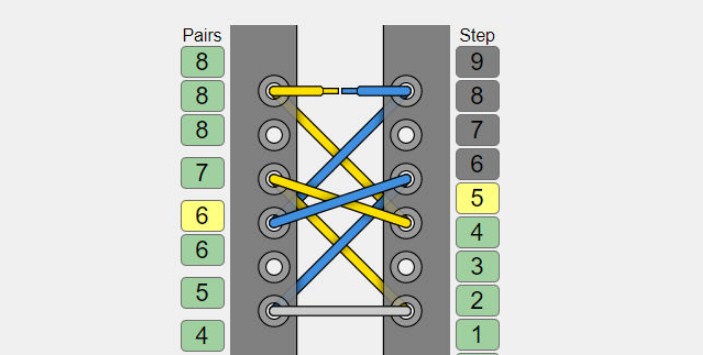
With a pass
- Such lacing allows you to remove the load from the rise and unload the ankle as much as possible. This species is perfect for those who have a high rise.
- Insert the laces in the first slots from the inside.
- Overwhelm them and stick Through the second slots, again from the insideThen make identical manipulation with the third slots.
- Skip the ends of the lace through the fourth slots outside, make overlapping And put from the inside in the fifth slots.
- In the last couple of slots, dry the laces identical.
- If you want to slightly release your leg, then you can "jump" through two rows of slots. In this case, instead of overwhelming on the fourth row, let the ends from the inside of the boot (without switching to the opposite). Rising two stitches up, make an overlap.
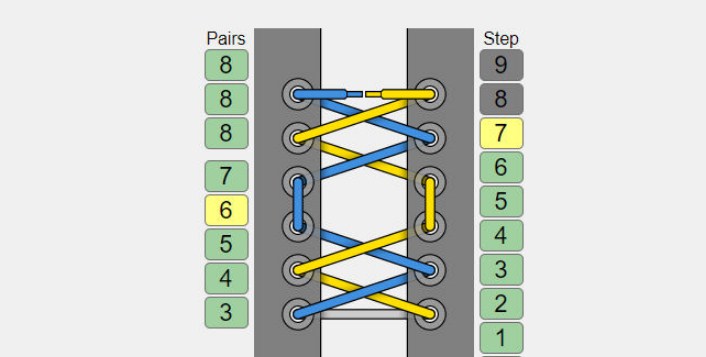
Camping
The lacing levels the load on the limbs, observing safety precautions - no extraneous objects will be able to cling to the laces, since they are located on one side of the boot.
- Sin the lace through the lower slots from the inside of the shoes.
- In the second slot on the outside, located on the same side, and then in its pair with the opposite side (use the inside of the shoes) in the second cut.
- Next, no need to change the sides. Insert the first tip of the lacing in the fourth slot (along the outer part).
- The second end to go outside through the third slot located along the same side part, and then through the third opposite.
- From the inside, skip the first tip of the lace to the other side, putting it there in the same place in a row, then in the steam room - on the other side of the inside.
- POST In the fifth slot The other end of the lace, using the outer part, and then let it through another paired slot from the inside.
- After such manipulations, the tips will come out on one side, they will hang from the fifth and sixth slots. It remains only to tie them with a knot - and you are ready for the campaign. You can do this in two ways. The first is usually used by experienced tourists for foot transitions, when the knot is tied from the inside, then you do not catch on branches and branches with laces.
- But if you decide to do bicycle sports, then in this case the knot should be tied outside - then you will not cling to the pedals.
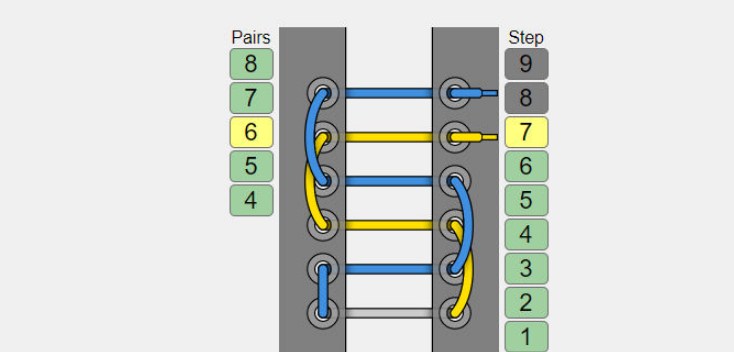
Staircase
- Such lacing is very reliable due to its strength. It is convenient to fasten tourist boots and skates with it, but tightening it is not as easy as it would seem.
- Skip the lace along the inner edge through the holes located at the very bottom.
- Pour the ends along the outer edge in the second pair of holes.
- Make an overlap on the inside, put them under the first stitches, and then stick the ends in the third pair of holes.
- Again, make a overlap of the laces along the inside, and now the second end will be upstairs.
- Under the second stitches, put the ends of the laces and stuck in the outer part into the fourth pair of holes.
- So lace to the end.
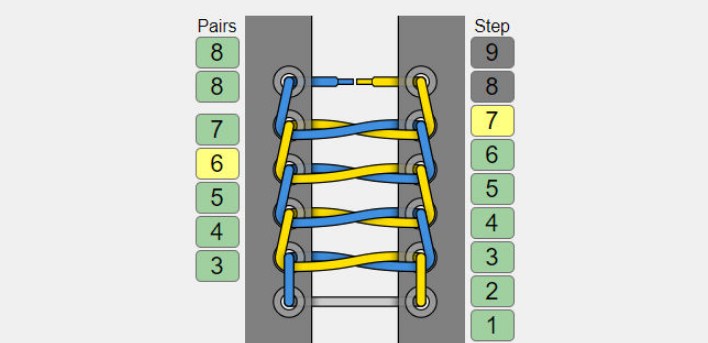
Nodal
- For light tightening and dense fixation.
- Insert the ends of the lace into the first pair of holes along the outer part.
- Tie an ordinary bundle and walk along the inside through the second pair of holes.
- Continue to lace in the same order to the very top, while tie the nodes on each pair of holes.
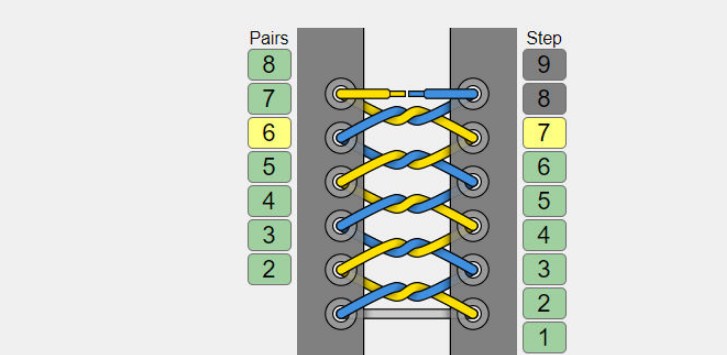
European line
Such a lacing is usually used when they put on shoes with edges that are close to each other. Shoes with a large gap will allow you to see not only external lacing, but also an internal zigzag, and it will not look very aesthetically pleasing. For such lacing are perfect, for example, Oxfords
- Skip the tips of the laces along the outer part through the lowest cells.
- At the inside of the shoes, one end to go through the second slot located on the other side. And then throw it on the opposite side and put it on the outside into a pair of slot.
- To do the same manipulation with the remaining end, only you need to skip it through a third couple of holes. Next, the same scheme works: the first end is found in the fourth slot, and the second in the fifth.
- Make an overlap of the ends, and then pass them from the inside of the shoe through the sixth pair of holes.
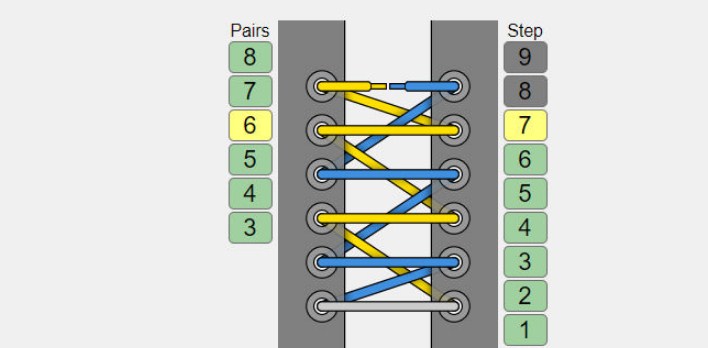
Lightning
- With this method, lacing is similar to lightning - it is creative and unusual.
- Insert the ends of the lace in the first pair of slots, which is closer to the leg.
- At one end, pass the lace along the outer part through the sixth slot on the contrary.
- The second - from above through the second cells opposite, and then pass through the third on the inside on the same edge.
- From the side of the tongue separated from the tongue, let the second tip through the second hole located opposite, and then through the third (on the same side).
- Continue to lace in the same sequence to the very top of the shoes - the second end of the lace should exit the sixth hole.
- After all the performed manipulations, you will only have to tie a knot.
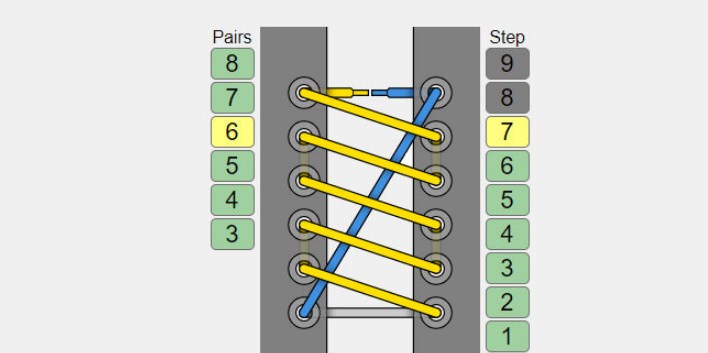
Railway lacing
- Such a lacing has some similarity with rails and sleepers - hence its name. Since it often crosses, due to this it becomes stiff, and therefore the shoes are perfectly held on the leg.
- On the inside of the boot, let the ends of the lace through the first slots.
- Pass the outer part through the second pair.
- Make the ends of the lace with the ends of the lace and put on the inside in the same second pair.
- Pass the ends on the outer side of the third pair, rewind them and insert them again into the same pair of holes.
- At each overlap in front, one or the second ends will be provided.
- When the lacing reaches the end, tie it with a knot.
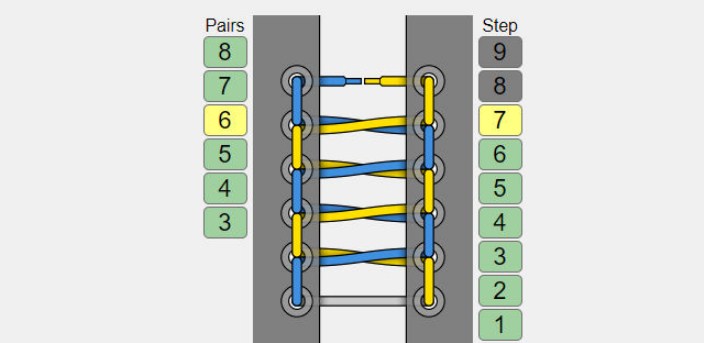
Snake
In this twisted lacing, you can really see a kind of "snake". She has an unusual look, and shoes with such lacing will be perfectly stayed on her leg, but it is not easy to tighten her.
- From the inside, go through the ends of the lace through the first pair of holes.
- Skip them along the outer part, make a overlap and insert from the inside into the second pair of holes.
- Put the ends under the first cross, rewind them in such a way that there is another tip at the top, and put in the third pair of holes along the outer part.
- Having gone all the way, you should put the tips under the previous cross, and then tie them with a knot.
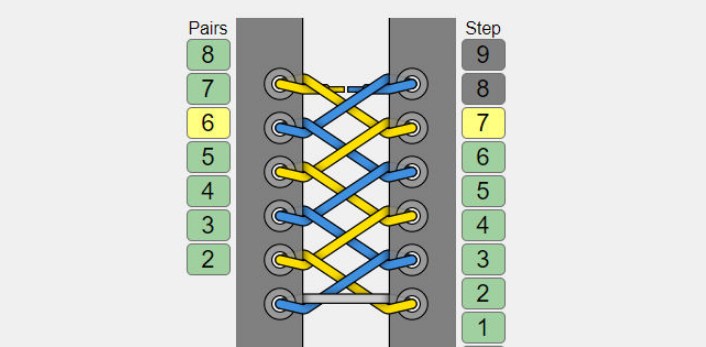
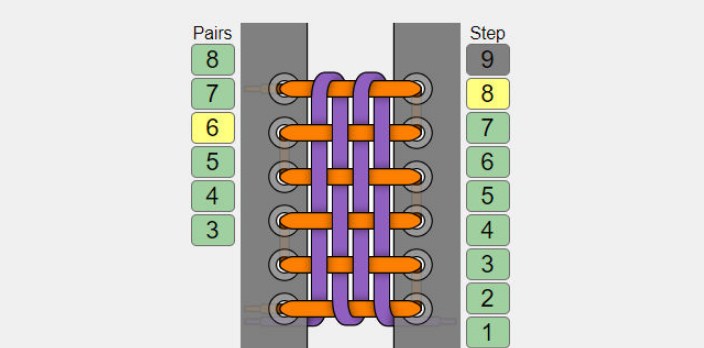
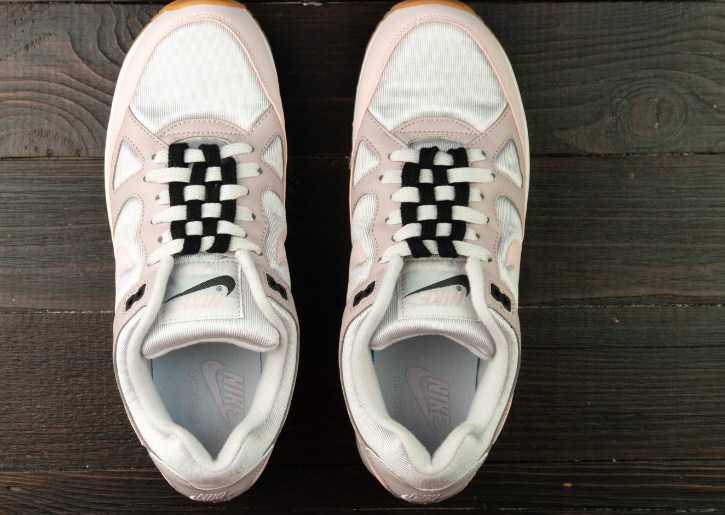
Chessboard
In this method, two laces of different colors are used - they should be flat and wide. With such a “chessboard”, your shoes will look beautiful and unusual.
- Take the first lace from the inside in the pair of the lowest holes. Since we need to make only a knot from one end of it, it needs to be left short.
- The second end will go into business. On the same side, it should be passed from the wrong part of the shoes through the second hole. Then - according to the outer - through the steamed slot on the contrary. In this algorithm, lace to the end. The tip of the first lace should be on the same side of the shoes with which the lacing began.
- We take the second lace - its end should be placed near the end of the first lace at the lower hole.
- Then it will need to be drawn either at the top of the line of the lace, laid earlier, then under it, as if creating the chess cells - this should be done to the upper part of the shoes.
- Having lowered the lace down, they need to “walk” again from above, then from below the first lace.
- You will need to do a couple more of these “waves” with the help of the second lace.
- And then - bring the tip to the edge of the sneaker near the first hole.
- If the laces of a large length went into operation, you can not finish the ends, but leave them on top, while tied to a knot or a flirty bow.
Drink, try, practice - and your peers recognize you with an unsurpassed lacing master. And this will be your next little victory!
We will also tell:
- What name of the boy to choose for the patronymic Nikitich
- How to measure basal temperature
- How to explain the proverb - "chickens in the fall are counted"?
- How and how much to cook frozen broccoli
- How to survive the death of a dog

