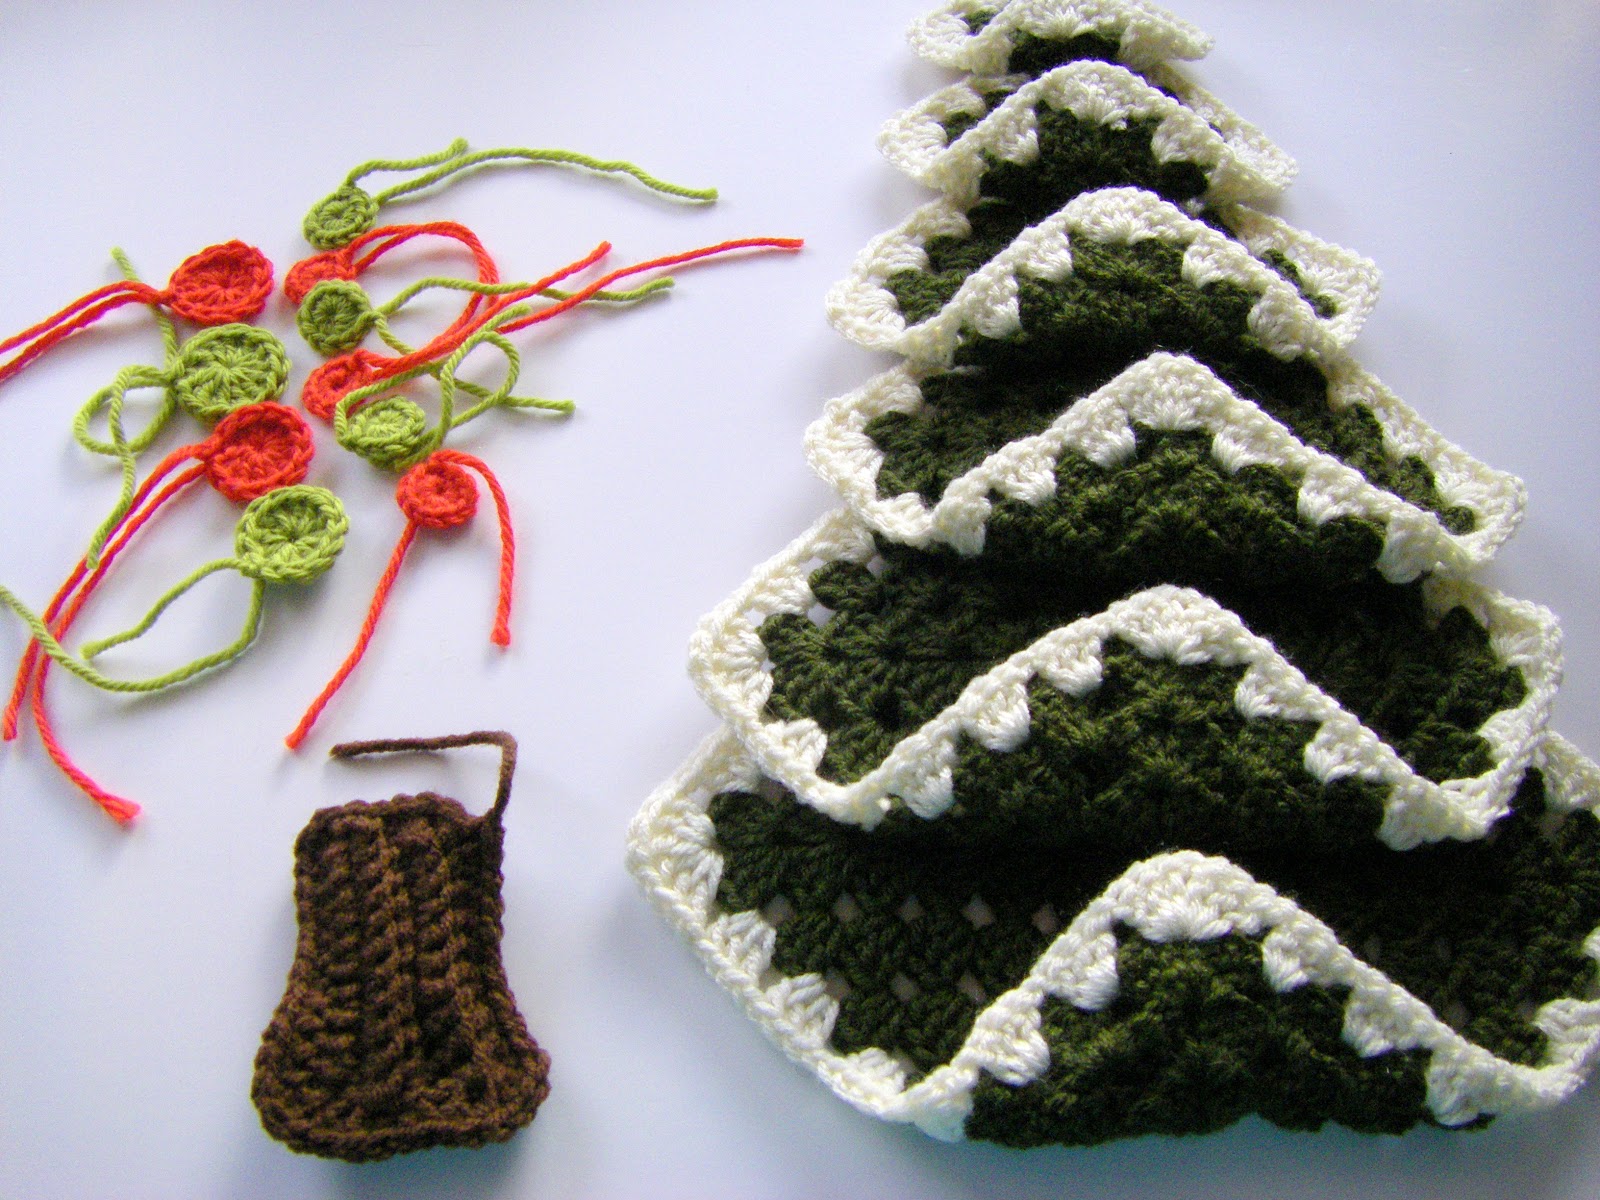
Everyone wants his jewelry for the New Year to be special. The best -made jewelry created for this is the best. In our article, we will tell you how to create a Christmas tree yourself using threads and hook.
Contents
- How to crochet a Christmas tree, large for beginners step by step: schemes with a description
- Openwork Knitted Christmas tree Crochet: Scheme and Description
- How to tie an interior volumetric Christmas tree by hook: a scheme with a description
- Video: Crochet Christmas tree. Knitted Christmas tree. New Year's toys. How to knit a Christmas tree?
Crochet a Christmas tree will decorate any interior, and it will also fill the house with sincerity, which only a thing made by yourself can set. You can realize the idea in different ways, but we will talk about the most basic and simple ones that even a novice needlewoman can handle.
How to crochet a Christmas tree, large for beginners step by step: schemes with a description
So, if you decide to tie a Christmas tree, then first decide which yarn you will use. Of course, it’s better to choose green. However, if you want to create a product as similar as possible in appearance to the original, then give preference to the “grass” or Yarnart Christmas. The composition in this case does not matter. To make a Christmas tree with stylized branches or needles, you can take a simple smooth yarn. So, let's analyze the simplest knitting scheme step by step.
First of all, decide on the form. This is important, since, depending on the purpose of use, it may vary:
- If you want to make a toy, then a cone, triangle, or flat will become an ideal shape. In this case, you can choose that you like it more
- If you decide to create a panel on the wall, then the best option would be openwork equipment and a flat figure. We will talk about how to connect an openwork product a little later
- To put the Christmas tree on the table or in another place to decorate, a stable frame will be required. So here is a pyramid or cone
So, we will consider the option of the simplest conical Christmas tree. Absolutely any yarn is suitable for her. By the way, if you choose a material with Lurex, then the Christmas tree will still sparkle and sparkle. Also, do not take a very thick thread and hook.
Step 1. We knit the cone

The first thing to create is a cone. Knitting starts from the top of the head and every few rows are added to the hinges to expand the Christmas tree. Try to ensure that the distribution goes evenly, otherwise there is a risk of spoiling the look of the Christmas tree. Knitting is carried out with crochet columns.
- Dial two air loops and make five simple columns from the second
- First row: Close the resulting chain into the circle, connecting the last column with the first air loop made. Do this at the end of each of the rows to connect the finished product
- Second row: Now we knit one loop into each column
Third row: add one column to each loop, that is, now we knit from one not one, but two columns - Fourth and fifth row: Knit as many loops as you have already scored. Do not add anything
- Sixth row: Here we make an increase through one loop. That is, we knit one column in the first loop, in the second - two and so on
- Seventh and eighth row: We knit as it is, do not add anything
- Ninth row: Here we make the increase in every third loop
- Tenth and eleventh row: You get 20 columns. We knit without additional increase
- The twelfth row: For each third loop we make an increase. As a result, you will get 25 loops already
According to this scheme, continue to knit until you get the desired height of the product. Keep in mind that the final two or three rows are knitted without increase.
As a result, you will receive a beautiful cone for our future Christmas tree. However, she is not yet ready.
Step 2. We make the bottom
When the cone is already ready, it can be decorated with on top and fill it, for example, with cotton or holofiber. Close the cone from below with a knitted bottom.
To do this, tie a small circle, which is suitable for you in size. The knitted part, for greater stability, sew it to the cardboard and then connect with the cone.
We examined the option of knitting the simplest Christmas tree. However, there are actually much more ideas. We offer you to get acquainted with other crochet schemes:
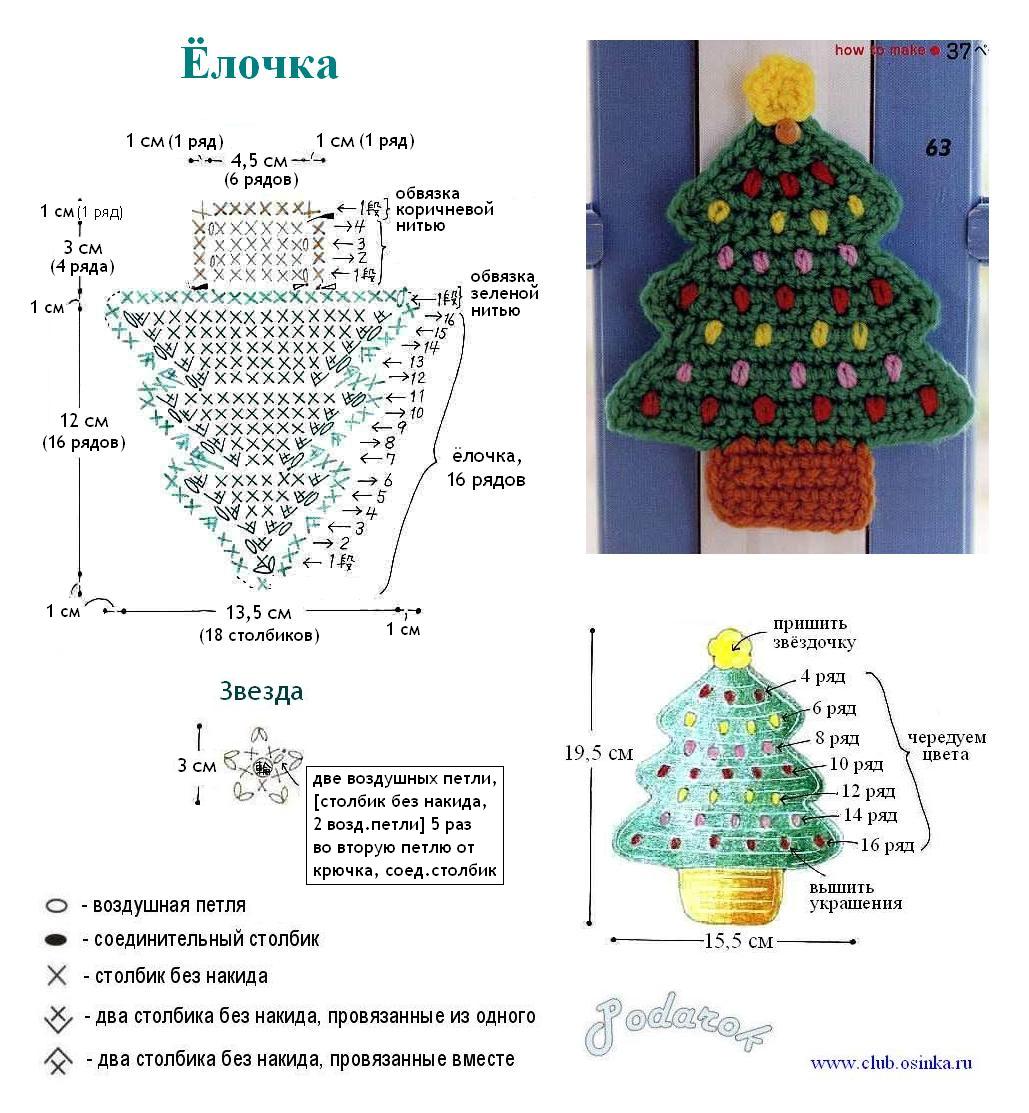
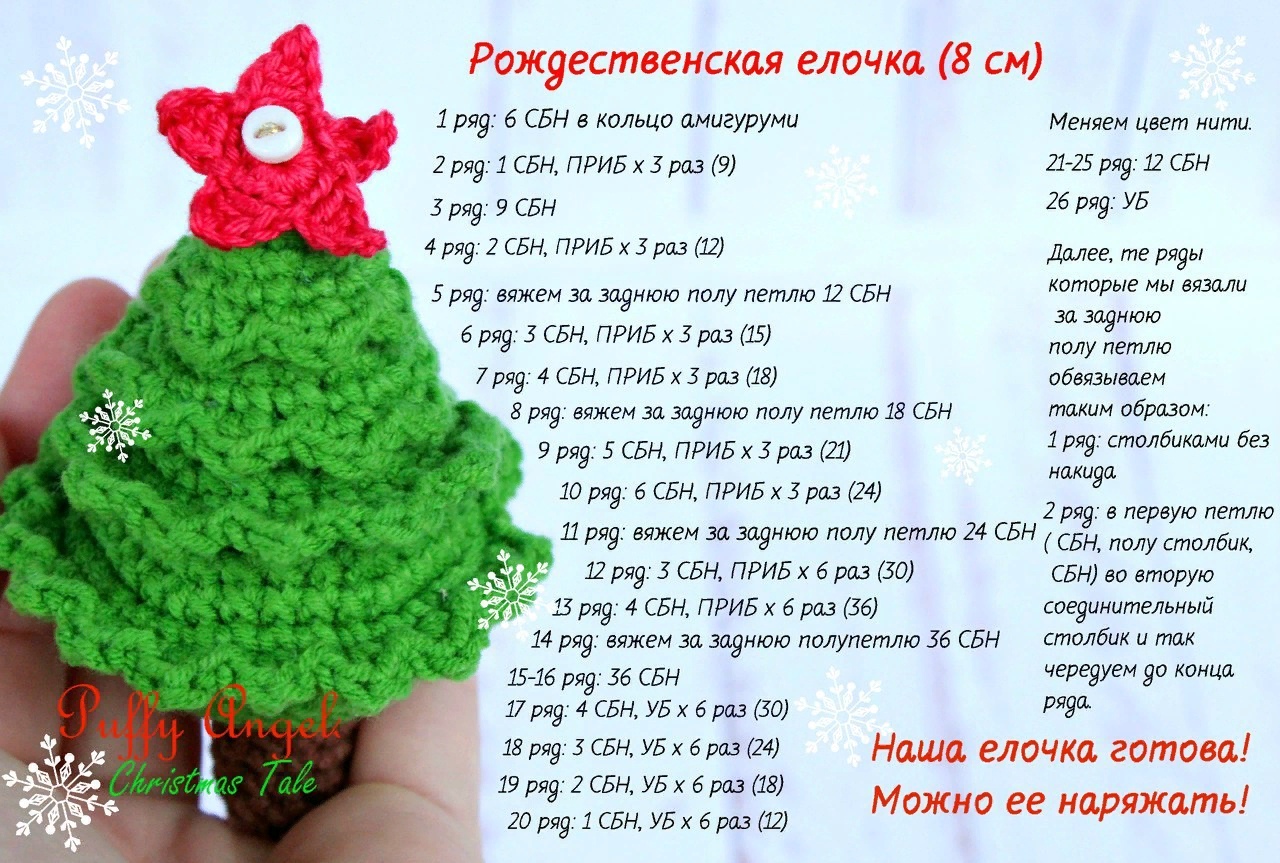
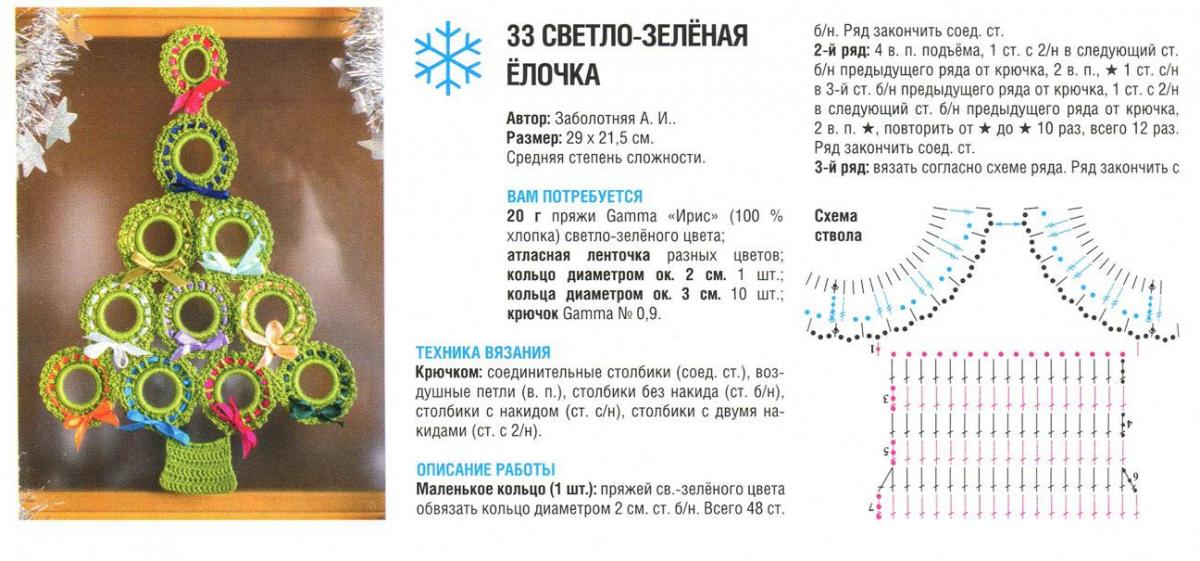


Openwork Knitted Christmas tree Crochet: Scheme and Description
You can crochet a Christmas tree in an openwork style. Such a pattern will make the twigs in appearance more fluffy and interesting. Let's look at one of the knitting options with you in detail.
So, in this version you will need yarn of green iris and a hook 0.9. Also, 20 pearls are needed for decor.
- Make a small circle. To do this, type five air loops and connect the first to the last
- In the front row, make three air loops and then knit nine simple columns
- The second row repeats the first. We knit one loop into each column until we add anything
- In the third row we are already starting to add. We do this in every third loop. A total of 12 loops will be released
- In the next row we also make an increase, but already four. Distribute them evenly. You will get 16 loops
- Similarly, we make an increase in the fourth and fifth row
- There will be five in the sixth row of the increase. In total, you will get 25 loops
- In the seventh-nine row we also make five increase
- We knit 10 and 11 rows already without adding
With 12 row, openwork knitting begins. It is performed according to the following scheme:
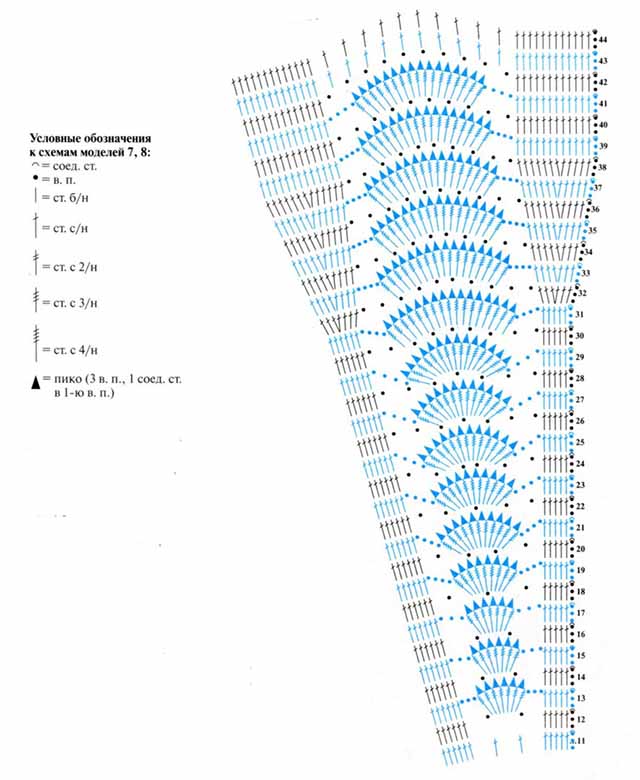
How to tie an interior volumetric Christmas tree by hook: a scheme with a description
It is easy to crochet a Christmas tree simple. However, the needlewomen are often interested in interior. Indeed, they help to revive the situation in the house, and even on holidays, you can place gifts under them. The approximate size of the finished product is 28-30 centimeters.
You will need 100 grams of yarn, hook No. 3, holofiber for stuffing, as well as two circles of cardboard or CD-disk.
The tree of several parts consists of:
- To make the base and stand, you will need four circles. They need to be tied in the size of your product. They will be green and brown, two pieces of each
- The barrel is made of a simple rectangular canvas. We knit its desired size, and connect the edges with simple columns
- For knitting a cone, use a diagram to create an openwork Christmas tree
- When everything is ready, you can start assembling the toy. First, sew together pairs of circles and basics. Take cardboard inserts inside
- Next, we sew the barrel to the already finished stand, as well as the base to the bottom of the Christmas tree
- The latest fill the cone with the selected material and sew it to the stand
The last thing to do is the branches. Tie them and sew them in a spiral to the Christmas tree. First, pick up a chain of any size and tie several branches, then tie the rest. So it will be easier for you to dial the desired length.
We create twigs according to the following scheme: in one loop of the chain - *3C1N, 2C2N, 3C1N; Skip 2 loops, 1SBN, skip 2 loops* and so repeat along the entire length of the chain.
As a result, you will get a beautiful voluminous interior tree, which will not only like children, but also surprise guests.
Video: Crochet Christmas tree. Knitted Christmas tree. New Year's toys. How to knit a Christmas tree?
Read also:
- How to tie a beautiful female beret with knitting needles - schemes
- How to tie a beautiful children's snood crochet on a boy and a girl
- Knitting for children from 0 to 3 years with description and schemes on knitting needles
- Knitting men's hat with knitting needles: schemes
- Beautiful female cardigan with knitting needles: knitting pattern, description

