This article will present knitting patterns for children from 0 to 3 years of different things with detailed master classes. Having studied the material, you can independently tie any clothes and a headdress to the baby.
Contents
- Knitting for children from 0 to 3 years old on knitting needles - selection of yarn
- Knitting children 0-3 years old-an envelope for newborns, schemes
- Knitting children from 0 to 3 years old - how to knit a dress?
- Hat with knitting needles for children from 0 to 3 years old
- Sweaters, sweaters for a girl and a boy from 0 to 3 years old
- Booties, socks for children from 0 to 3 years old knitting needles
- How to knit overalls to children from 0 to 3 years old?
- Video: knitting for children from 0 to 3 years old
Now it is popular with your own hands. Knitting for babies from 0 to 3 years old is especially popular in women. Clothing for babies are small, therefore it will not be difficult to bind it. Such things will sit well on children, and the kids will be comfortable in them. After all, mothers in the process of creating a thing take into account the characteristics of the figure of the child and invest all their love.
Do not compare clothes connected with your own hands with blouses and overalls, which is sold in the store. Manufacturers do not always make quality products. They can use yarn with an admixture of synthetics or with poor -quality dyes. Because with your own hands, clothes will be much better purchased.
Knitting for children from 0 to 3 years old on knitting needles - selection of yarn
When mom is on maternity leave, then in their free time you can do needlework. Knitting for children from 0 to 3 years old is a simple process. For clothes, babies can select high -quality threads pleasant to the body. They can be bought for knitting in stores in various colors. Therefore, choosing a yarn of the color you like will not be difficult.

Before you start knitting any thing for the baby, pay special attention to the choice of yarn. Choose only a hypoallergenic thread for kids. After all, clothes are in contact with the body, so you can not use yarn with synthetic fibers so as not to harm the child. Pay attention to the threads of calm tones. Do not choose too bright shades, there are chemical dyes that should not contact the baby's delicate skin.
Pay attention to the thickness of the threads. If you knit clothes for the winter season, then use woolen yarn or threads from alpaca wool. For spring-jacket, threads with cotton raw materials are perfect. Acrylic, yarn with bamboo fibers is indispensable for the process. These threads are of high quality. Clothing tied from them never loses its shape.
Important: Clothing from melange thread looks beautiful. Thanks to staining in sections, the pattern on things is formed independently. It turns out beautiful dresses, sweaters and envelopes for children.
Knitting children 0-3 years old-an envelope for newborns, schemes
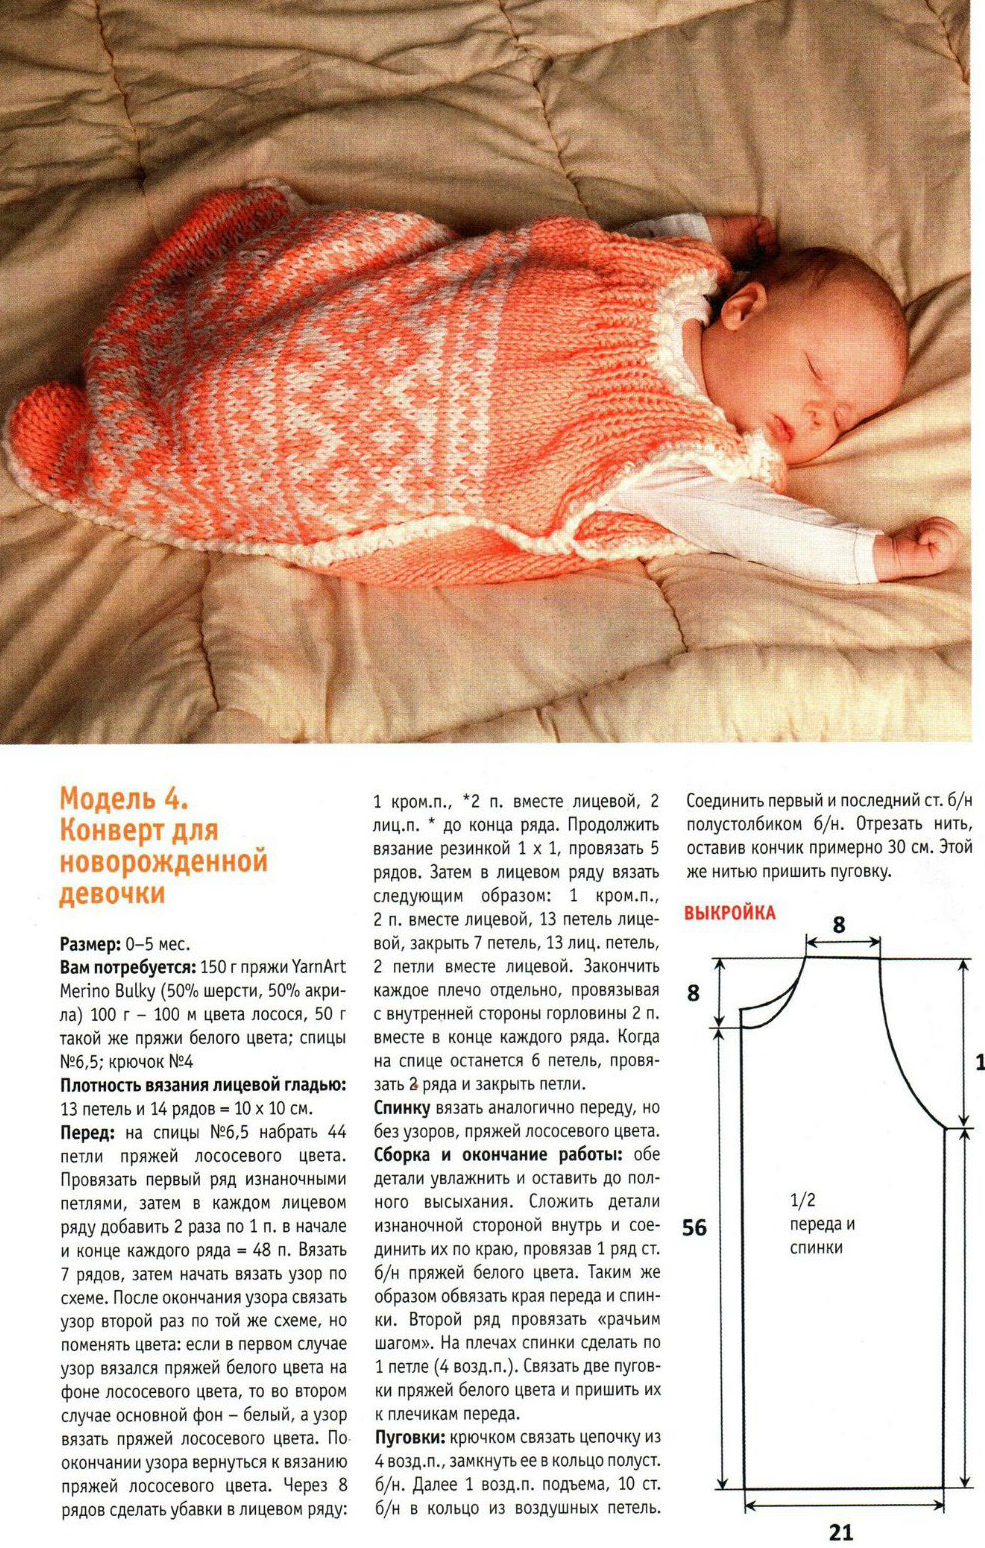
The newborn envelope will come in handy when the child is taken from the hospital. It is also convenient in this little thing to take the child for walks in a stroller, or to the hospital, to an appointment with a pediatrician. It can be bought in a store, and even better tie it yourself.
If the mother is a craftswoman for her craft, or simply masters knitting for children from 0 to 3 years old, then the envelope for the baby is not difficult to bind. Moreover, you yourself choose a model that you like and decide on the yarn. Your envelope will not turn out like everyone else. And now things are not unlike the rest and are valued in the first place.

Attention! This envelope is suitable only for the baby from birth to six months of age. If the child is larger, then it is necessary to adjust the size of the product. This will not be difficult if you know how many loops you have to type for one centimeter. To calculate the quantity, first knit a piece of fabric 10 to 10. Thus, you calculate the number of loops.
Consider the simple model of the envelope, thanks to which you will master the technique of product performance. It will not be difficult to tie the thing, even a pattern is not needed for an envelope. In the future, it can be used as a blanket for a child.
Tools, materials:
- Woolen yarn - 625 g
- Knitting needles (circular) - 3.5
- Marker
- Buttons - 8 pcs.
For the envelope, patterns such as elastic bands, patch knitting and pattern, which are provided below in the image:
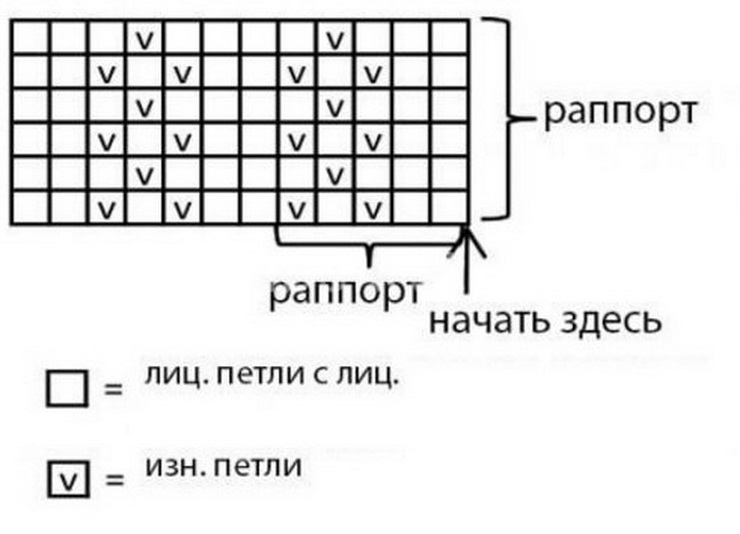
Knitting pattern
The product consists of three parts:
- Before the envelope
- Hood
- The back of the envelope.
Moreover, separately these parts do not need to be knitted, it is enough to tie a rectangle of the required size, and then sew it.
Knitting process:
- Start knitting with front part envelope. You need to dial 122 loops on circular knitting needles. Follow the first six rows with a plate pattern, knit in the front and wrong rows only facial loops and two hem.
- Knit twenty rows with an elastic band, close the rows in six rows of a patch pattern.
- When everything is ready, start knitting according to the following scheme: ten loops with a plate pattern, one hundred two loops of the drawing, which is given above in the image, at the end again ten loops with a patch pattern. So knit up to 50 centimeters of the canvas.
- Then knit back. A pin or marker mark the beginning of knitting the back. Knit the canvas with the same pattern as the front of the envelope. Just leave a hole for a button in every twentieth row, or rather knit three loops together, and after three crochet for forming a holes for button. According to calculations, you should come out four holes on one side of the envelope and four on the other.
- Knit the back of the same size as before.
- Hood It is again fed with the same pattern as the whole canvas, it is knitted for another fifteen centimeters. And then they close the loops and assemble the product.
It will not be difficult to assemble the product. Start with a hood. The top of the product should be sewn with a knitted seam. For beauty, you can make the edge, as in the figure below. It is not necessary to sew an envelope anywhere, just sew the buttons and fasten them on the sides. You can decorate the product with pompons, applications.
Next, see a selection of products with descriptions and patterns that can be tied on the knitting needles yourself.
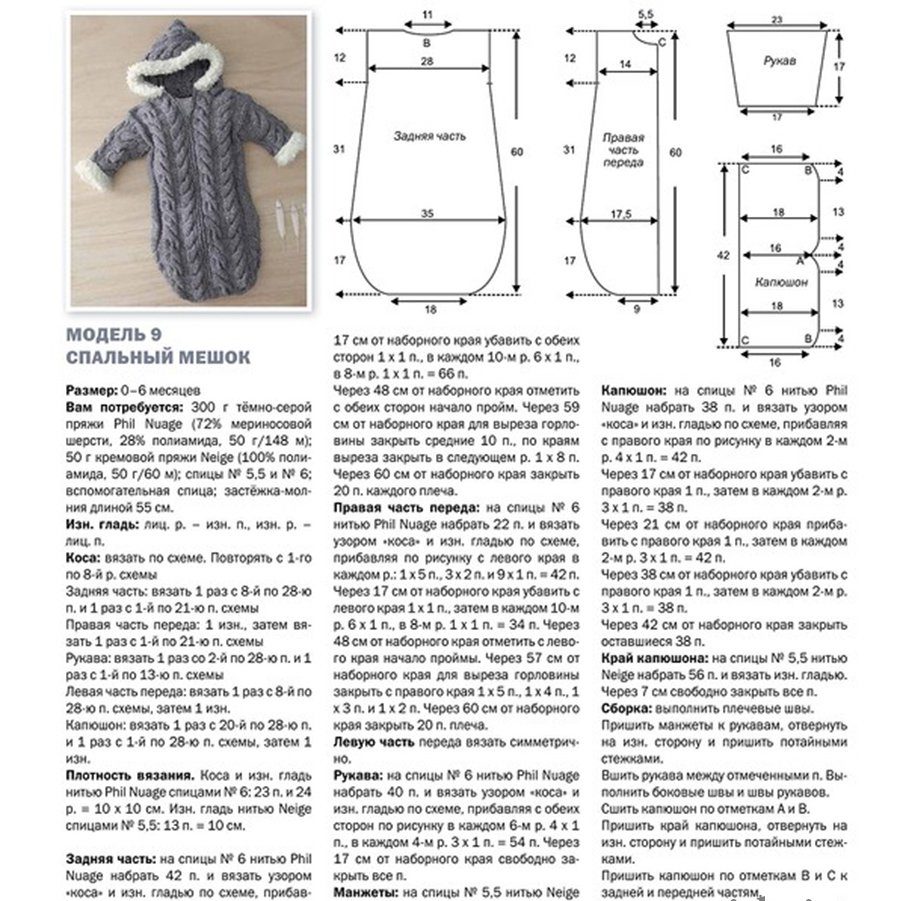
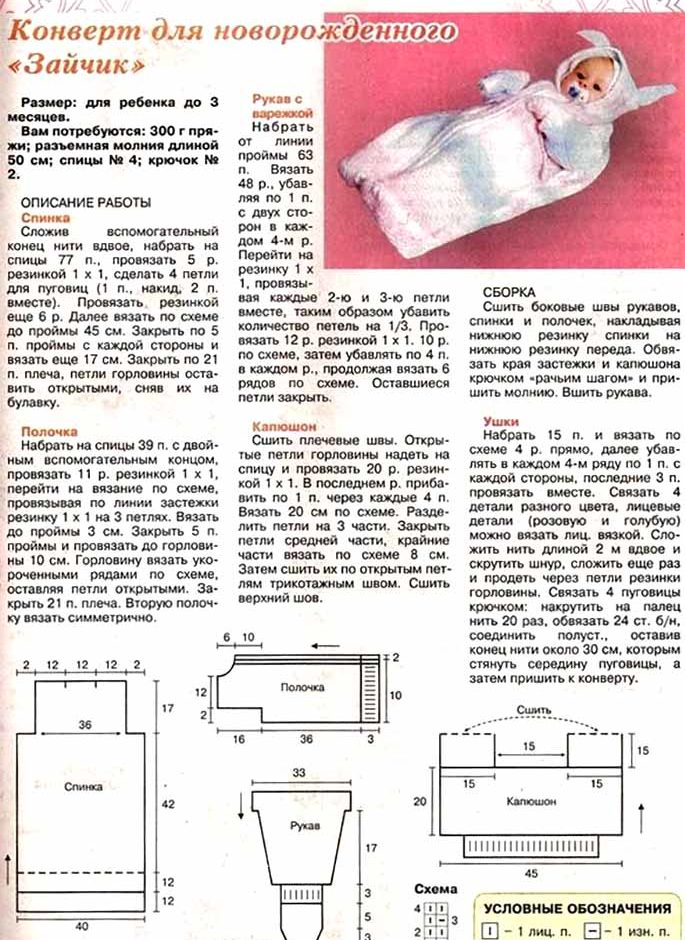
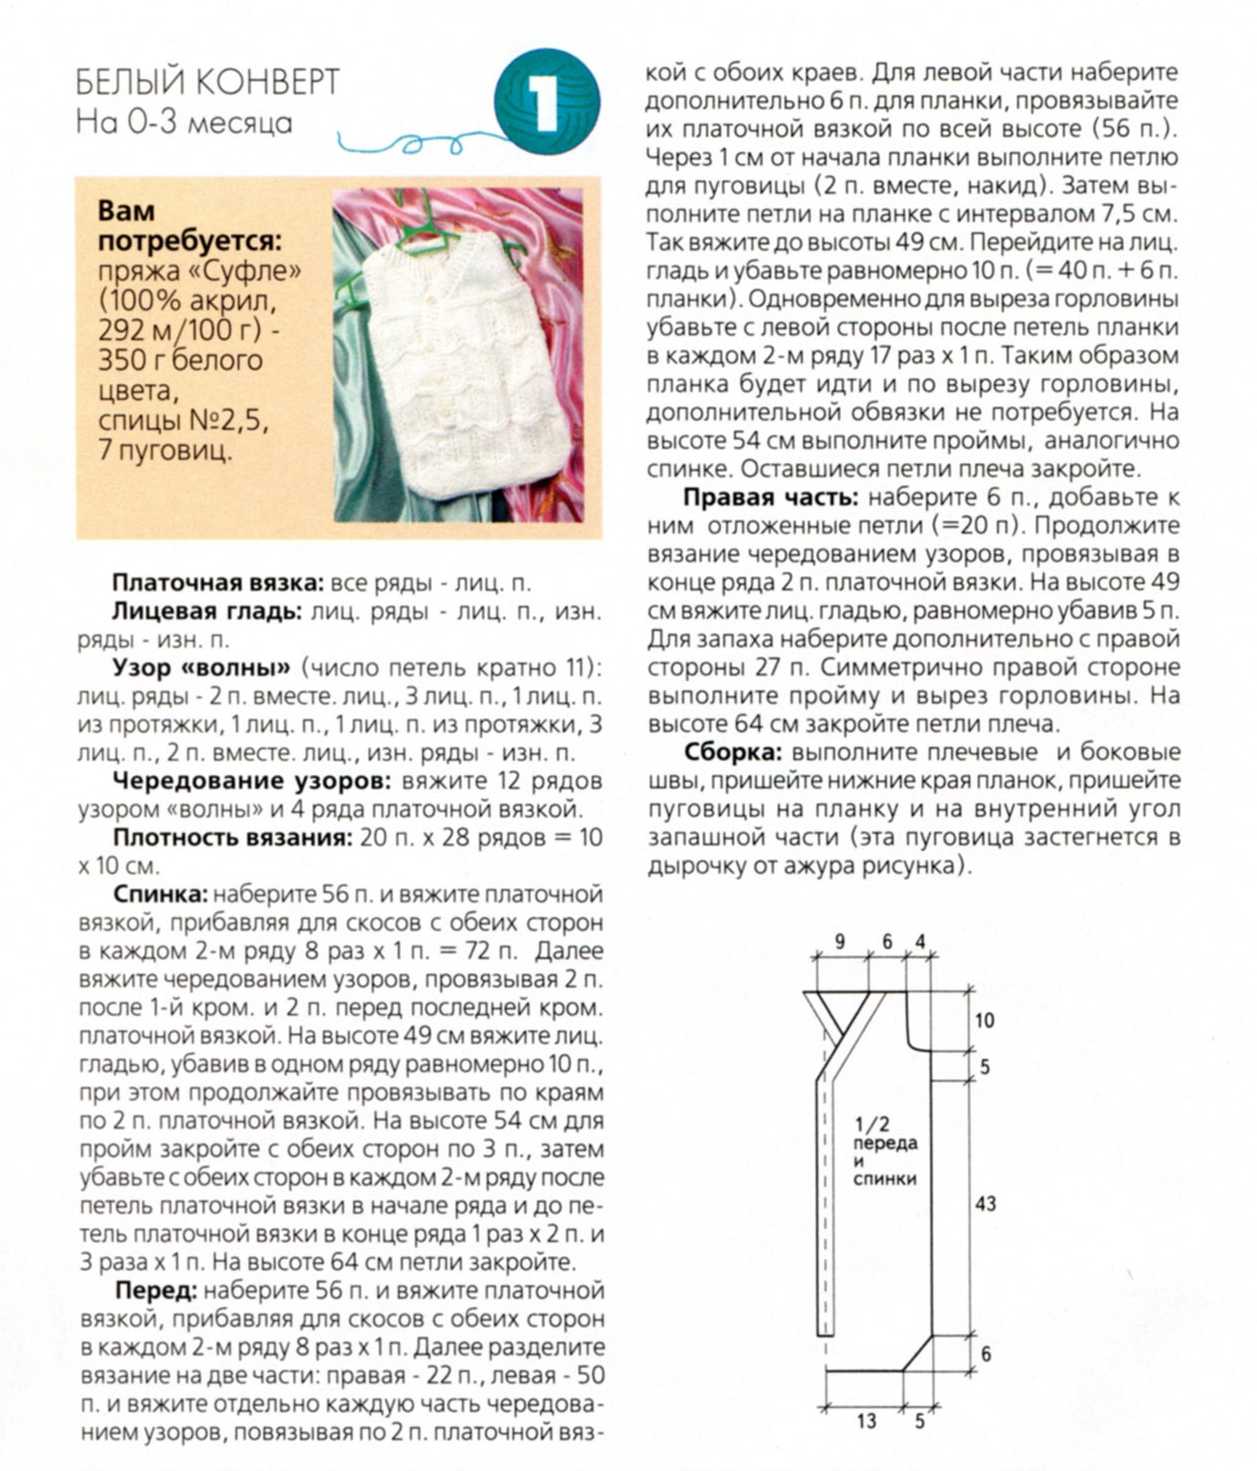
Knitting children from 0 to 3 years old - how to knit a dress?
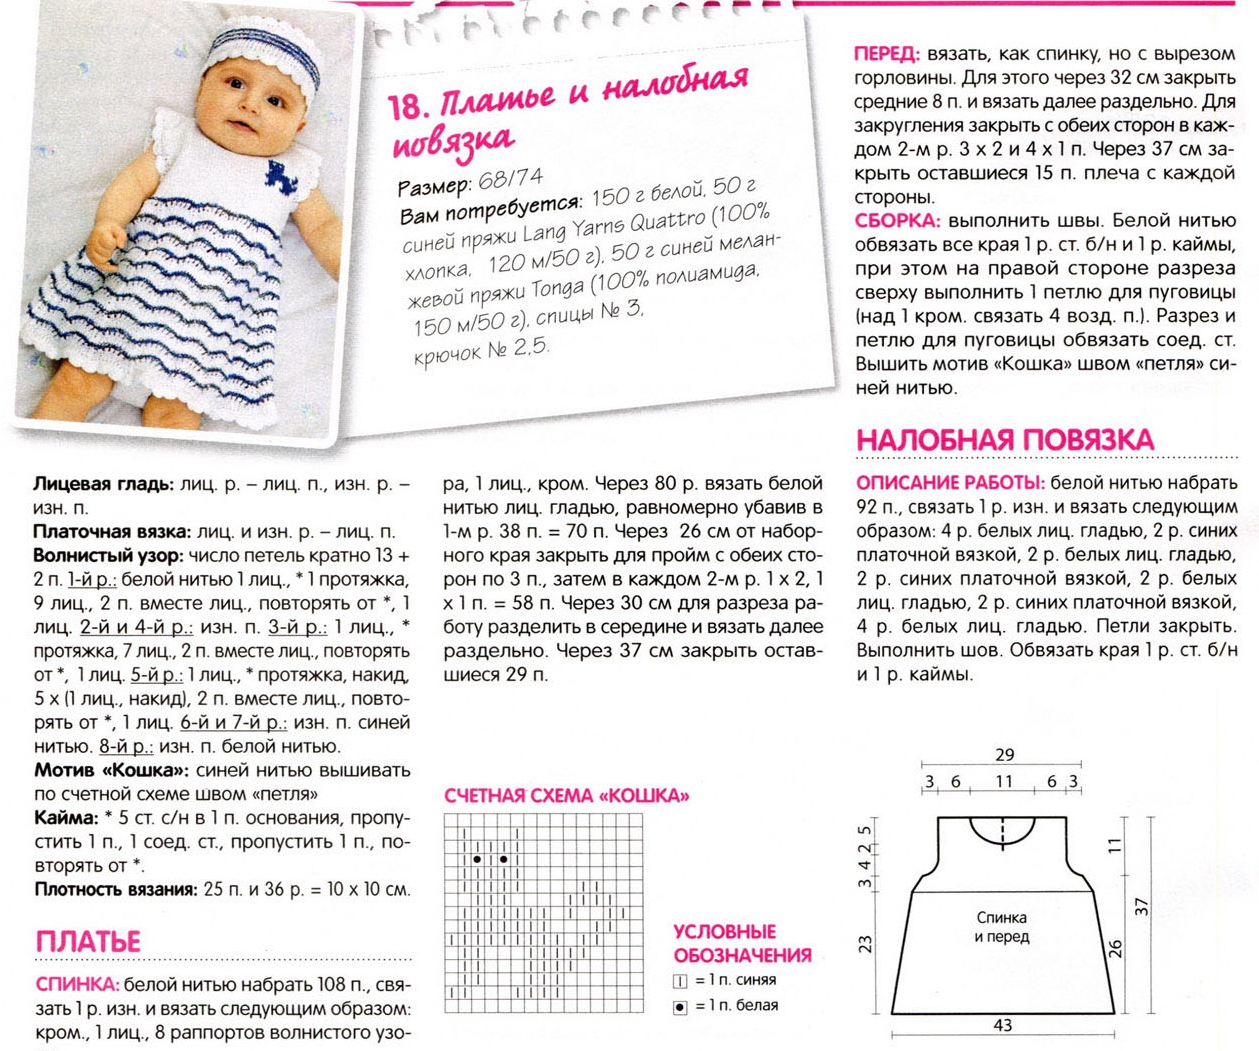
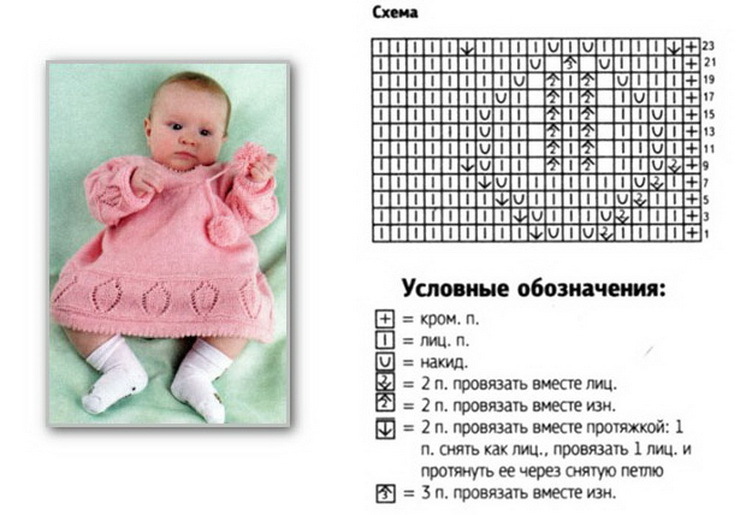
It doesn’t matter to be an experienced craftswoman or only master the basics of knitting, understanding the schemes provided further, will not be difficult for anyone. Knitting for children from 0 to 3 years old is just a suitable process to master the equipment. Products for children of this age are small, therefore, knitting them is not long and simple. While the girl is growing, you can attach various things to her. Dresses are especially beautiful. A girl will not do without a dress. Any mother is pleased to dress up your little fashionista in a beautiful sundress or elegant dress. Consider the clothing models of this species.
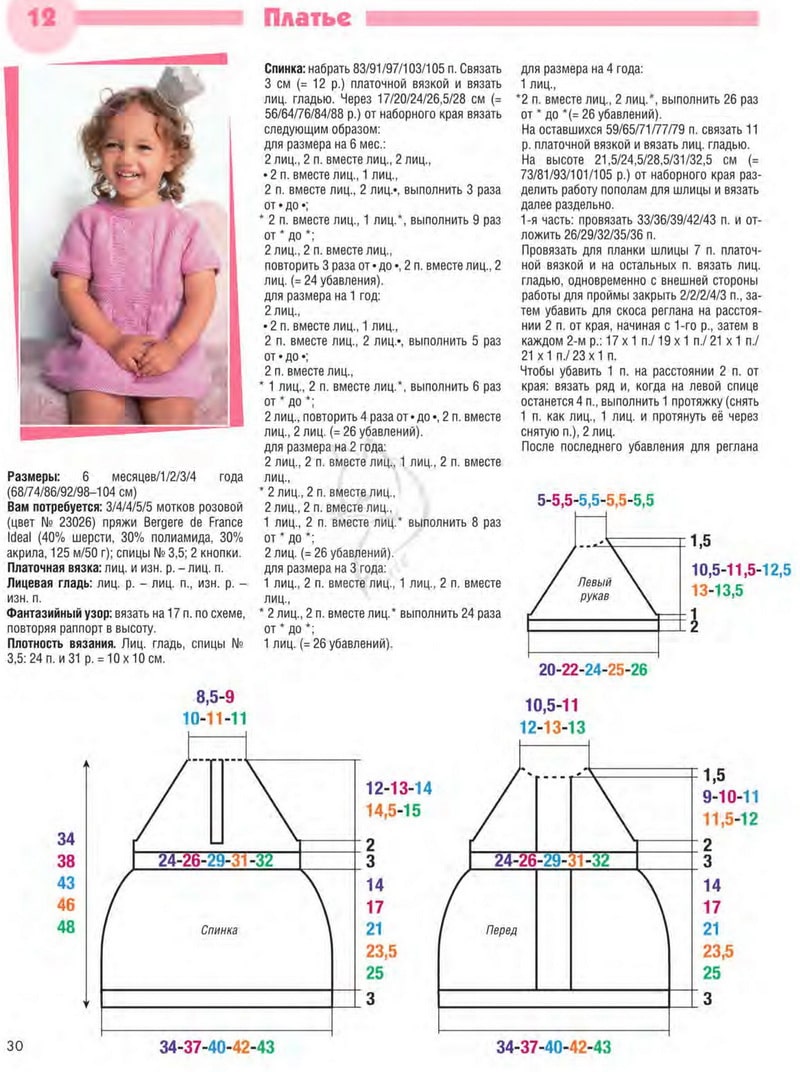
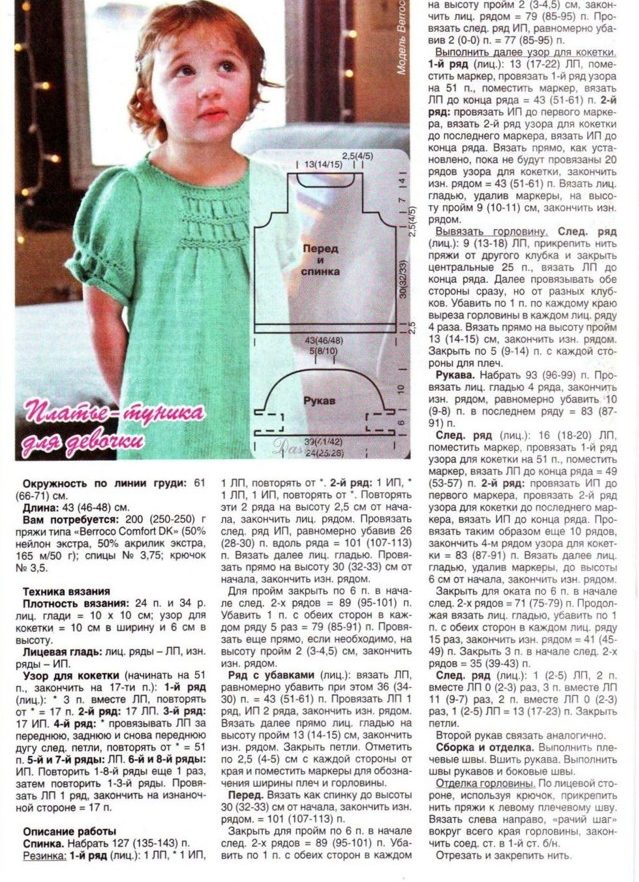
Below is a pattern of a dress, which is very easy to tie for a girl with knitting needles.
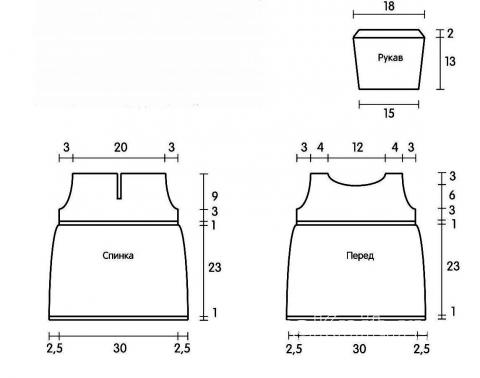
Dress pattern
The size of the product can be changed. Select the size for your baby, consider its parameters. You can knit a dress longer or shorter, much depends on your preferences. Its view will be pretty in any case. Choose threads that are more suitable for you for your young fashionista. In three years, the child already has her preferences and she knows what color she likes more.
Process:
- The back of the dress Knit by the pattern, which is presented above. Knitting from the bottom begins. It is necessary to dial 74 loops, knit with the front surface. Sicks are knitted according to the rules. The first loop is removed without knitting, and the last loop is knitted wrongly.
- First, knit an even canvas without decrease and additions.
- When knit 25 centimeters, then make an decrease in eight rows, reduce six loops from each side.
- Having knitted 28 centimeters, you should close three loops on both sides to decorate the arm of the sleeve. After that in each second row, remove one loop, until you remove three loops from both sides.
- Then knit the armhole, as on the pattern above, after three centimeters, divide the back into two parts to arrange a section, where then it will be possible to insert a zipper on the back. Thanks to this dress, it will be easy to dress over the head.
- Then arrange the shoulders, close the loops and the whole back is ready.
- The front detail of the dress They are knitted according to the same scheme as the back, the only difference is that there should also be decorated by the neck, close the loops in the middle. And no need to knit a section where the zipper is inserted.
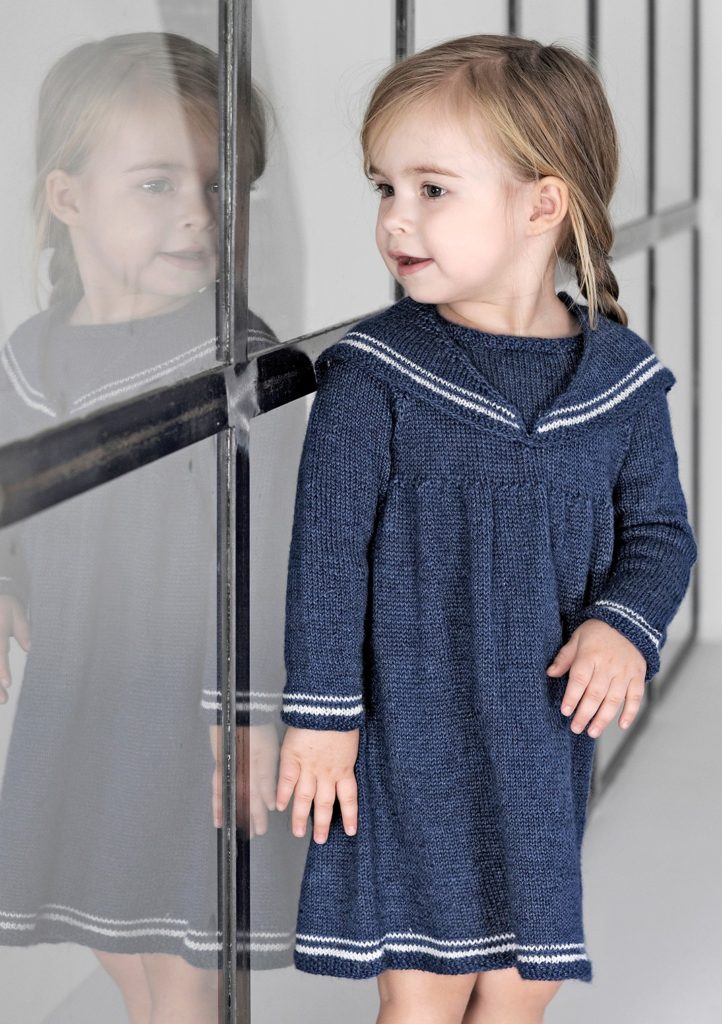
- Sleeves They are knitting with two glomeruli symmetrically on each other on the same knitting needles.
- They start knitting from below. In the beginning, the elastic band is knitted. It is enough to knit three centimeters with an elastic band and then you can switch to the front surface. For beauty, the strips of two rows in a row are knitted with a white thread.
- The length of the sleeve is measured from brush to the shoulder. They knit the sleeve, by the pattern, gradually adding the loops, at the top they decorate the shoulder cut. To do this, at first, the loops are added, then they decrease and the remaining five loops in a row are closed in the last row.
- The last detail of the dress is collarSee the photo above. It is necessary to start knitting it from below, for this, 160 loops are collected and four rows are knitted in a circle without decrease and increase in loops. Strips are inserted white, then the reduction of the loops begin to decorate the beautiful rounded neck at the edges. The result is an original patch collar.
To collect all related details, you will need a hook. Crochet the front of the dress and back, shoulders, then sleeves. It remains to only wear a collar on top and grab with threads so that it does not dig. You can decorate the dress with pompons, lace. If you crochet the bottom, then the dress will become even prettier.
Next, see examples of schemes of dresses for small princesses that can be tied in just a few days.

Hat with knitting needles for children from 0 to 3 years old
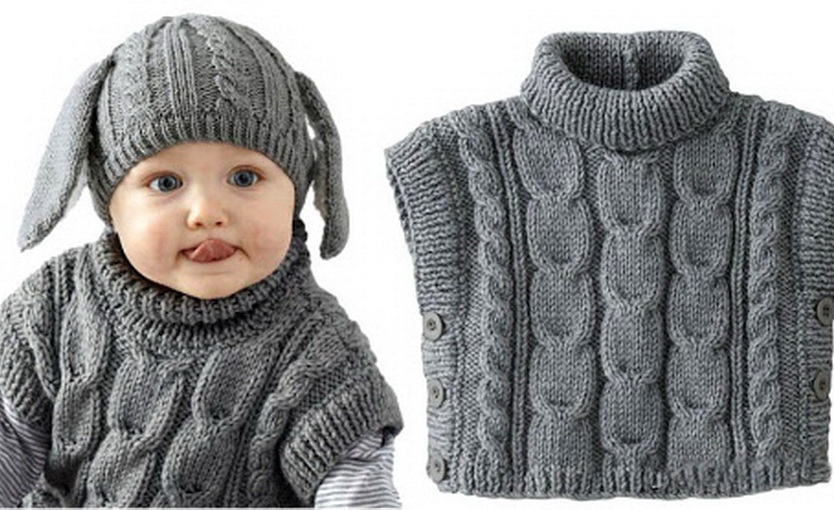
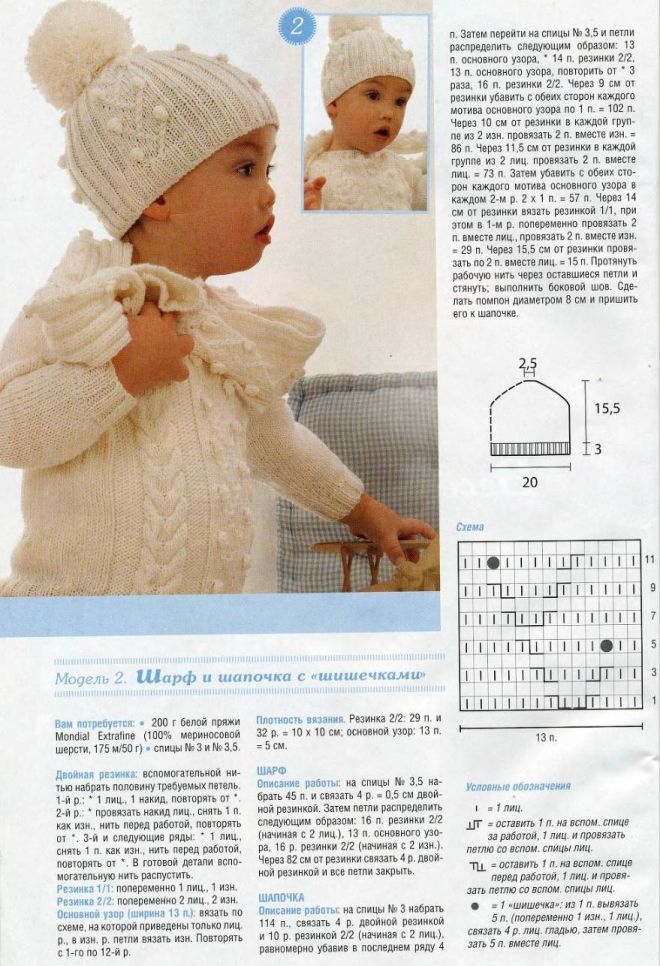
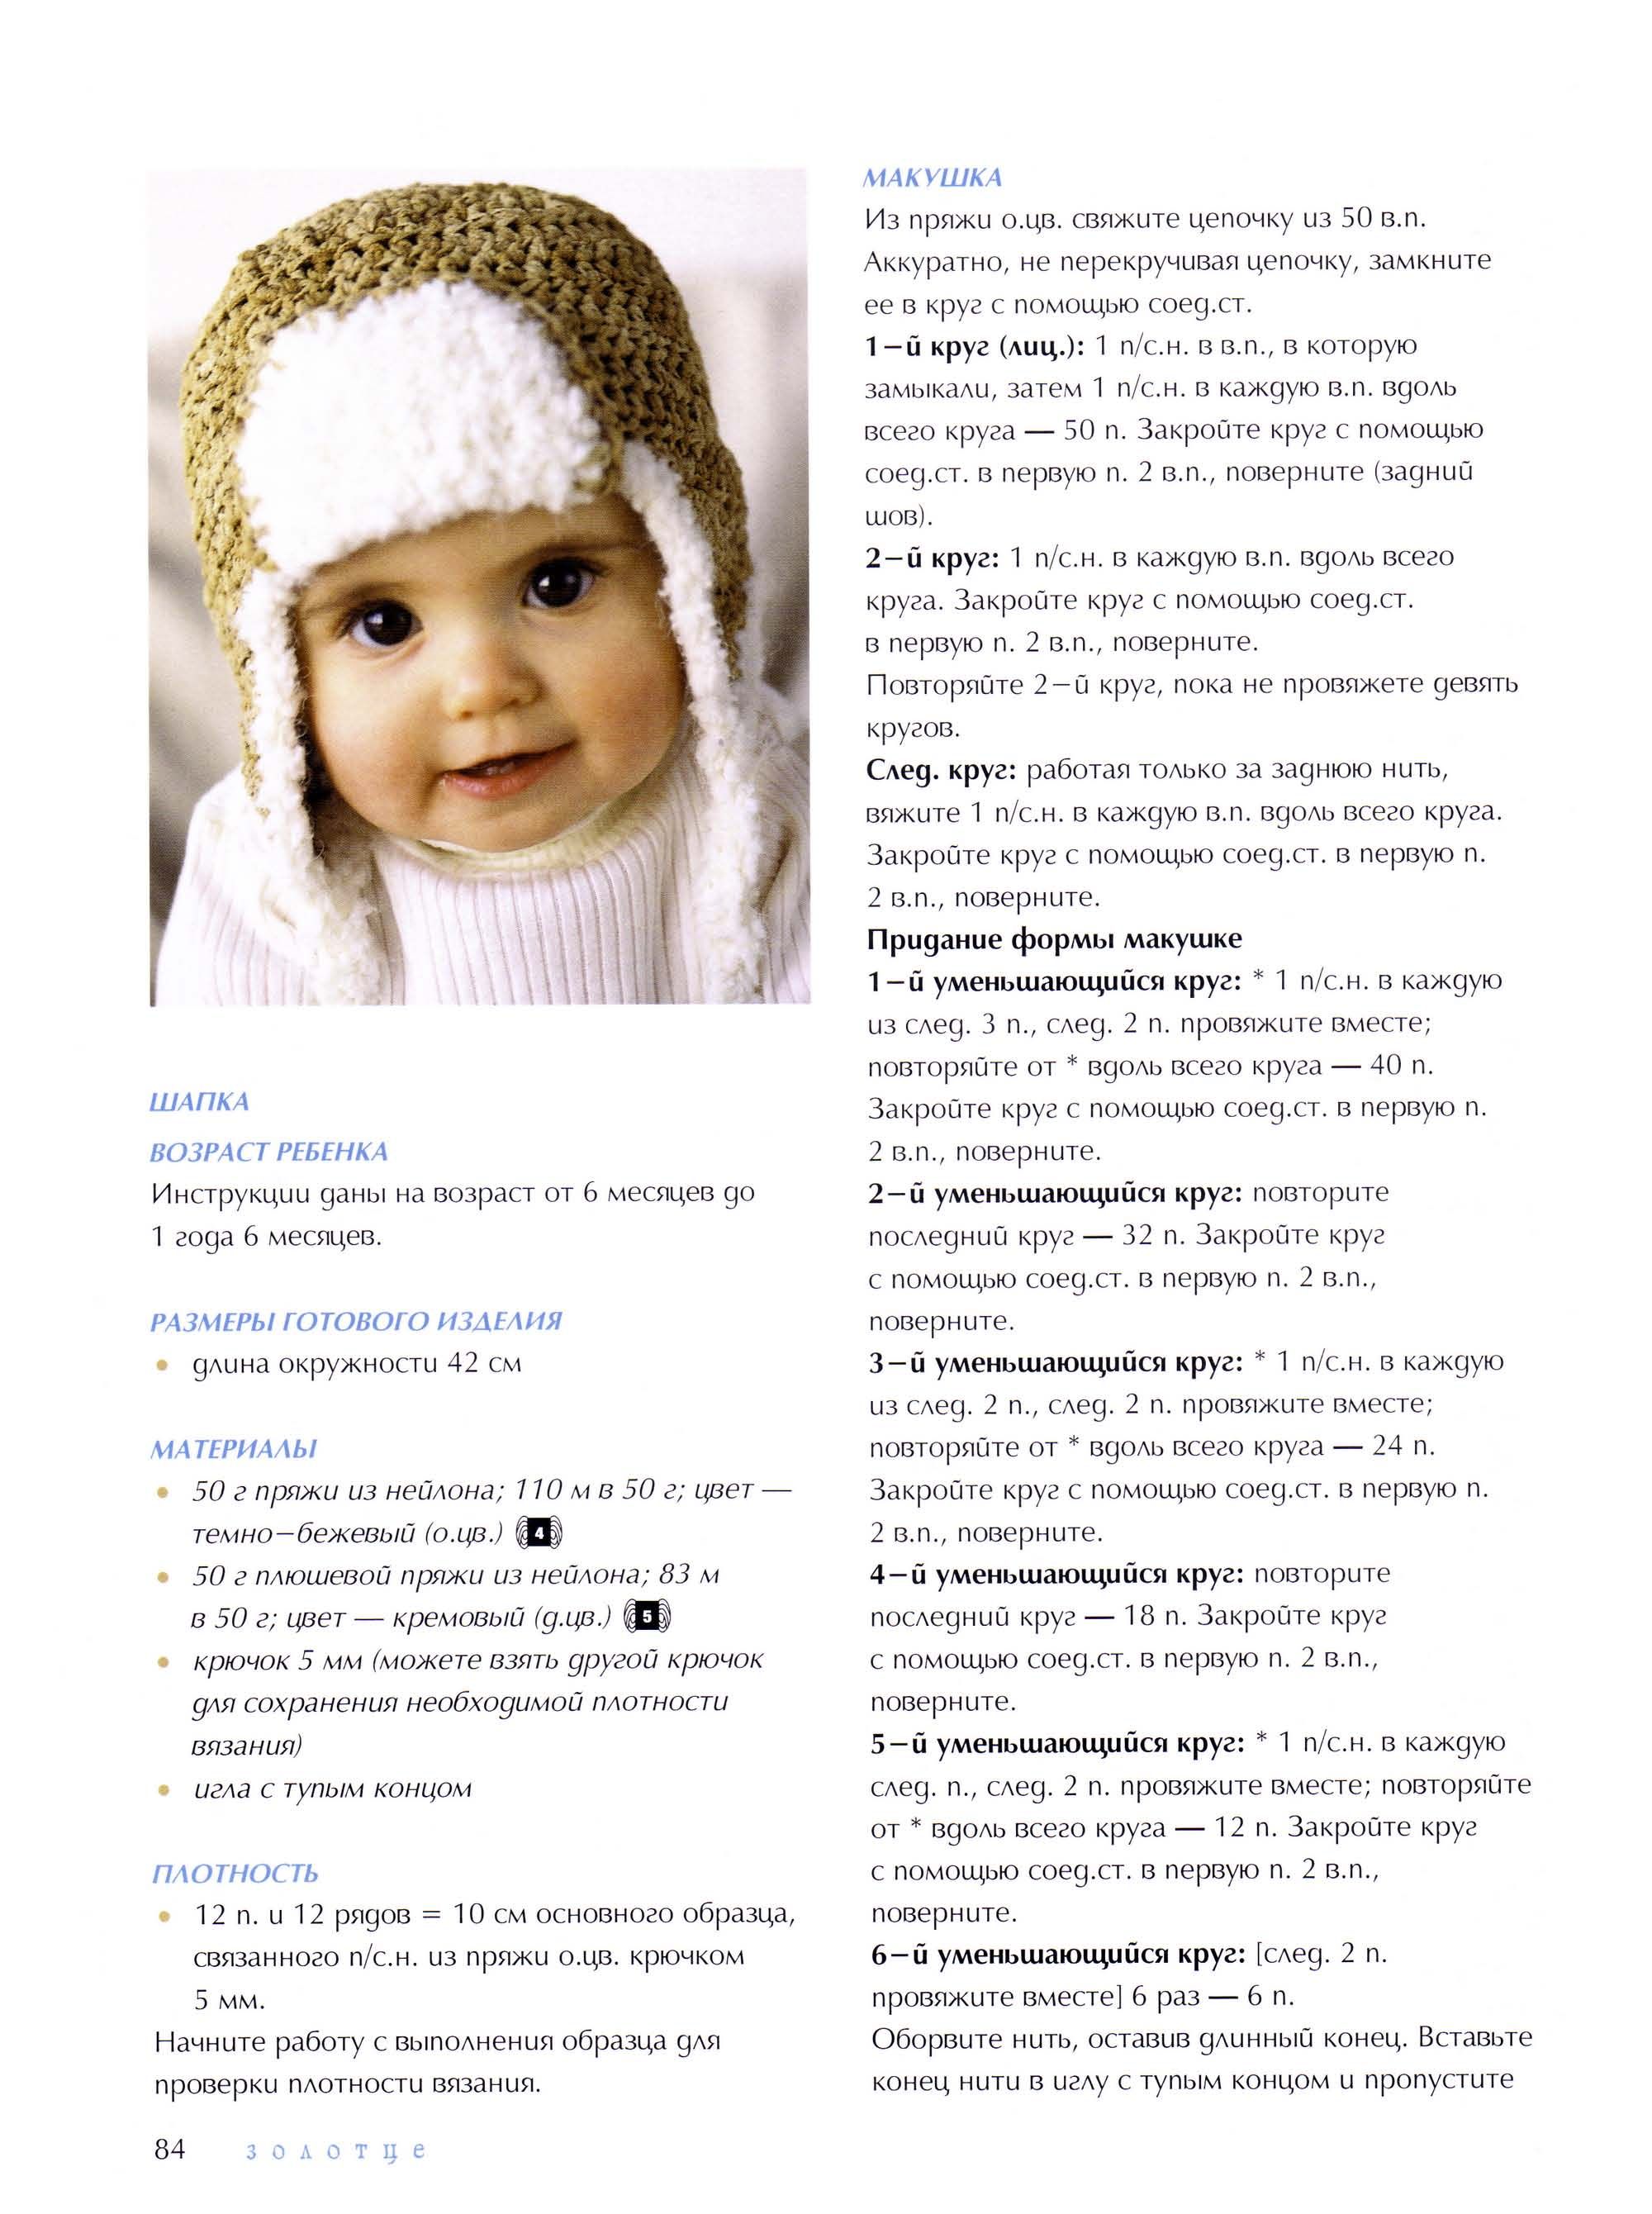
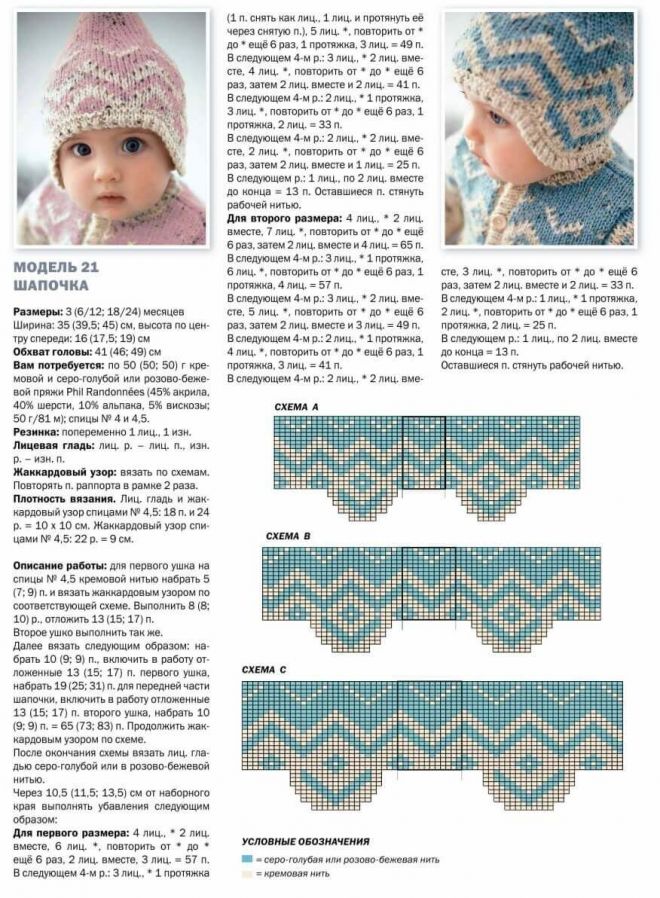
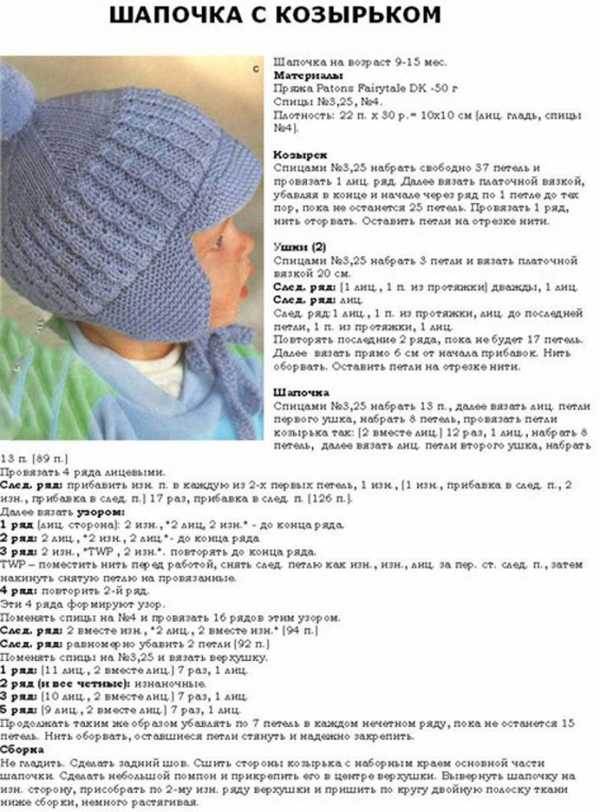
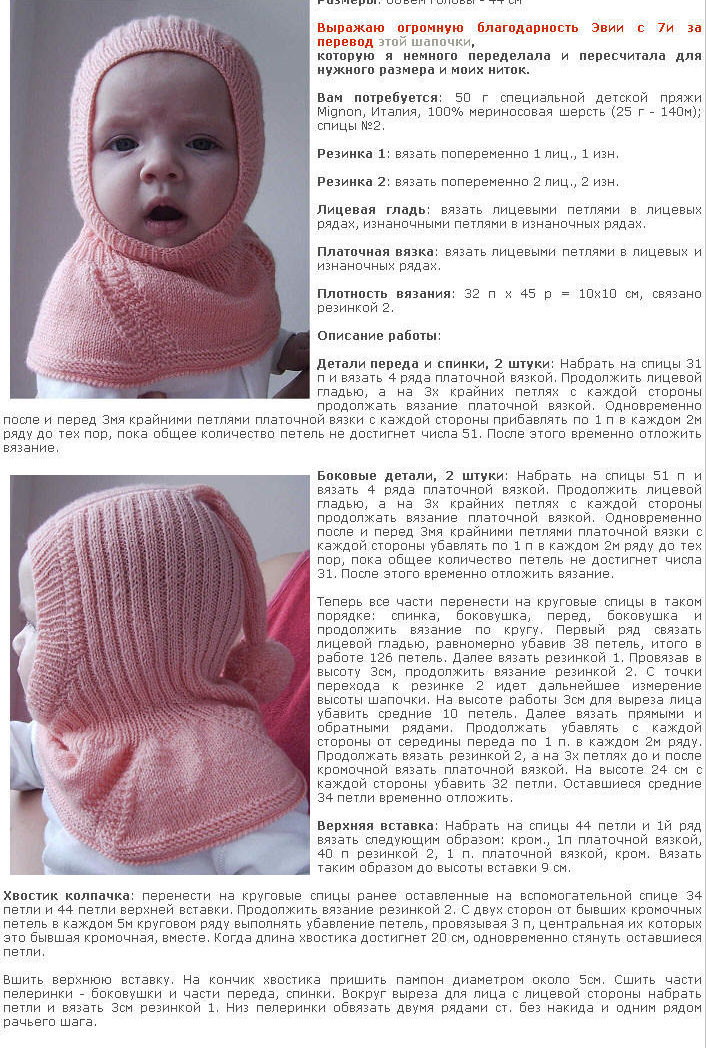
Hats in cool weather are an indispensable thing. Moreover, knitting for children from 0 to 3 years does not take much time. Therefore, you will succeed in tie a hat to your baby quickly. The process will be pleasant, because it is knitting that calms the nervous system and pleases with its result. Next, we consider how to tie a hat with braids with ears, as in the photo below.
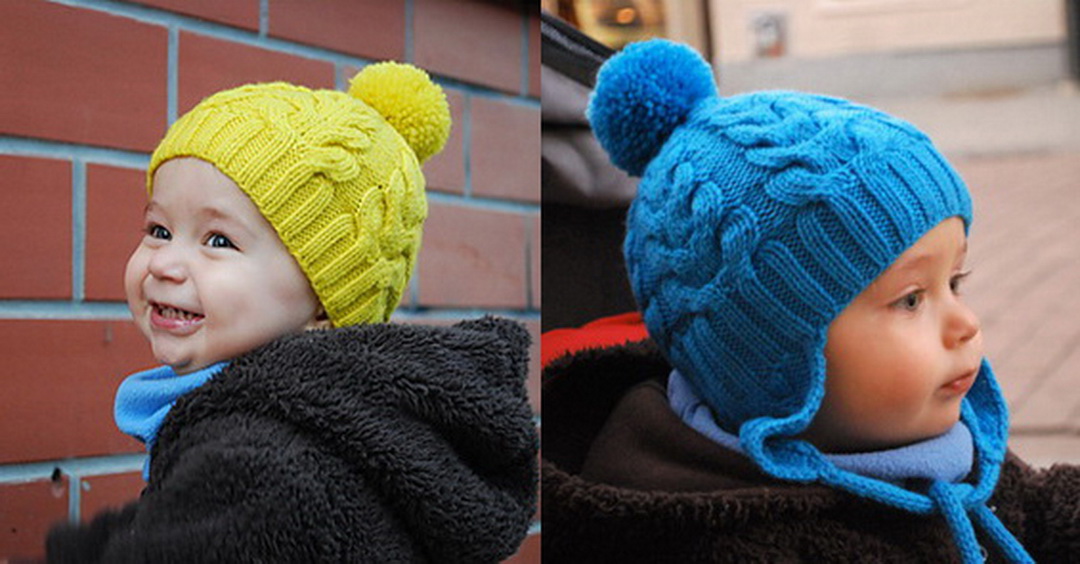
The cap is suitable for a child from five months to eight, if the head is about 42 centimeters.
You will need:
- ALIZE Royal yarn - 2 pcs.
- Circular knitting needles - 2.5 and No. 3
- Knitting needle to knit braids
- Pins, scissors, hook.
Process:
- Type 126 loops on circular knitting needles, closed the circle. Knit the gum of 20 rows. Select the pattern by one loop and knit again the elastic band of 20 rows.
- Knit further according to the picture, which is presented below. 6 loops of the wrong, six facial, so to the end of the row. Where the front in every sixth row make the transfer of loops from one knitting needle to another to form braids.
- After you knit 14 rows, you should start to decrease the loops. The cap will be rounded onto the top of the head, so we evenly reduce the loops over the entire circle of the cap, how to make decrease see the description further.
- In each row, it will have to be reduced to at least 7 loops, since it turns out seven rapports for knitting a braid on a hat.
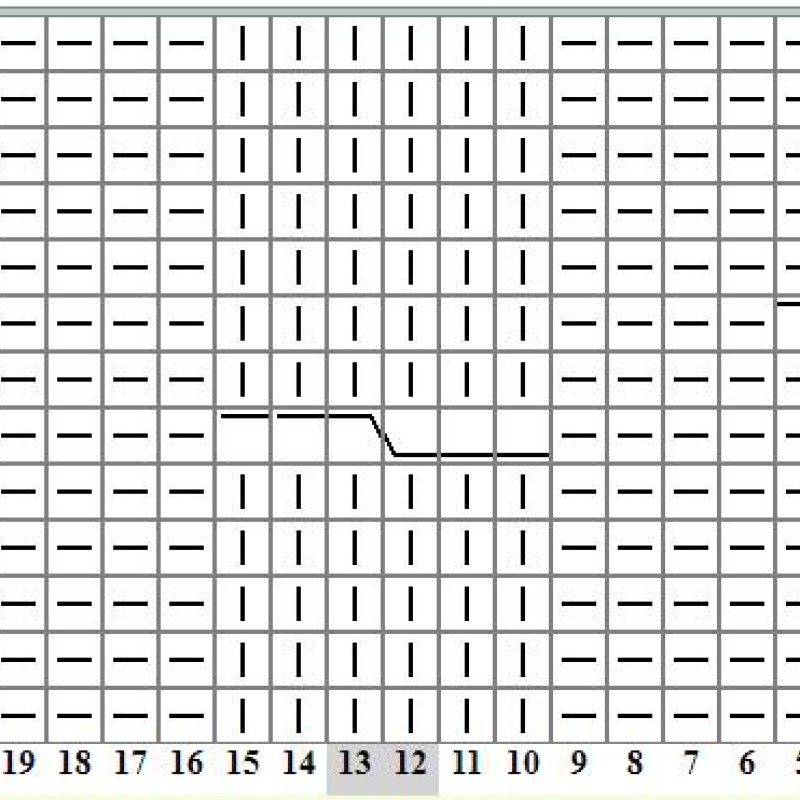
How to reduce the loops correctly?
The decrease will occur in stages, if at the end it will already be inconvenient to knit on the knitting needles with a fishing line, you will have to switch to ordinary hindsurities. And when you reduce the loops, do not forget to form braids on a hat.
- So, when you knit 14 rows, then knit the sixth and fifth loop together, where you knit the wrong loops.
- Knit the second row along the pattern.
- The third row is knitted according to the drawing and already reduce the fifth and fourth loop, or rather knit them together with one.
- Knit again without reduction.
- In the fifth row, remove the fourth and third loop.
- Knit the sixth along the pattern.
- The seventh row reduce one more loop.
- The eighth in the pattern without decreases.
About twenty loops should remain at the end. Cut the thread. Crochet stretch the working thread to close the rest of the loops. Pull the head of the hat.
Knit the ears as follows:
The gum on the hat is double, because it needs to be tucked and fixed from the back of the product. Now you need to distribute 24 loops of the ears on the sides of the cap on one and the other.
The ears are knitted with the wrong loops. The start of knitting from the hat. Find two rows without decrease, and then make a reduction in extreme loops. Do the decrease through one row. Knit so until there are six loops left on the knitting needles. Do not rush to close them. Of these, you will then form ties. For beauty, you can make pompons. One more cap, two other small ties on the top.
Sweaters, sweaters for a girl and a boy from 0 to 3 years old
When a newborn is born, this is joy. Parents and grandparents are preparing for this reverent event in advance. In addition to furniture and children's room, you still need a stroller, many accessories and clothes. Of course, all this can be bought in a store, but part of the clothes for kids can be sewn or tied with your own hands.
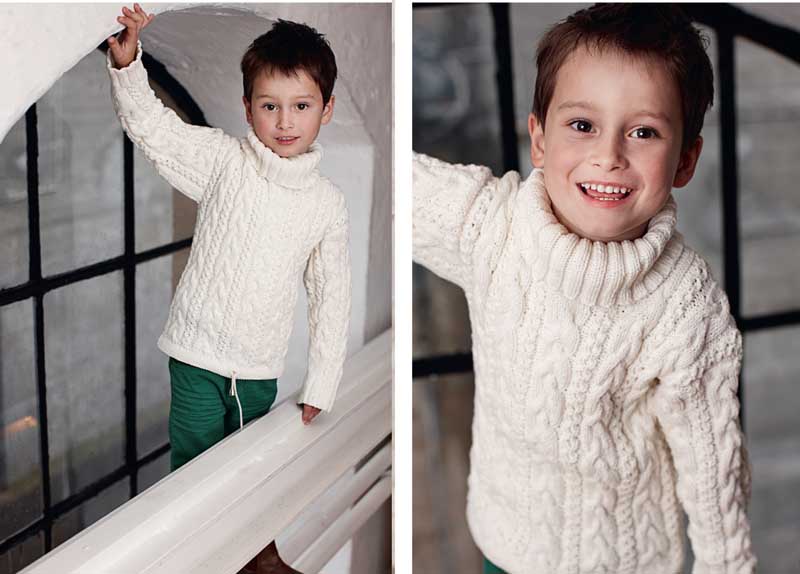
You can master knitting for children from 0 to 3 years old yourself. Moreover, on the Internet you can find any material on the development of this technique. It is enough to have desire and patience. Fantasy will not hurt yet - thanks to it you can create things dissimilar to others.
How to knit a sweater for a boy of three years:
Suitable for the baby for height: 94-96 centimeters.
For the process you will need to take:
- threads - 350 g
- suitable knitting needles
- circular knitting needles - for knitting a collar.
There are 2.4 loops for one centimeter.
Step-by-step instruction:
- Start knitting with backs. To do this, pick up eighty loops on ordinary knitting needles.
- Stitch four centimeters with an elastic band: 1 persons. P + 1 out. n. In the last row of elastic bands, add six loops throughout the back canvas, so that they are evenly distributed around the perimeter.
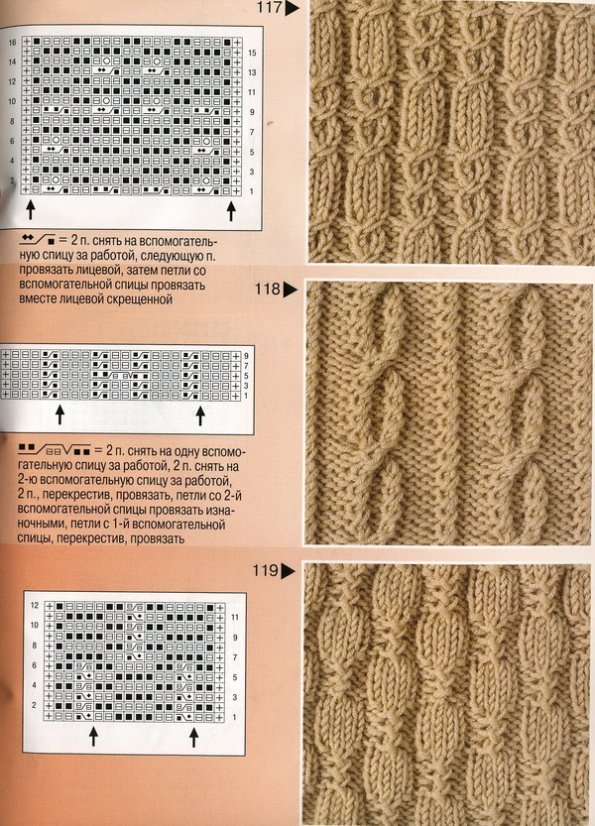
- Then go to another pattern: braids. It is advisable to change the knitting needles by a size larger so that the loops are a little freer. You will see a braid drawing below in the image. With this pattern, knit the entire back of the back. When knit 38 centimeters, decorate the shoulder cut and close the loops.
- For knitting transfer Products will need to dial 80 loops. Again, you will need to tie four centimeters of elastic bands 1/1.
- After add six loops and knit the canvas with braids on knitting needles No. 3. When tie 33 centimeters of the product, close 16 loops in the middle - this is a neck.
- After smoothly, design the neckline, closing after another row of knitting 2 loops in a row.
- Also design a sloping line of the shoulder, gradually closing the loops, starting from 36 centimeters of the length of the gear. When knit 38 centimeters, close all the loops of the canvas.
- Sleeves They are knitted from two skeins symmetrically. On knitting needles in size 2.5, type forty -two loops. The first rows - knit 4 centimeters with an elastic band. In the last row, add 14 loops so that lush sleeves come out.
- Change the knitting needles to number 3, and knit the pattern of the braid. To expand the sleeve from the 12th row, begin to add a loop in each 4th row. When tie 22 centimeters, close the loops completely.
Collecting the sweater will not be difficult. Crochet and “sew” the part of the back and the front. After sew the sleeves. Tie the loops on circular knitting needles, connecting them to the neck, and tie the collar with an elastic band: one front loop, one loop is wrong. It is enough to knit with this method of 14 centimeters and close the loops. The sweater is ready.
Below are a lot of interesting mopes of sweaters, sweaters with a description:
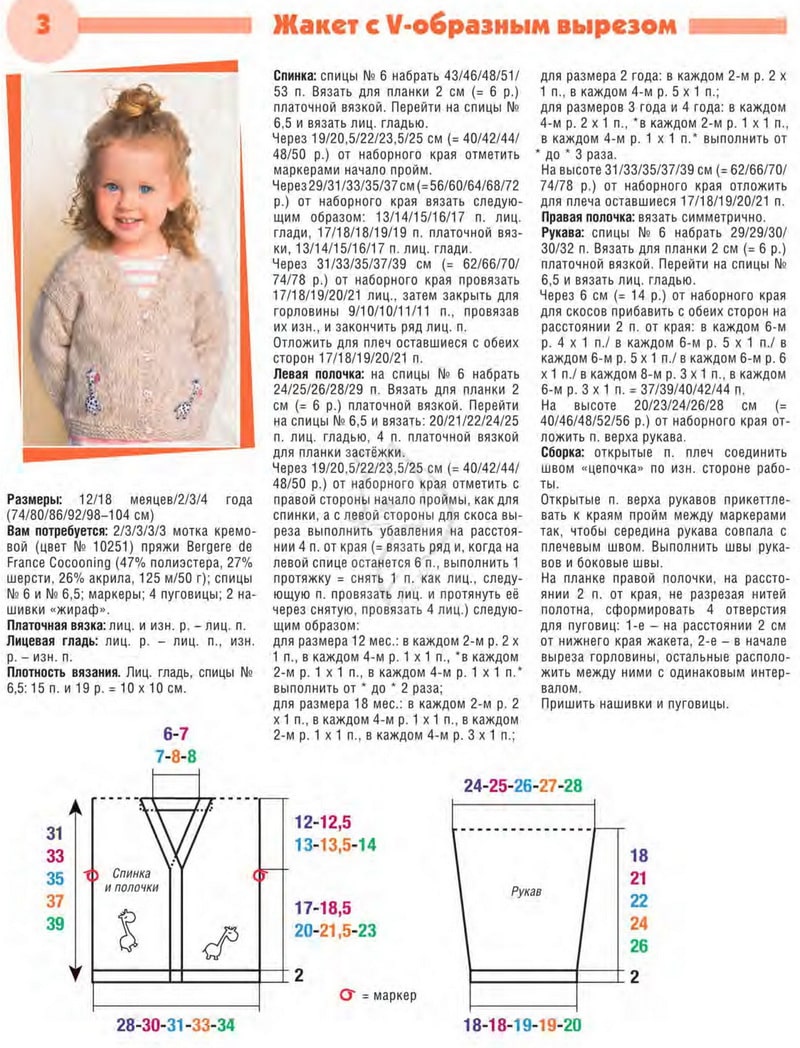
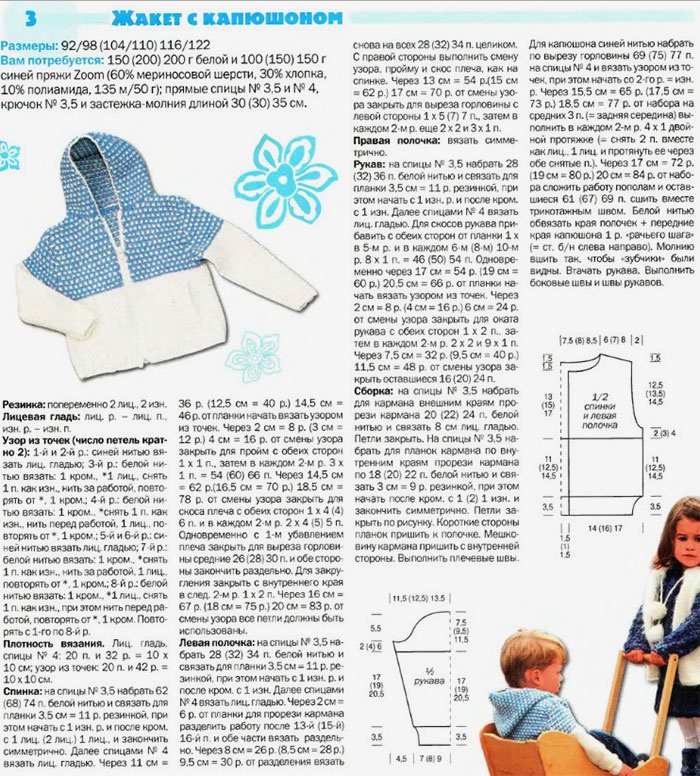
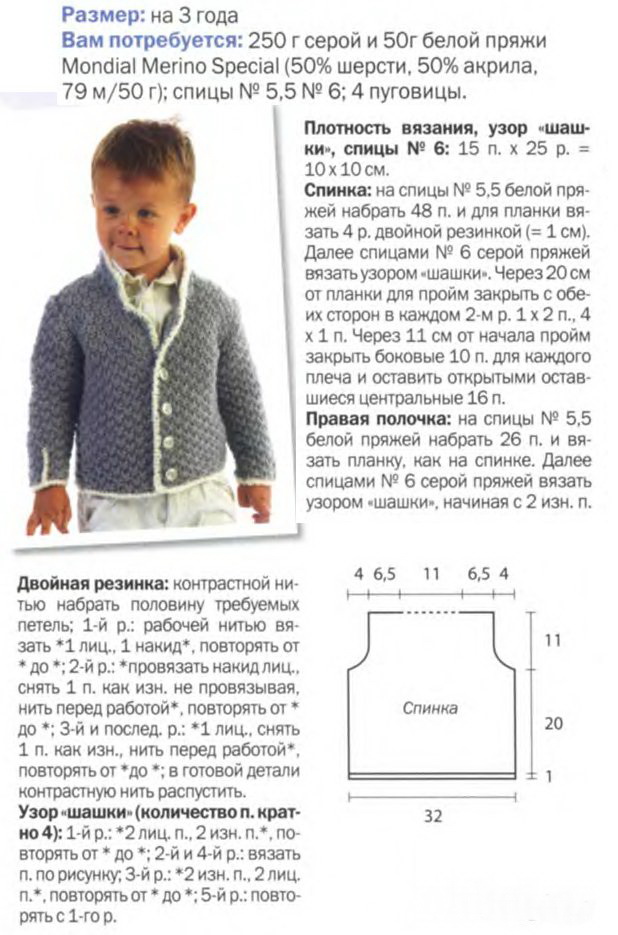

Please note: in order not to make mistakes with the size when knitting blouses or sweaters, it is better to make measurements of the baby. You will need to know the sizes such as: chest girth, waist and hips, product length, sleeve length. They are taken into account when knitting these products.
Booties, socks for children from 0 to 3 years old knitting needles
From yarn, you can tie not only warm or summer clothes, but also a booty or socks pleasant to the body. Knitting for children from 0 to 3 years old is a pleasant process. See what beauty can be obtained from white and pink yarn, if you make a little effort.
Tools and materials:
- White threads - 150 g
- Pink yarn
- Knitting needles No. 3, scissors, needle
- Guipure
Progress:
- Take forty loops on the knitting needles. In the front row, knit all the facial loops, except for the only hem.
- In the second row, start with the hem loop, then knit one front, cloak, then seventeen front, cloak, two faces, again cloak, 17 facial + clip + 1 front and bromous loop.
- In the third row, knit the bromic and all the loops with the faces.
- In the fourth row, knit the bromatic, then: two facial, cloak, seventeen facial, crochet, four facial, crochet, seventeen facials, crochet, two facial and hem.
- In the fifth row, all facial loops, except only hem.
- In the sixth row, the first bromic + 3 faces, cloak, six facial, crochet, 17 facial, crochet, three facial and hem.
- In the seventh row, knit the facial loops, except for the only hem.
- In the eighth, the first bromic, 4 facial, crochet, seventeen facial, crochet, eight facial, crochet, 17 facial, capacious, 4 facial and hem.
- In the ninth, knit the bromary and all the loops facing. After the additions, when there are 56 loops on the knitting needles, these loops go to the foot.
- The side is knitted with the front surface - seven rows. Then connect the first and seventh row. After knit the eleven rows with a plate pattern, make a marking for decorating a sock (15 loops + 8 + 10 + 8 + 15). Tie a toe.
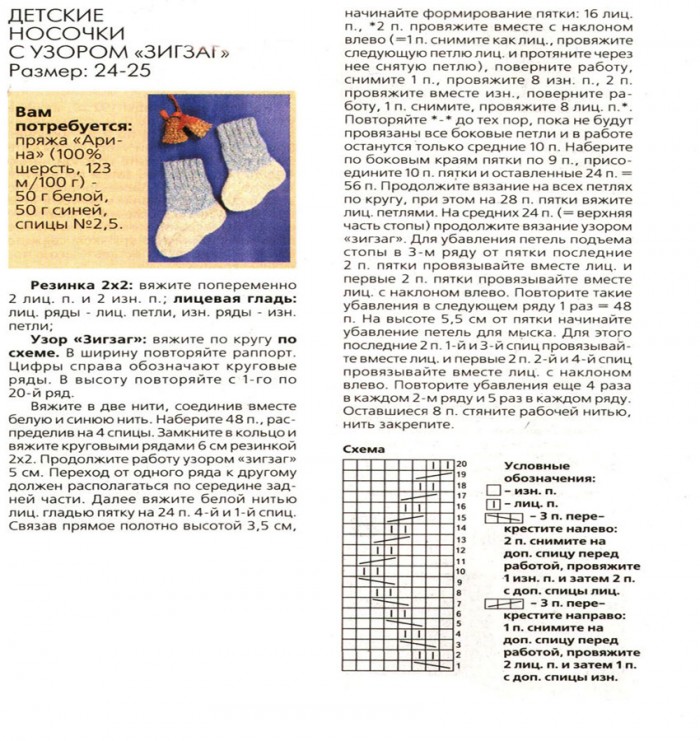
When the sock is ready, you should make holes for lacing booties. They are done as follows: cloak + two loops together faces. + Knockok + 2 loops together persons. As a result, 40 loops will remain on the knitting needles. Then you need to tie the entire row with facial loops, then knit the cuffs with a pattern "corn".
How to knit a drawing on the knitting needles - "corn"
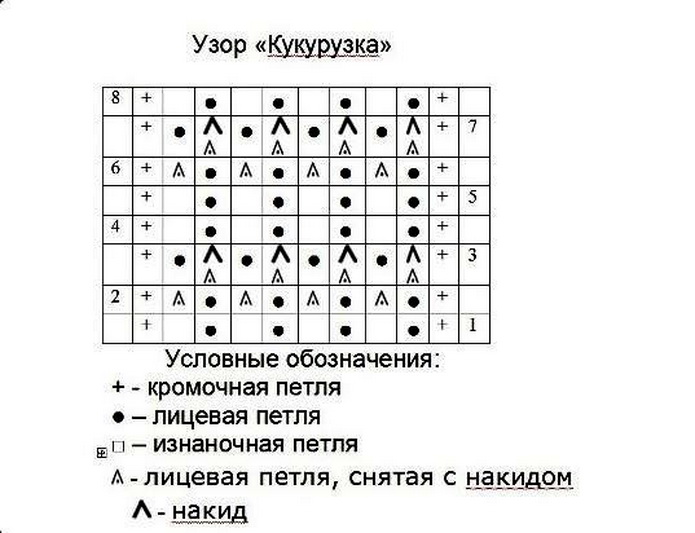
- In the front row, knit the only iron loop, 1 persons., 1 out., 1 persons., 1 out. So knit until the end of the row, knit the last loop not by the pattern, but with the only hem.
- In the second row, remove the first loop, without knitting, 1 persons., Remove 1 loop without knitting, with crochet after 1 persons. And repeat the process to the end of the row.
- In the third row, knit the hem, do not knit a crochet loop, make a cloak again, after 1 persons. Repeat the rapport to the end of the row.
- In the fourth row: the first hem, 1 persons., 1 out. And so to the end.
- Thus, you get beautiful patterns, you need five such convex patterns. After knit two rows with a plate pattern, close all the loops and sew the booty with threads.
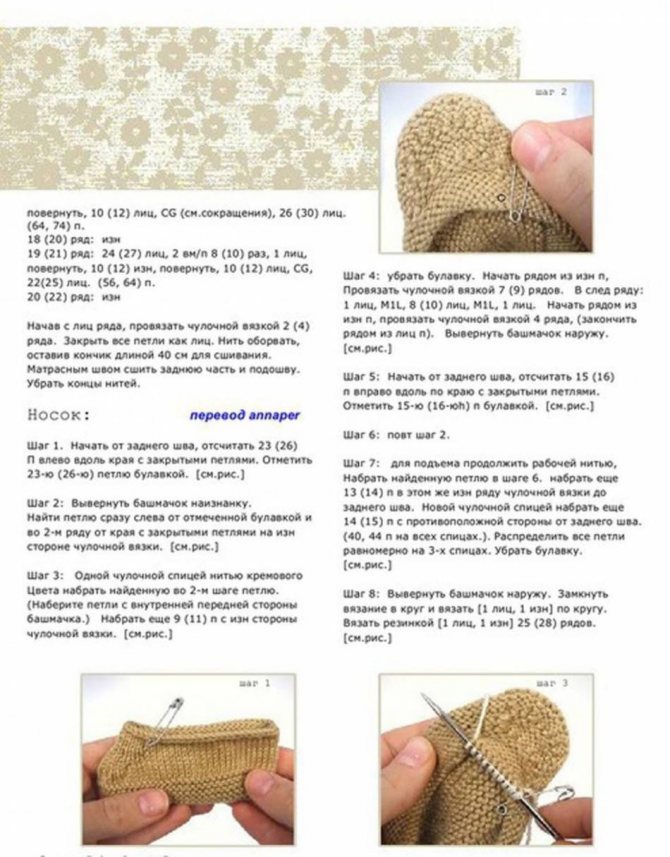
It remains only to insert the lace and decorate with hyprashable and flowers a booty, as in the figure above. Knit the second booty according to the same scheme.
How to knit overalls to children from 0 to 3 years old?
The jumpsuit for babies is comfortable in that it will warm in cold weather. They are put on by mothers when they go with their children for a walk or lead the child to the hospital for a physical examination. Probably all children in the wardrobe have such a thing. It can be bought in clothing stores for children, or you can tie it with your own hands. Moreover, knitting for children from 0 to 3 years old is popular among mothers, so you can find a lot of tips on the network online about the process of creating such clothes.
For overalls, you will need:
- Yarn - 425 g
- Knitting needles - suitable size
- Needle, scissors, accessories for decorating a thing
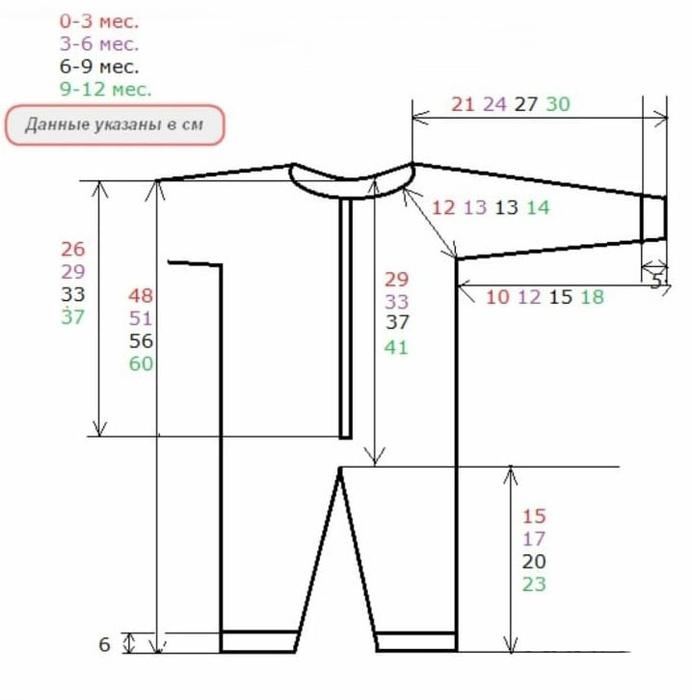
Before starting the knitting process, take measurements. You will need to find out the width of the chest, the volume of the hips and the size of the waist. Also take measurements of the circumference of the neck, head, the length of the product, the length of the sleeve, pants. To make clothes longer, you can make a pattern with allowances. The overalls drawing is provided below. You substitute your measurements in the pattern and make small allowances for free fit.
How to knit a jumpsuit?
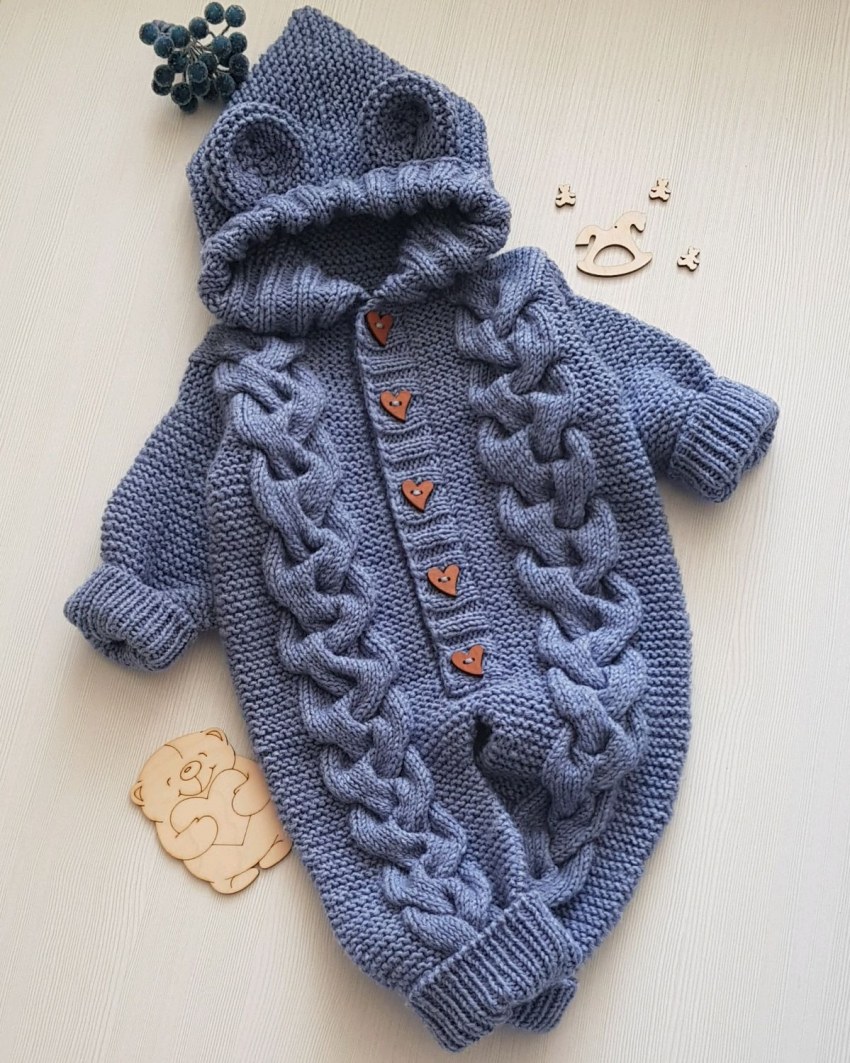
- The model with ears is suitable for both the girl and the boy, if the color of the product is neutral (not pink and not too dark). After building a pattern, you can immediately start knitting overalls. He is comfortable, and at the same time he will sit beautifully at the child. The figure has a gray thing, you choose any that you like.
- For ears, you can buy threads of a different color, so they are more expressive against the general background. To get started, dial 36 loops on two knitting needles. Pull one knitting needle and knit four centimeters with an elastic band 1/1 or 2/2.
- Next, go to the Posulchny pattern. In every fifth row, make an increase - 1 loop. Having knitted 15 centimeters, combine the legs of the overalls in the middle.
- And knit the back of the jumpsuit with the same pattern. See the pattern and make the necessary additions in the area of \u200b\u200bthe sleeves when knitting the back to the arm of the sleeve.
- At the top you should decorate the neck, closing in the middle of 20 loops, and then knitting two together in two sides through one row.
- When the jumpsuit reaches the required length, close the loops, proceed to knitting the front of the product.
- Before It fits somewhat differently. In addition to the hollow pattern on the pants and the spit pattern will be present in front.
- Even at an altitude of 29 centimeters, see the pattern above, you should divide in half the loops of the front detail of the overalls so that the child is comfortable to wear a thing.
- Then knit already two parts of the gear to the armhole of the sleeves, knit unheated sleeves, as in the image above.
- Decorate the neck, close the loops.
- The hood is knitted separately, then sewn to the product. The ears are also knitted on the knitting needles, and in the end they are sewn to the hood.
Separately, you need to connect the plank with holes for buttons and tie it with hook to the overalls. At the end it remains to sew buttons, the product is ready.

Still look at the portal of articles on similar topics here:
- Knitting on knitting needles - how to knit a men's hat?
- Knitting female caps;
- How to tie the snood with knitting needles?
- How to crochet a snood for a child?

