From this article you will learn how to sew beautiful soft toys with your own hands.
Contents
- How to sew a soft toy of a bull from the shreds of fabric to school: step -by -step instructions
- Video: Slow version. MK, how to sew a cow made of felt without a sewing machine
- How to sew a soft toy horse from fabric shreds: step -by -step instructions, templates, photos
- Video: How to sew a soft toy-rush with your own hands? Apart
- Video: Master class "Fleet toy-horse"
- How to sew a soft toy lavish from fleece: step -by -step instructions, pattern, photo
- Video: DIY Soft toy, new year's sheep
- How to sew a soft toy snake from fleece or flaps of fabric: a pattern with a description, photo
- Video: How to sew a snake toy?
- How to sew a soft toy of a New Year's tiger from a fleece on a Christmas tree: step -by -step instructions, pattern, photo
- Video: How to sew a lion cub - a detailed MK with patterns at the request of subscribers!
- How to sew a soft toy of a bunny, a rabbit of felt for a competition in a kindergarten: step -by -step instructions, pattern
- Video: We sew a toy in the evening! Bunny Tilda.
- Video: DIY Soft Toy Hare Toy
- How to sew a soft toy of a cat, a cat made of shreds of fabric, sock: step -by -step instructions, pattern, photo
- Video: Without a cat and life is not the same! Or how to make a sofa pillow-cat with your own hands!
- Video: kittens from socks. Very simple! How to make a toy with your own hands?
- How to sew a soft toy of a dragon from improvised materials: step -by -step instructions, pattern, photo
- Video: A unique dragon toothless and daytime fury made of magnet became a toy-overwhelming toy!
- How to sew a soft toy monkey from natural or artificial fur: step -by -step instructions, pattern, photo
- Video: How to make a monkey with your own hands?
- How to sew a soft toy of a rooster made of fur or fabric: patterns, photo
- Video: How to sew a rooster? DIY soft toy with your own hands.
- How to sew a soft toy dog \u200b\u200bfrom artificial or natural fur: patterns, photo
- Video: How to sew a dog?
- How to sew a soft toy pig from fleece: a pattern with a description
- Video: Piglets from felt. How to sew a pig? Pattern
- Video: Master class-Peppe pig with your own hands
- How to sew a soft toy rat from flaps of fabric: a pattern with a description
- Video: How to make a rat? DIY toys
- The best New Year's soft toys with your own hands: photo
- Video: How to sew a gnome with your own hands? New Year's toys. Pattern in the description
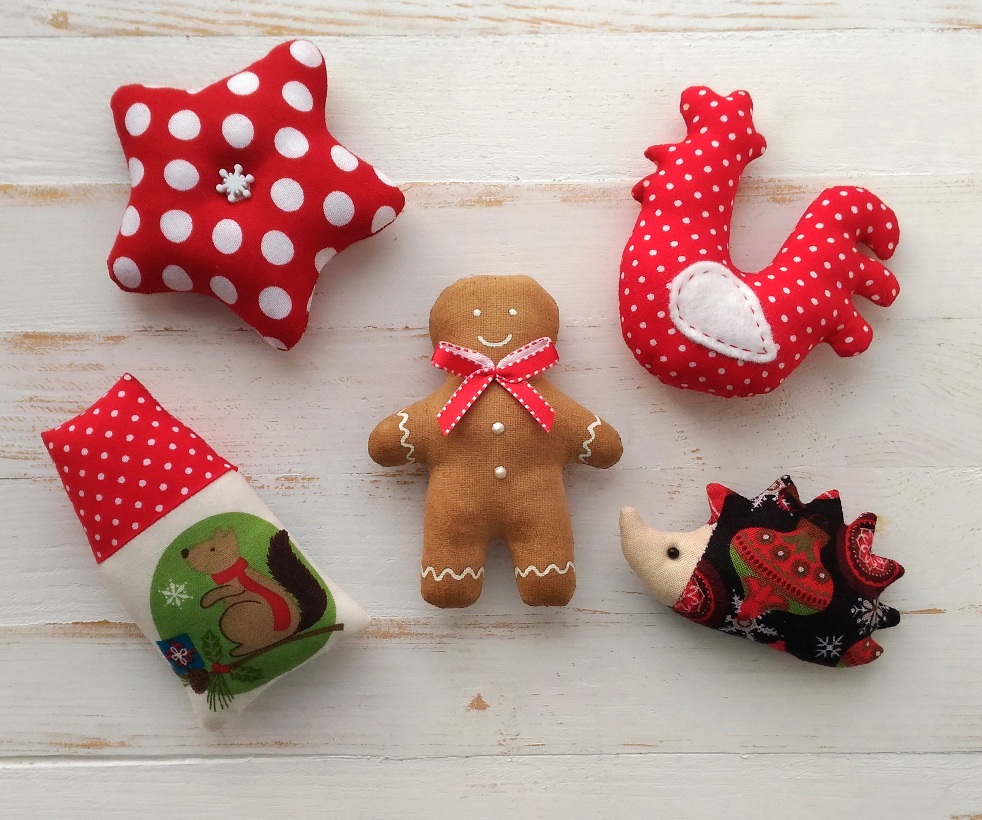
New Year's holidays soon. Cold in winter so wants something soft and warm. Therefore, the best gift for the New Year, or another holiday, will be a soft toy made by yourself. Even if your son or daughter has a birthday, such a toy will be a welcome surprise. You can make it from shreds of fabric, fur, felt and other improvised materials. The main thing is to make a pattern and follow the instructions that are given in this article.
How to sew a soft toy of a bull from the shreds of fabric to school: step -by -step instructions

Even a beginner can make a soft toy at home. This process is very interesting, but many beginner craftswomen are asked by questions: “How to sew? What material is used? What are the threads? You will find answers to these and other questions here. ”
Here is a pattern of a bull. If you sew the udder, you get a cow. Transfer the pattern to paper by printing on a printer, and then cut all the details from the shreds of fabric.
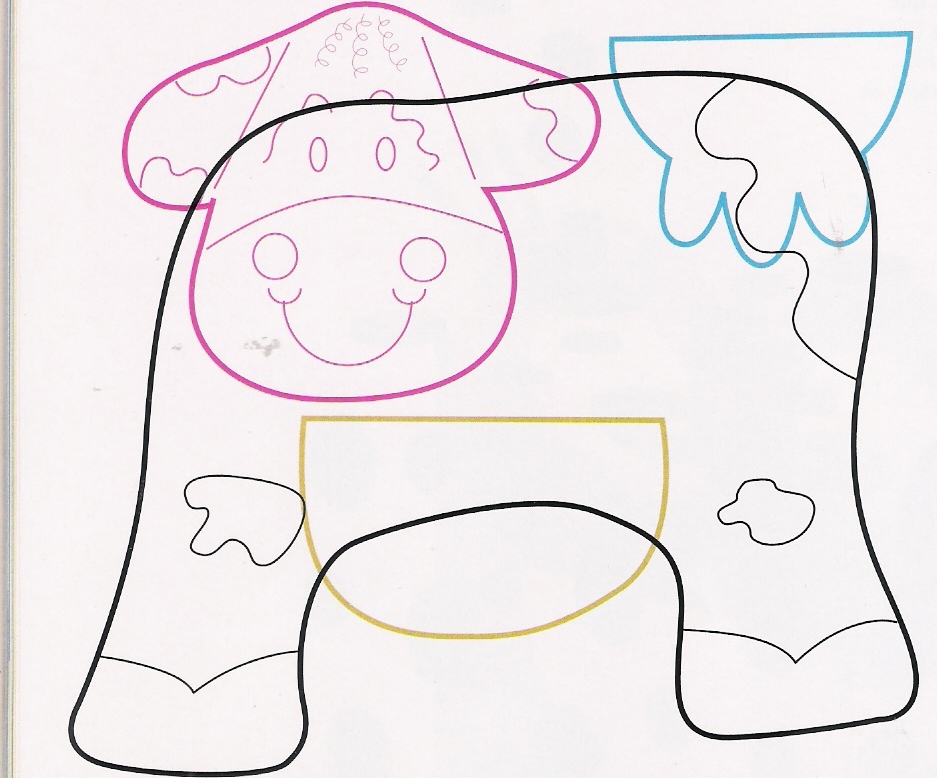
What materials will be needed to sew a soft toy of a bull from the shreds of fabric? Here's a list:
- Fabric shreds
- Tapes for decoration
- Cotton wool or foam
- Buttons of different sizes and flowers to make eyes, nostrils.
Tools:
- Scissors
- Awl
- Measuring tape
- Wire
- Iron
- Sewing machine
- Threads and needle
Of course, the list is not limited to this, toys can also be filled with various cereals or used for paint decoration.
We sew the toy in stages:
- First, make a toy pattern.
- Transfer it to the fabric, immediately cutting out all the details, making indentes for the seams.
- Gather the elements together and sew the mock stitch (head, body).
- After that, sew a half -ready product on a sewing machine, leaving a hole in order for the toy to be turned out. Sew the abdomen and head. Also attach the tail from some kind of tape or lace.
- Horns can be made from the old hair hoop. A bang from synthetic fabric, having previously dissolved a small piece, or from any thread.
- Turn out the product and defeat well.
- Now you should fill the bull with cotton or cereals.
- Gently sew the remaining hole with a hidden seam.
- In conclusion, sew the eyes. Additionally, the toy can be decorated with tape, beads, threads and other decor.
Important: Choose any fabric for the toy, but it is desirable that the edges do not crumble.
Watch the video how to sew a felt cow. This is also very simple, not even needed a sewing machine, everything is done with your hands.
Video: Slow version. MK, how to sew a cow made of felt without a sewing machine
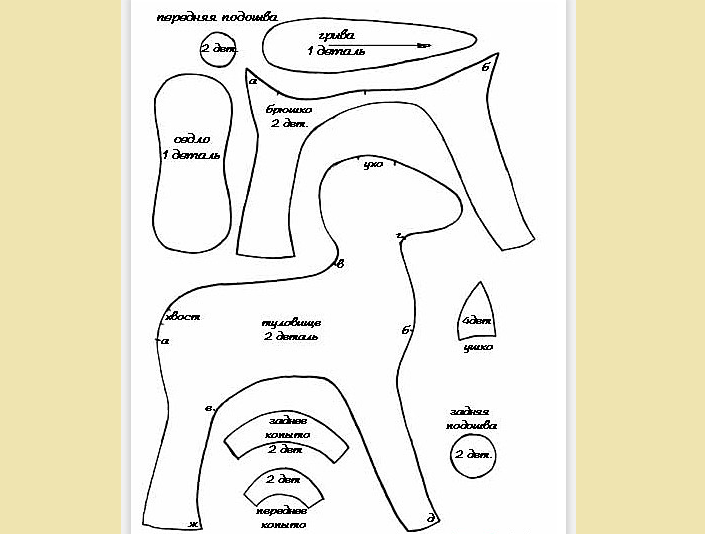
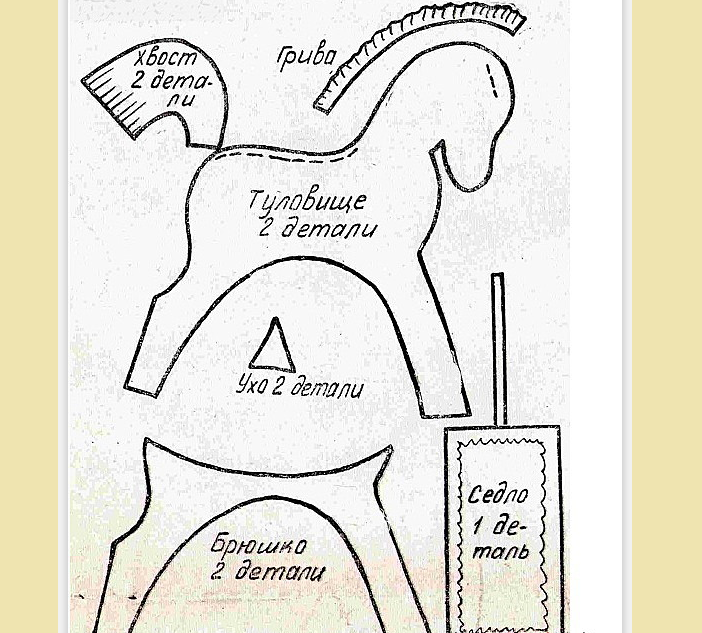
How to sew a soft toy horse from fabric shreds: step -by -step instructions, templates, photos
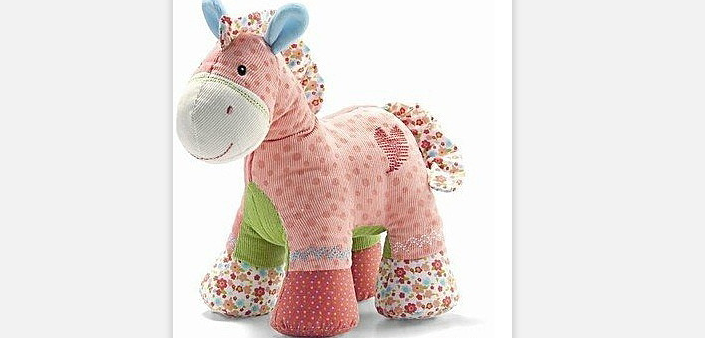
Materials for work:
- Fabric shreds
- Tapes for decoration
- Cotton wool or foam
- Buttons of different sizes and flowers to make eyes, nostrils.
- Scissors
- Measuring tape
- Threads and needle
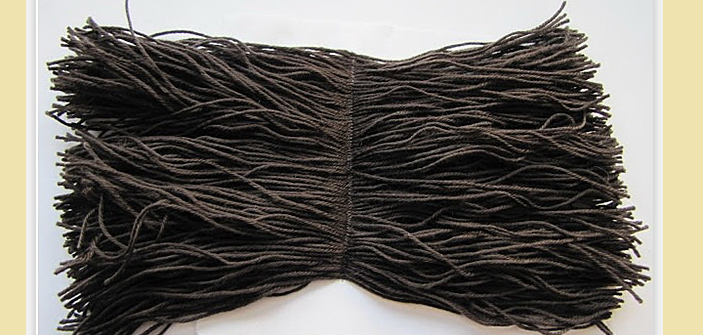
Important: when stitching the horse, leave the intervals in order to then fill it with something.
After drinking the horse with a synthetic winterizer and sew the remaining gaps. Also, in order for the pony to be heavier, it is possible to pour small pebbles or cereals into the hoof. At the end, decorate the horse: sew the eye, embroider nostrils and smile, attach ribbons and saddle.
Video: How to sew a soft toy-rush with your own hands? Apart
A very interesting option for creating a soft toy made of felt. Watch a video master class and bring this idea to life, creating a masterpiece with your own hands.
Video: Master class "Fleet toy-horse"
How to sew a soft toy lavish from fleece: step -by -step instructions, pattern, photo
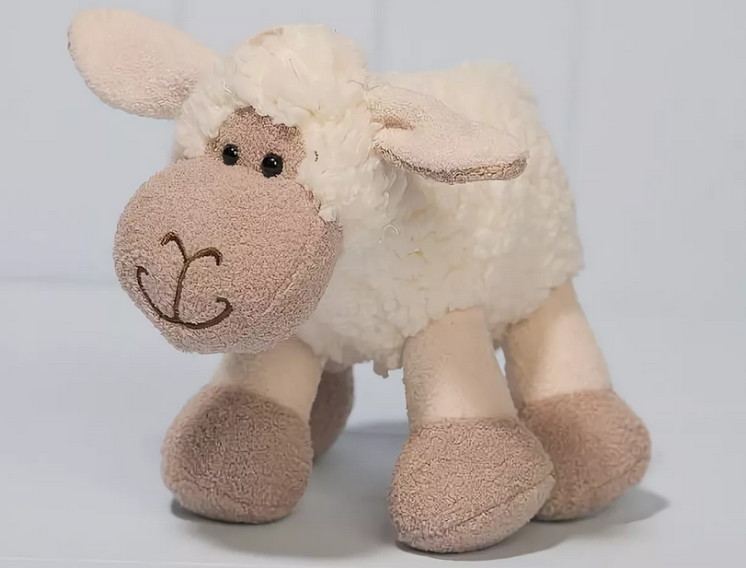
If you want to make a surprise for a child with your own hands, we suggest sewing a soft toy for a sheep of fleece. Such a gift is perfect for the New Year, birthday or any other special day. Creating a soft miracle is quite easy and fast. Only a few hours - and the sheep is ready. So, how to sew a soft toy for a sheep of fleece?
For work, you need to have:
- Fleece (dark and beige)
- Big and small buttons
- Filler (cotton wool, fur, Folofiber)
Step-by-step instruction:
- We prepare the pattern.
- To do this, you can use the template that we offer, or you can find and create your own unique sheep.
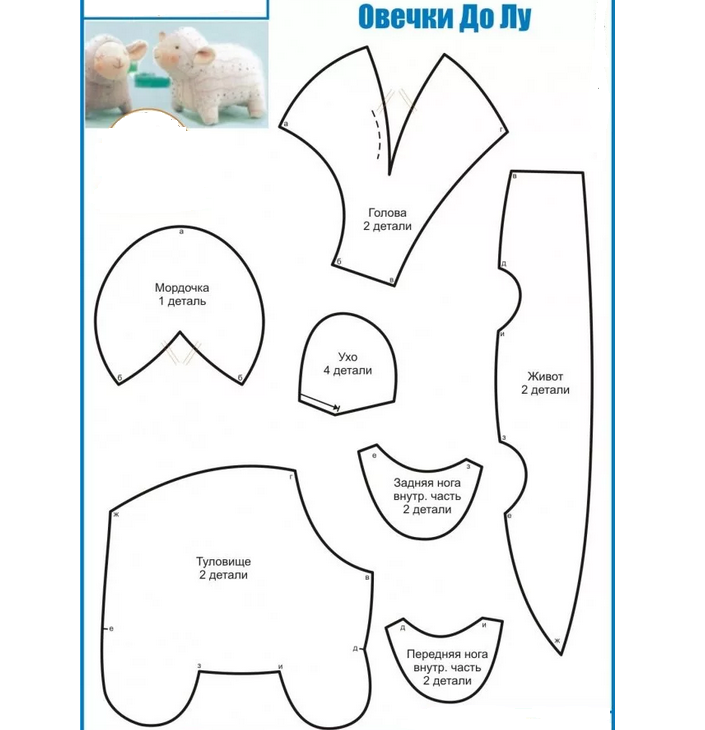
- Cut the details of the toy. Make them in quantity, as in the photo above - 2 pieces of all but muzzle and ears (4 pieces).
- Apply the pattern made to the fabric and carefully circle it.
- For the body, use a gray or black fleece, for a muzzle - beige or white. Do not forget to leave a seam (approximately 0.5 cm).
- We fasten all the elements. It is important that all the details are connected by pins “face” inward.
- We sew the details. Try to ensure that the loops are 3-4 mm from each other. Leave a place (4-5 cm) not completely sewn up to turn the fabric with the front side.
- We fill the toy with cotton or fur. Our sheep acquires forms.
- We sew the muzzle to the body. To make the head of our toy carefully, use a secret seam for fastening.
- Determine the location of the eyes and sew small black buttons.
- What kind of sheep without a curly bang? You can beat cotton wool and glue it on your head.
- We make the legs. Use large buttons of dark color for this. Sew them from below - it will be a hoof and the sheep will stand well on any surface.
Everything - our soft toy is ready for a flower sheep!
Video: DIY Soft toy, new year's sheep
How to sew a soft toy snake from fleece or flaps of fabric: a pattern with a description, photo
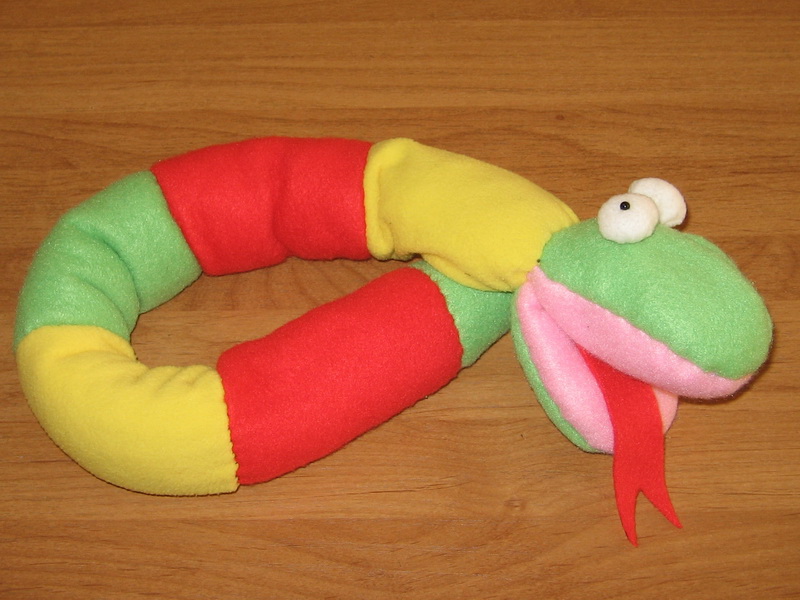
Many children love such unusual toys. A soft snake can be used instead of a pillow, it’s fun to play with it, it is not very cumbersome and light. Sewing such a toy is simple. You need to cut only a few details and connect them. Below you will find step -by -step instructions for sewing a soft toy of a snake from a fleece or flap of fabric. Here's a pattern:
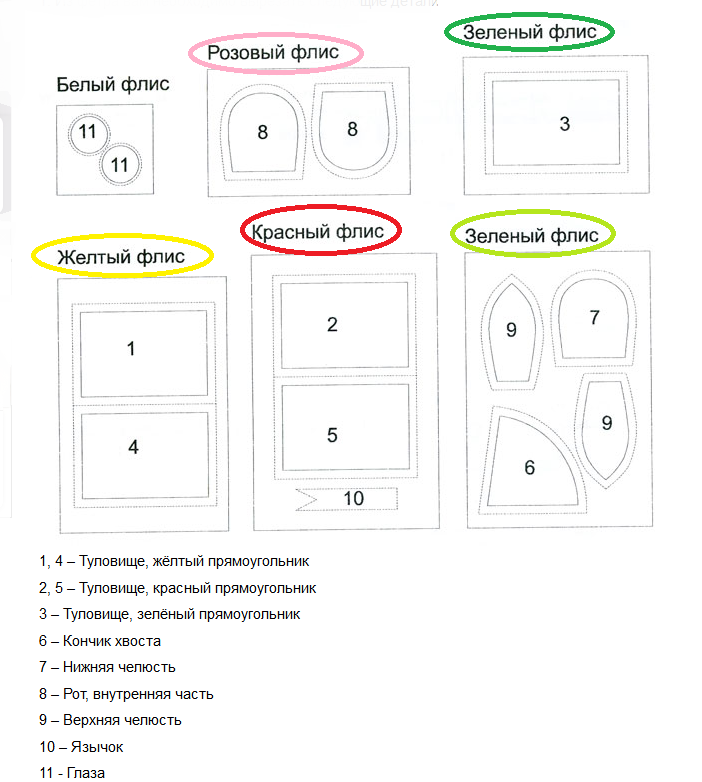
Description of work on creating a snake:
- Print a pattern on a sheet of paper of the desired size. If you want to make a large snake, then the pattern is needed in an increased version.
- Cut all the details and transfer them to the fabric. Cut them in the right amount. Look at the photo of a ready -made snake.
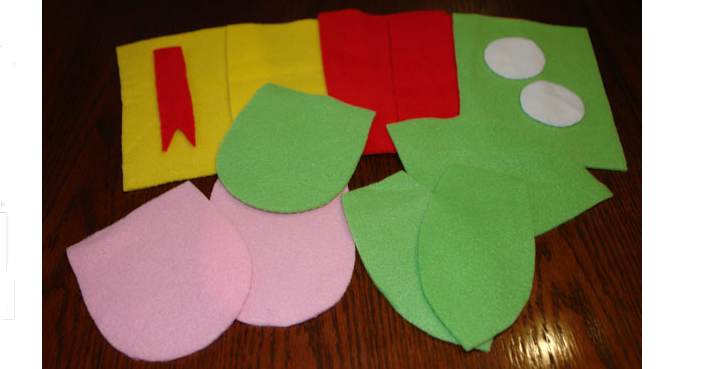
- Now sew the parts of the body from the inside, connect them and turn them out “on the face”.
- Sew the details of the mouth, inserting and sewing the tongue.
- Attach the rest of the head details and sew this part to the body.
- Make your eyes and attach them to the head. The snake is ready.
You can fantasize with the color and texture of fabrics. You can use, for example, chintz, fleece or felt flats in this product. It will turn out unusual and very attractive.
Video: How to sew a snake toy?
How to sew a soft toy of a New Year's tiger from a fleece on a Christmas tree: step -by -step instructions, pattern, photo
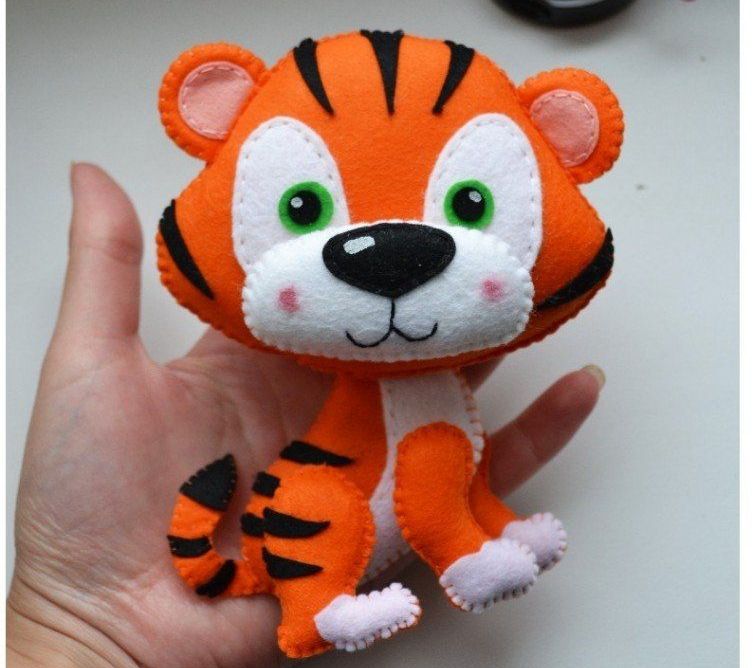
Creating a soft toy with your own hands is not entirely difficult to think initially. Such work is feasible even to those who do not very often hold the sewing needle in their hands. Such a craft will serve as an excellent souvenir for the New Year, it can be hung as a decoration and a talisman on a Christmas tree. How to sew a soft toy of a New Year's tiger from fleece on a Christmas tree, as in the photo above?
The following items will be needed to make a toy:
- Sewing needle
- Dense fleece orange, brown or yellow
- Black flap of fleece
- Fabric
- Synthetic winterizer or what you can fill in the toy
- Scissors
- Beads or beads for eye
- Chalk or marker for stroke on fabric
Pattern:
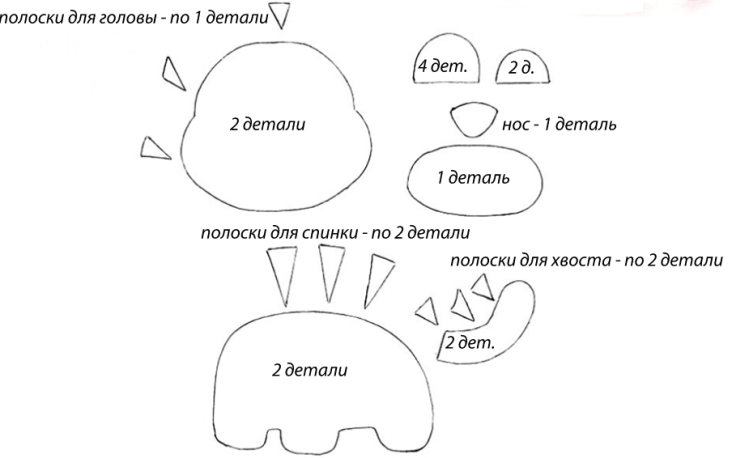
Step -by -step work instruction:
- Print the pattern of the tiger, cut all the details and add them to the fleece.
- Cut the resulting parts of the tiger, sew the ears and tail to the body.
- Add the strips to the body of the tiger, sewing black triangular pieces of fabric to it.
- Sew your nose and muzzle on your head.
- Go in pairing the ears of the silence, add your eyes from beads or beads, embroider a mustache and mouth of the tiger.
- Combine two parts of the head, filling it with synthetic winterizer, two halves.
- Now you need to sew parts of the body with each other, gradually filling them with the filler.
- Attach your head to the body and the New Year's souvenir is ready.
Use a pink pencil to make a blush. The eyes can also be made of buttons or cut out of a dense felt suitable in size. Look in the video how the lion cub is performed. In his likeness, you can create a tiger.
Video: How to sew a lion cub - a detailed MK with patterns at the request of subscribers!
How to sew a soft toy of a bunny, a rabbit of felt for a competition in a kindergarten: step -by -step instructions, pattern
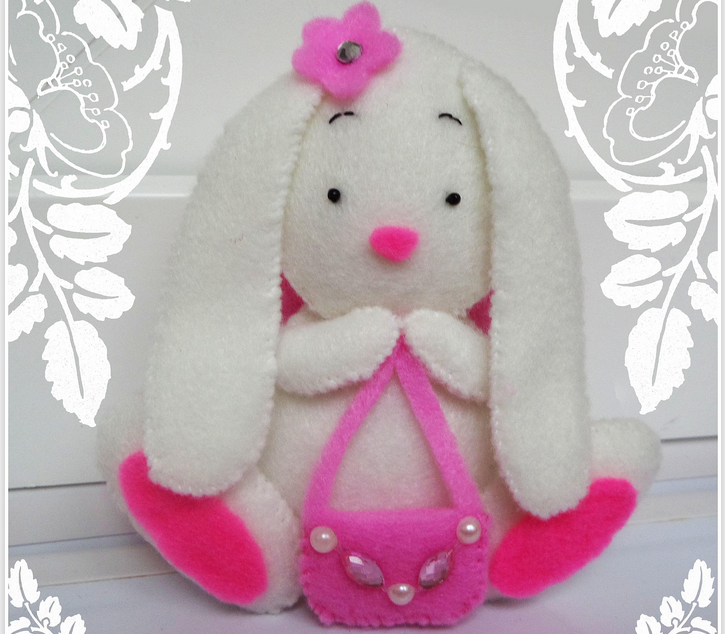
Your daughter or son wants you to buy a soft toy? Maybe you need a toy for a competition in a kindergarten? There is no need to go to the store, you can sew it yourself. For this, you will not need expensive tools and materials - everything is simple and easy.
It is no secret that soft toys adore absolutely everyone who likes to return to the world of carefree childhood, and animals become best friends in fun games. To sew a soft toy of a bunny, a rabbit made of felt, we have prepared a simple lesson for you, in which you will quickly learn to sew it with your own hands without much difficulty. The bunny you made will carry a powerful charge of positive and love.
So, let's get down. What do we need for the bunny:
- Bright pink, pink and white felt
- Pink and white threads with a needle
- Scissors
- Glue "second" (you can use "moment")
- Black beads (for the eye of a bunny)
- Filler made of synthetic winterizer and tweezers
- Rhinestones
- Pencil, felt -tip pen, pen and paper
Here's a bunny pattern:
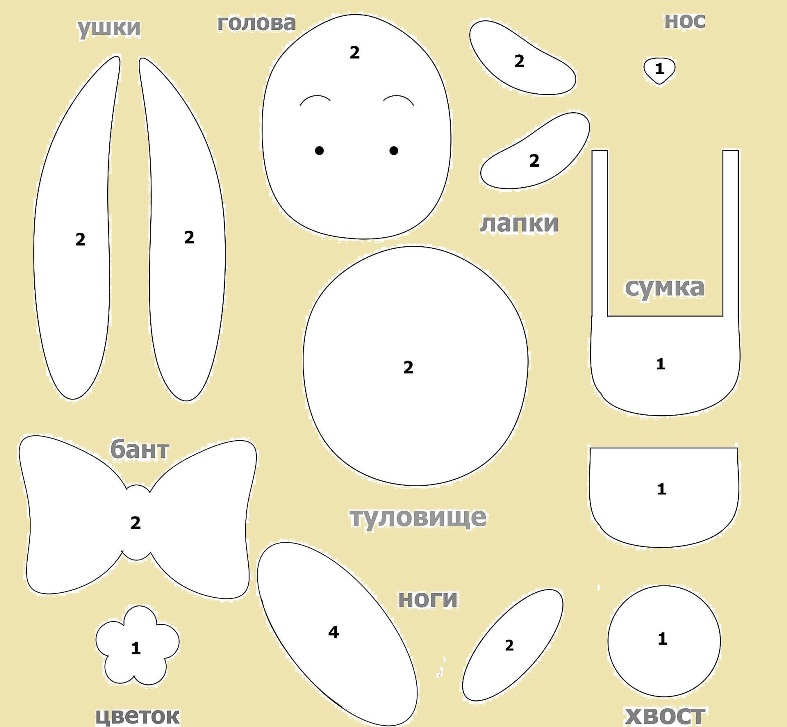
Step-by-step instruction:
- At the very beginning of the work, we will need a pattern of our future toy of a bunny. Using the program to view images, increase the print size to the desired size and print the pattern on a sheet of paper.
- If you don’t have a printer, it doesn’t matter, attach a sheet of paper to the monitor and circle the contours with a pencil.
- The numbers on the pattern mean the amount that will be needed for parts of the body. As you can see, the number 2 on the Bange means that two such details need to be made.
- Lay the cut parts on the felt fabric of a suitable color and circle the handle or a felt -tip pen.
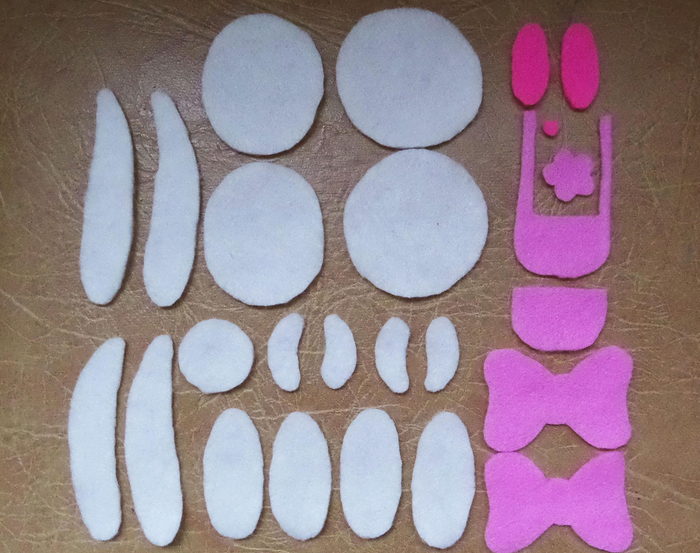
- It is better to start collecting a toy from the head. We sew the beads to our round part and embroide the eyebrows with a double thread.
- Glue the bright pink nose with glue for a second. Be careful, drops of glue can get into clean areas, and then you will have to make a new muzzle.
- We attach the second part of the same part and sew up with a hidden seam.
- Below we leave about one and a half centimeters to fill the finished head with a synthetic winterizer. To fill the filler through such a small hole, we take a pre -prepared tweezers.
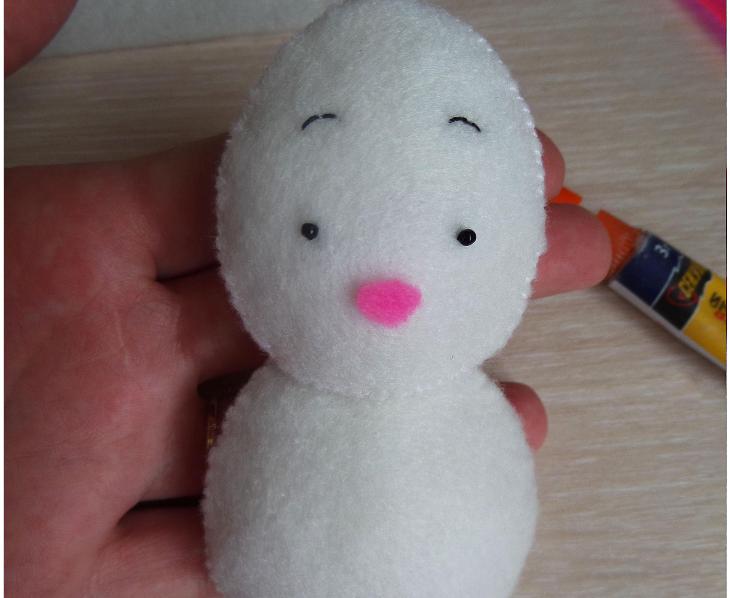
- As soon as the synthetic winterizer is enough, we completely sew the hole.
- In the same way, we make a bunny of the paw and the body.
- Glue the head to the body, but some needlewomen use threads.
- The paws of our bunny must be sewn so that they rise to the face.
- The ears are similarly sewn with an invisible stitch, at your discretion you can not fill the ears with synthetic winterizer.
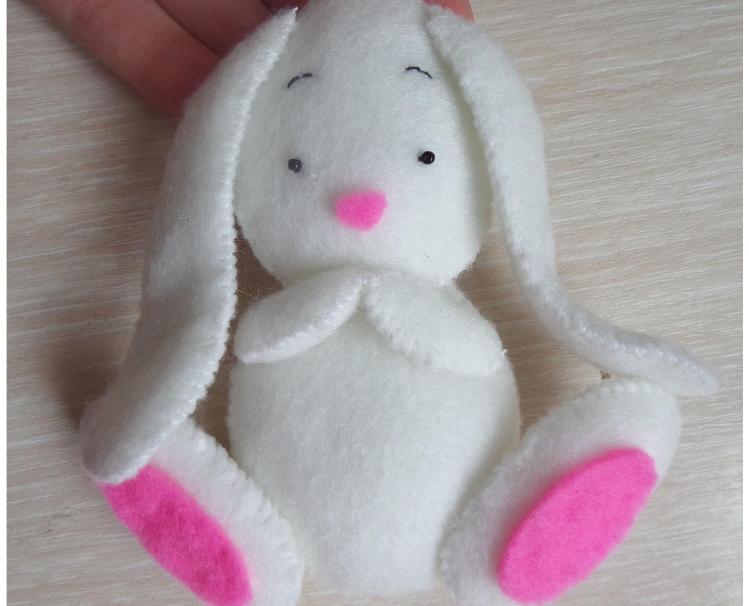
- Do not forget to sew the legs.
- As soon as they finished sewing up the legs, glue bright pink pillows.
- Now it's time to start collecting all the details together.
- Glue a flower with a rupture on your head.
- We sew the bag and glue the straps.
- Do not forget to decorate the bag with strangers.
- We give our bunnies her handbag in the paws.
- We sew the pink bow and glue it to the neck.
- And finally, we make a tail. In the middle of the circle we put a piece of synthetic winterizer and tighten it with a thread.
- Glue the tail.
We got a rather cute soft toy of a bunny from improvised materials. It is worth noting that you can add cute and tie real children's booties for this toy. How to do this, read in the article on our website on this link.
Video: We sew a toy in the evening! Bunny Tilda.
Video: DIY Soft Toy Hare Toy
How to sew a soft toy of a cat, a cat made of shreds of fabric, sock: step -by -step instructions, pattern, photo
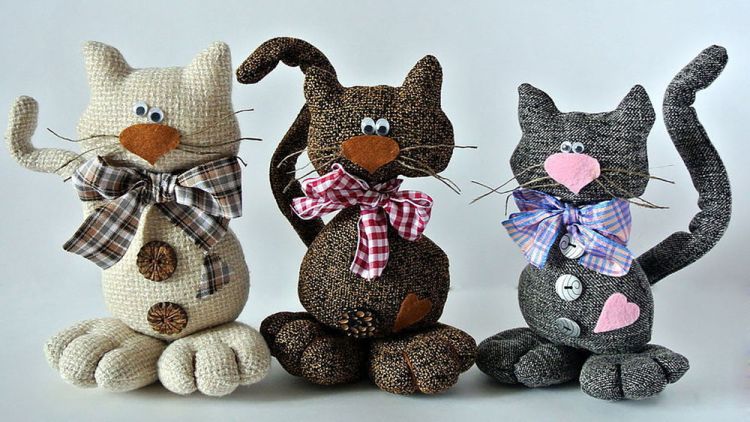
Such a toy can be a great gift for children, and will also be a pleasant surprise for your family and friends, for example, for the New Year, if it is a symbol of the year or for a birthday.
What materials will be needed for sewing a soft toy of a cat, a cat of fabric shreds:
- Two materials of different colors.
- Pattern of the future product on a cardboard basis.
- Pins for fixation
- Filler to choose from
- Threads of bright colors
Tools for the future product:
- Scissors
- Needle,
- Sewing machine (optional)
Tools for stuffing soft toy:
- An excellent tool for stuffing toys is a wooden skewer, since it is with the help of it that you can fill the smallest details of the product.
- But this must be done exclusively with a blunt end, since acute can damage the fabric.
If all materials and tools are prepared, you can start. Here is a step -by -step instruction and pattern:
- On a pre -prepared fabric, you need to put a pattern and circle with the calculation that the seams will take a lot of space.
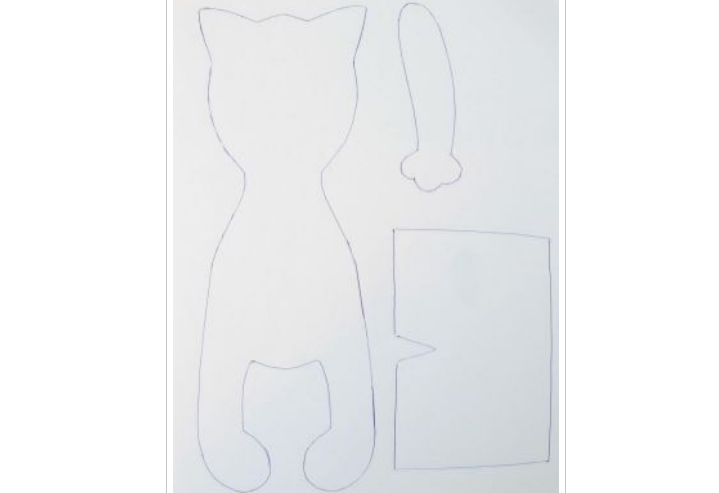
Details need to circle a certain amount:
- Torso 2 pcs
- Paws 2 of the same models
- Shorts - 2 pieces
Details are transferred to the fabric and stitched in various ways:
- Machine
- Manually
Important:Machine stitches should be no more than 1.5 millimeters using a polyester thread.
Manual seams convenient for use:

- Secret seam It is used to sew holes left to fill the toy with the selected material.
- The seam back is a needle Used to emphasize the exact forms of the selected product.
- Tambourine seam Used to form a wide stitch as a decoration.
- The seam forward is a needle Used to flash patterns on the product, as well as to collect all components of the toy.
- French knot To create a pupil in the center of the eye of a soft toy.
- Switch embroidery for small elements.
We continue the work:
- Cut the already prostrated parts with an allowance of 8-10 millimeters.
- Follow the toy with material. Ears, tail, paws can be filled with a wooden stick so that it is all evenly.
- Stitch the hole that was left to fill the toy.
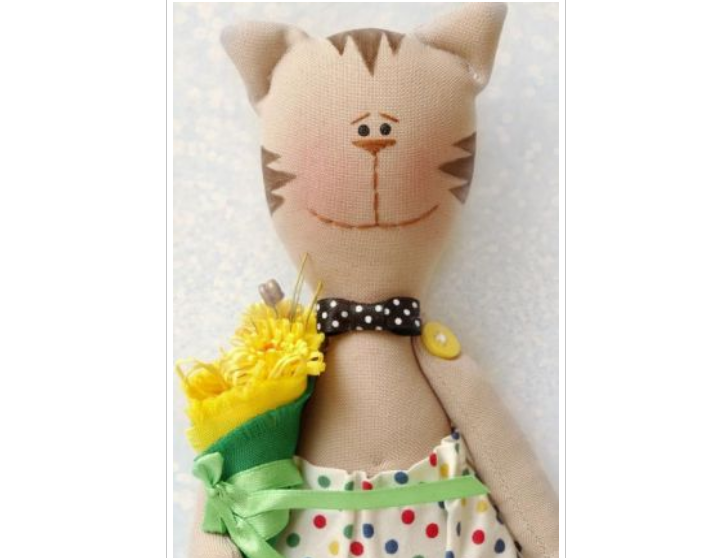
- The most exciting step can be considered a decoration of a soft toy, and this is sewing, embroidery, cutting out of interesting elements on it, and the most common is considered to decorate with the help of fabric paints, it gives the toy colorful elements that emphasize the sophistication of this product.
- Process the edges using an overlock function.
- If the body is ready, you can start forming a muzzle.
- After the muzzle is formed, a soft product can be considered-a toy-cat.
So easy and easy to make a soft toy with your own hands, which will delight relatives and friends.
Video: Without a cat and life is not the same! Or how to make a sofa pillow-cat with your own hands!
The kitten can still be made from the sock. It is better to choose a bright color material, it will turn out very beautifully and interesting.
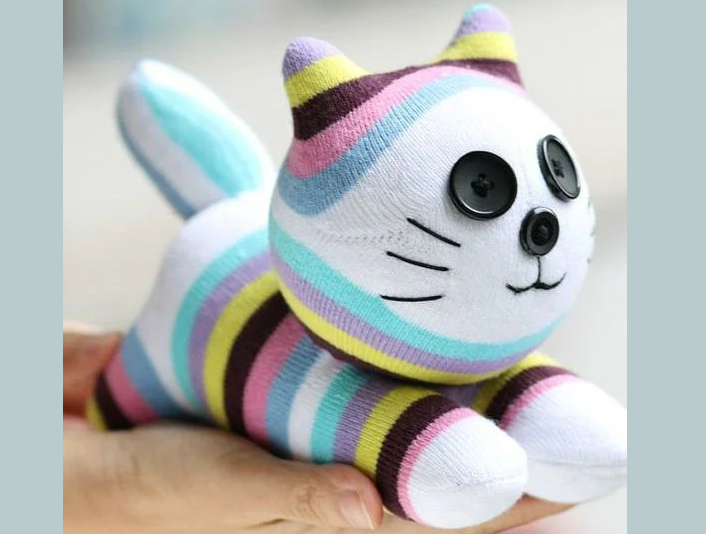
What materials will be needed for sewing this wonderful toy:
- Toe (color to choose from)
- The thread is ordinary
- Free for embroidery
- Filler (to choose from)
- Threads of bright colors
- Buttons
Tools for the future product:
- Scissors
- Needle
- Wooden skewer
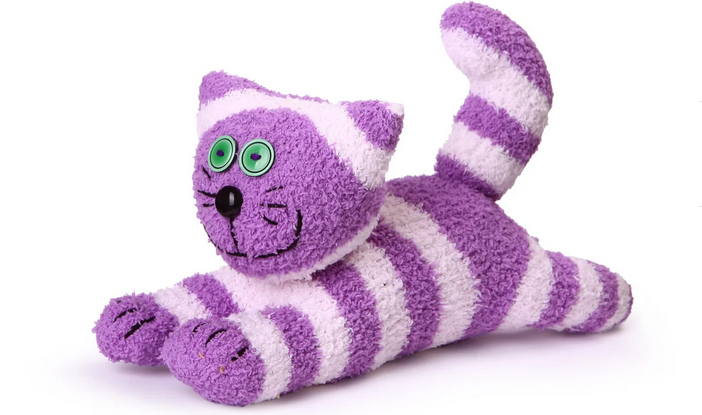
Beginning of work:
- First you need to cut off the upper part of the sock, since the product will be from the lower part.
- The toe is filled with material with the correct distribution, since the head should be less than the body.
- Now, right along the upper part, you need to be knocked out with needles without bending the corners, as these are the future ears of the cat.
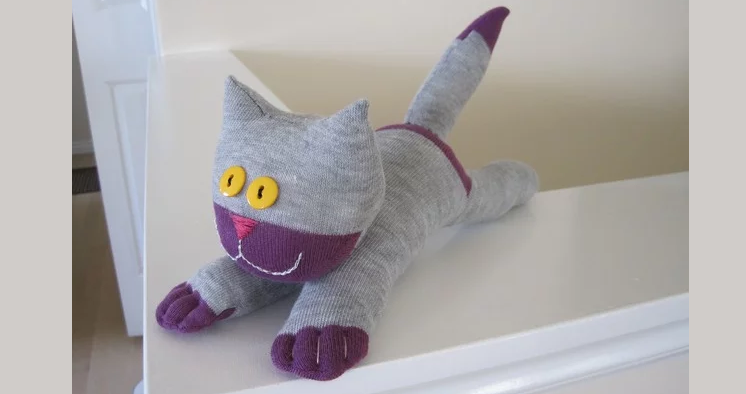
- Sew with a hidden seam outlined by needles line.
- The most important step, since it depends on it how beautiful the cat will be. Embroider embroidery, embroider eyes, mouth, nose, mustache.
So you can make a soft toy with your own hands so easily and simply, which will delight your relatives and friends!
Video: kittens from socks. Very simple! How to make a toy with your own hands?
How to sew a soft toy of a dragon from improvised materials: step -by -step instructions, pattern, photo
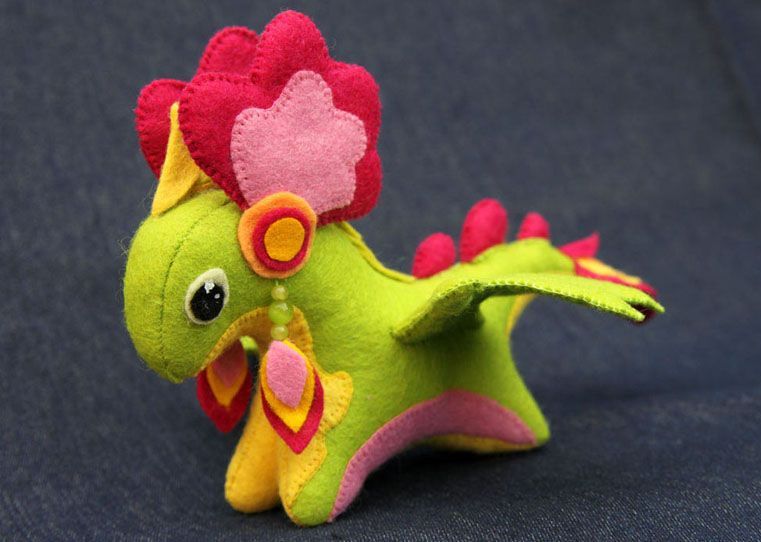
In order to sew a soft toy of a dragon from improvised materials, you will need the following materials:
- Fleece The color, as you wish, it can be green or other color.
- Felt and microfiber Dragon body colors.
- Black and white felt Or another dense woolen fabric, like on a coat or jacket. You can cut the old thing, but you can buy a new fabric.
- The knitwear is black.
- Filler, you can synthetic winterizer.
- Granulate - To fill in the toy.
- Ribbons for decoration.
A phased description of needlework:
- Draw a pattern on paper, or even easier, take the ready -made one and print. Below is a finished pattern. Just increase it and print it.
- You will need 2 sheets of A4 format. After the blanks are taken to the paper, they must be cut out.
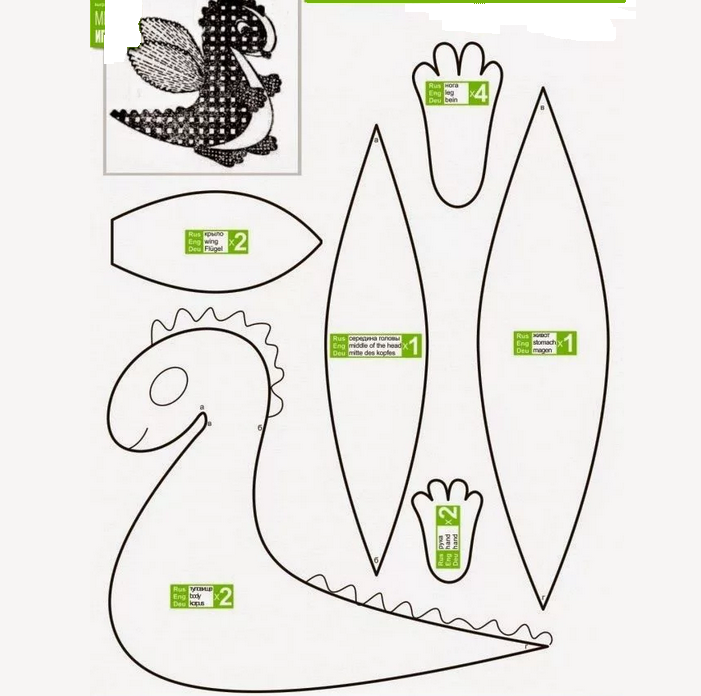
We attach patterns to the material of the color we need and cut out:
- 2 parts of the body
- 1 part forehead
- 1 detail abdomen
- 2 wings of green microfiber
- 2 of black knitwear
- 2 Details from white felt - eyes
- 2 details from black felt - pupils
- 2 details of the hand
- 2 details of the leg
- 1 part Combator of the head
- 1 part tail
It is worth knowing: Fabric blanks must be made without increases. Details of the wings It is necessary to perform with an increase of 0.5 cm. The blanks necessary for the eyes of the dragon, cut out without adding, exactly in accordance with the paper option. Details of the limbs We perform toys without increments from the Dragon Body Ferm.
Here is a step -by -step instruction:
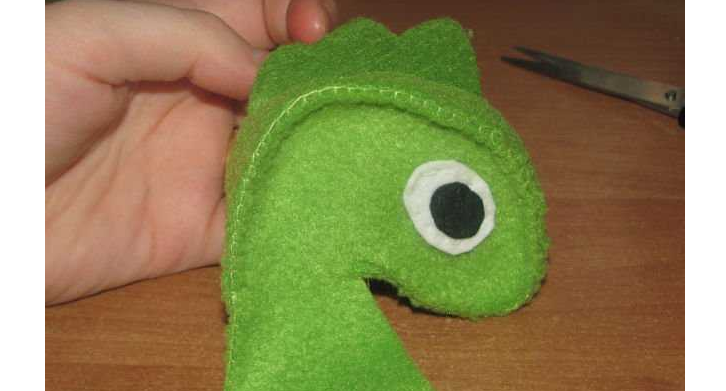
- First, we sew the eyes with the “back needle” with the dragon's body, and then sew the pupils with the same seam on top of the eye. 2 details of the body of the dragon with ready -made eyes should come out.
- We take the details of the “forehead” and “crest of the head”, outline approximately the middle of the forehead and sew a hidden seam of the comb.
- Then sew your forehead to one part "body". We perform the seam through the edge into the loop. Having retreated 2-3 mm from the edge of the product, we start the thread from the wrong side to the front side, leaning the thread over the edge, retreating, a little 1-2 mm from the previous stitch, we also remove the needle and spread the threads into the formed loop.
- In the same way, sew your forehead to the second part "body".
- Then you need to take the parts of the wings. We apply one green wing to one black, the front sides to each other and roll them with a needle. We do the same with the second details of the product. As a result, two wings come out.
- If there is a machine, you can sew the details, leaving the lower part of the wing free. Or carefully sew with our hands with a machine seam, retreating from the edge of the product of 1 mm and leaving a little thread at the beginning of the product, when performing the first stitch. We also leave the base not stitched, and it is necessary to leave the thread after the firmware, in the last stitch, do not cut.
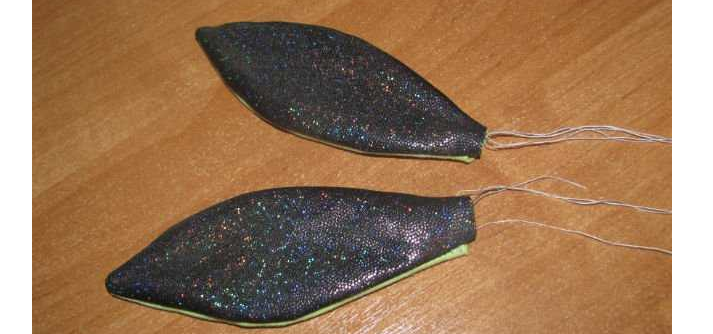
- Cut the upper corners on the wings with scissors, about 1 mm, making them from pointed straight. It is important not to hurt the stitch. For this, the indentation was needed.
- We turn the wings on the front. If necessary, to better fall the fabric, you can steam with an iron.
- Leaned threads, tighten the base of the wings.
- We compare the wings with green details to each other. Using a needle, sew the details to each other with several stitches.
- We return to previously stitched details of the body and forehead. In the place where the last seam of the “forehead” ends, we make several stitches 2-3 cm long and sew the wings.
- The wings must be slightly launched inside the details of the “body of the dragon”. We remove the needle from the wrong side to the front, a distance of 2-3 mm from the edge. Then, from the front part, the needle is removed to the edge of the body.
- Having fixed the wings, sew the tail completely from the upper body, and 2-3 cm on the lower surface of the part.
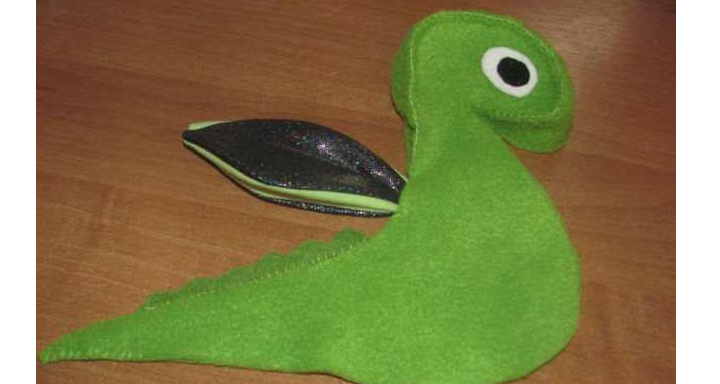
- The lower part in the part “Croat for the tail” must be flashed “through the edge into a loop”.
- Next, sew the crest for the tail, with a hidden seam, capturing only the threads of the stitched crest.
- We sew the already familiar seam, the part “abdomen” to one of the details of the body.
- It is necessary to immediately fill in the tail of the toy with a filler.
- We sew the abdomen to the second part of the body. It is necessary to leave not sewn about 5-6 cm near the neck.
- We fill the lower part of the toy in the abdomen alternately with the filler: filler - granulate - filler. The head of the toy is filled only with the filler.
- We sew the left hole.
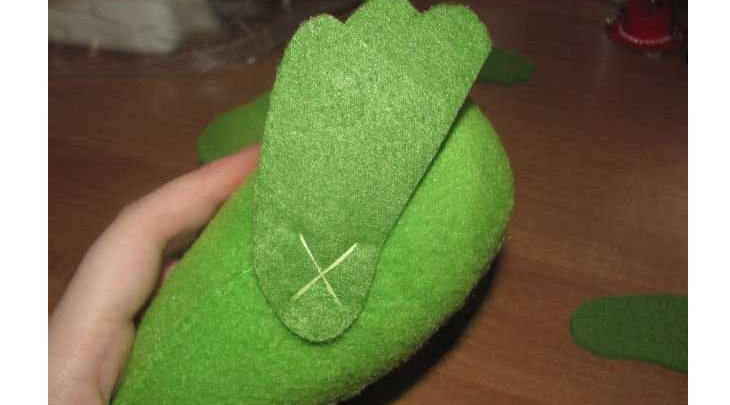
- We try on the location of the paw. We sew with double thread, two large stitches, in the heel area, a cross on the cross. We also sew the second paw.
- We plan the location of the paws of the dragon. We sew both paws in the same way - the cross on the cross.
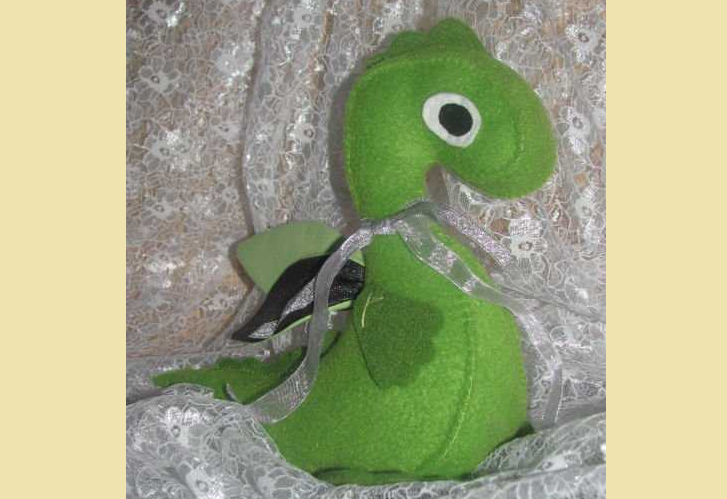
You can decorate the toy with a ribbon by tied it on the neck. Watch the video, it tells and clearly shows how else you can sew a dragon.
Video: A unique dragon toothless and daytime fury made of magnet became a toy-overwhelming toy!
How to sew a soft toy monkey from natural or artificial fur: step -by -step instructions, pattern, photo
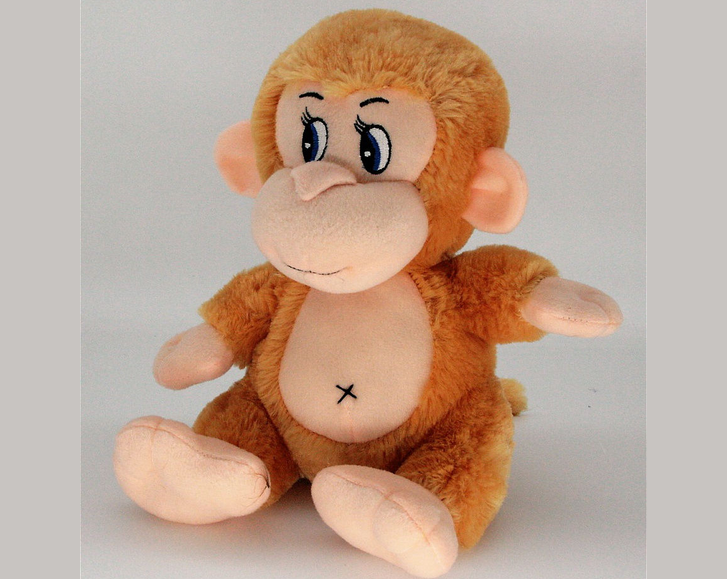
Monkey is a funny and cheerful little animal. A soft toy in the form of this ripper will be a great gift for any holiday. Sew it yourself - such a surprise for a child or even an adult will be doubly pleasant. If you have flaps of natural or artificial fur, then you can start sewing right now. If not, then such blanks can be bought at any store for needlework.
For sewing a soft toy of a monkey you will need:
- Textile: fur, fleece or felt dark brown and light brown (or you can even take cotton types of tissues at discretion).
- Filler: Vata, synthetic winterizer.
- To create the eyes - Buttons, beads are black, pieces of black and white felt.
- Brown threads and tools - Scissors, needle, pencil, pin.
Pattern:
- Make patterns of monkey details.
- You will need 2 details for the body and head of the monkey, tail and ears.
- Also 4 details on the paws and one part for the muzzle.
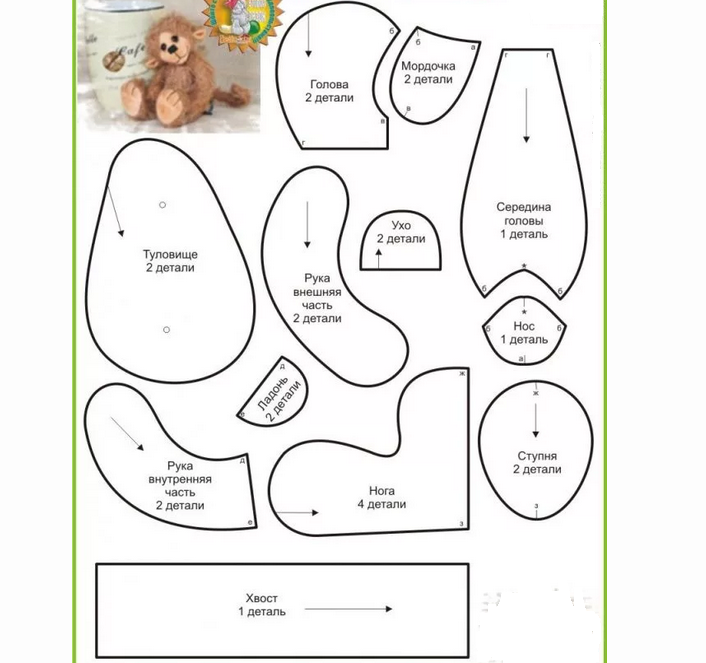
Step -by -step work instruction:
- Cut the parts from paper and transfer to the fabric, leaving 0.5 cm to the allowances. Attach the details of the parts and cut the blanks.
- First sew the tail and paws. Stuff with the filler, leave the hole.
- Then sew the basis of the toy - the body.
- Also sew the finished paws and tail. Leave a hole for the neck on the torso.
- Next, sew the monkey’s head and sew ears and eyes to her.
- Then connect the head with the body.
- Make your mouth and nose in any convenient way: from fabric, with embroidery and so on.
If desired, you can add several decor elements, for example, tie a bank on the neck or sew a flower in the ear.
Video: How to make a monkey with your own hands?
How to sew a soft toy of a rooster made of fur or fabric: patterns, photo
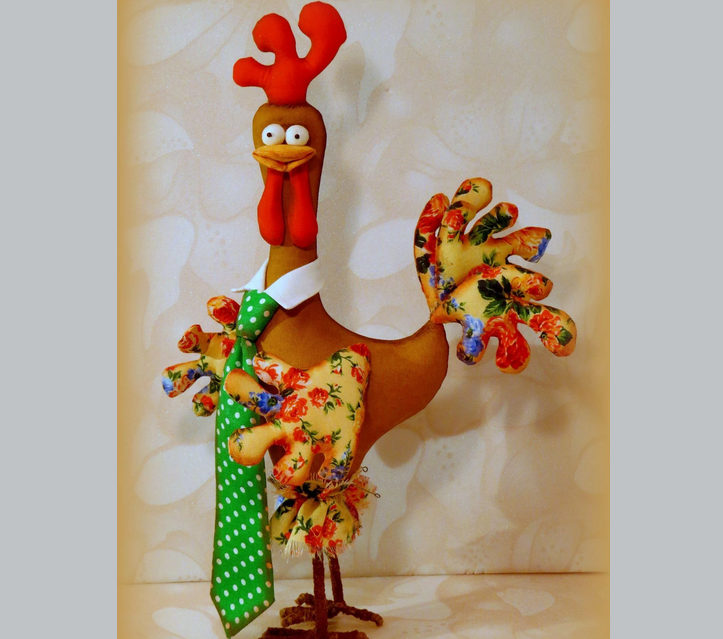
A funny but stylish rooster is also a symbol of the year. This is a great gift for the New Year and for any children's holiday for the baby. In order to sew a soft toy of a rooster made of fur or fabric, you will need:
- Material
- Fabric
- Watering material (synthetic winterizer)
- Buttons or eye beads
- Scissors
- A few needles
- Printed or redrawn pattern in the right format and size
- Call
First, it is required to print the pattern on the parchment sheet in the right size.
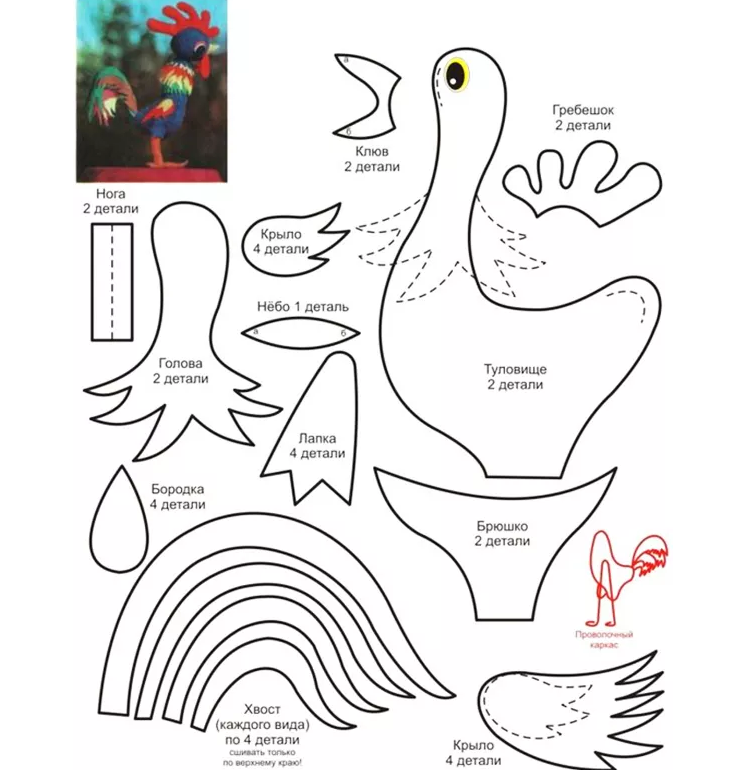
Now do the following:
- Cut the details and use the fine to transfer their contours to the fabric. It should be noted that paired parts from different types of fabric should be circled on one material (if you have different flaps).
- Each second detail should be turned upside down to come out, as in a mirror reflection.
- Then draw an additional circuit 2 cm larger than the first and cut the parts.
- First, from the wrong side, sew the part of the chest part with the abdomen and body.
- Then turn out the workpiece on the front side.
- Sew two parts of the head, leaving a gap for filler stuffing.
- The same work is performed with wings.
- Insert the wire frame into the inside of the rooster. Draw conclusions for the tail and paws from it.
- Then the torso and head of the toy should be filled with the filler in order to give, a good volume.
- After that, sew these details together.
- Sew the wings along the upper part to the body, before that, insert a cardboard into them.
- The next step will be the connection of two parts of the beard and beak. It is necessary to fix these parts in their required places on the toy.
- At the rooster, the tail is made of fabric strips, which are sewn on one side of the sides. In order not to be difficult to turn these objects, it is worth sewing them on the front side with a neat seam.
- Put on the items on the wire part-frame, sew it.
- The paws of the rooster can be covered with soft material on the same wire or other frame.
At the end of the manufacture of the toy, there will be eye design. Use round buttons or beads. But you can make them from suitable pieces of material and sew in place.
Video: How to sew a rooster? DIY soft toy with your own hands.
How to sew a soft toy dog \u200b\u200bfrom artificial or natural fur: patterns, photo
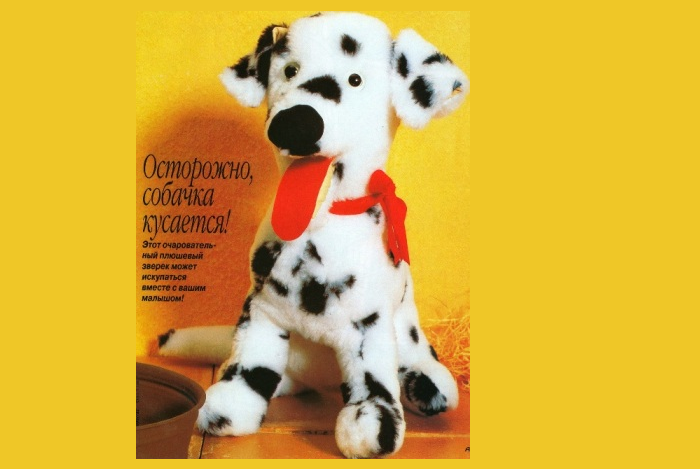
This cheerful Dalmatian can become a real friend. They say he even bites. Well, what about it without it? After all, he is almost like real. Below you will find an instruction that will help sew a soft toy dog \u200b\u200bfrom artificial or natural fur.
Materials that will be needed:
- Artificial fur (length and thickness depends on the size)
- Sitter of satin
- Artificial or genuine leather, or suede
- Filler (to choose from)
- Sewing threads
- 2 eyes
- Bell (optional)
Tools for the future product:
- Scissors
- Needle
- Wooden skewer
Pattern:
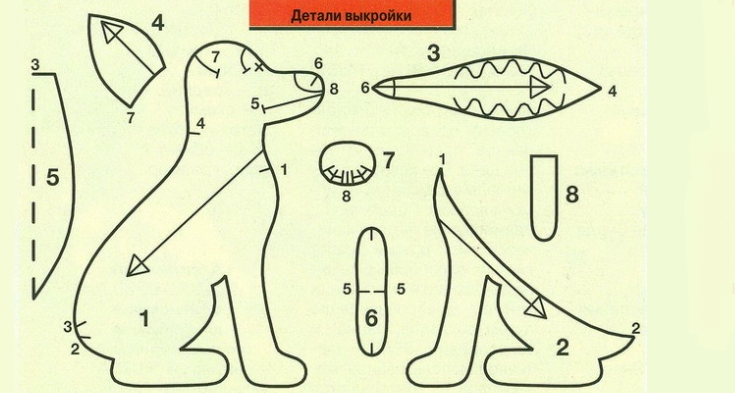
Here is a layout plan for a pattern:
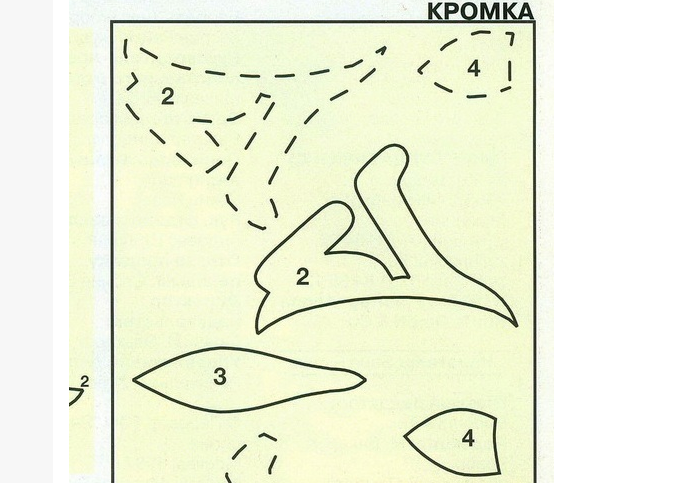
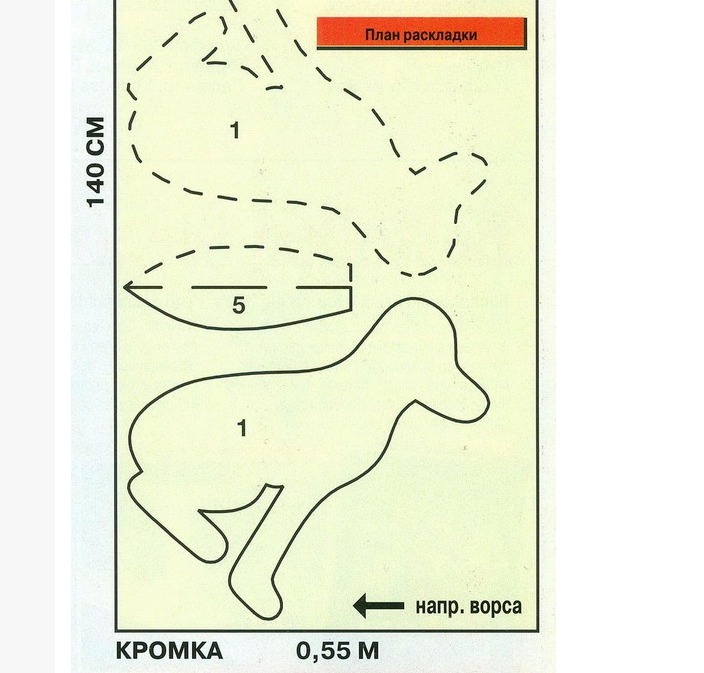
The start of work is the creation of a pattern that consists of such details:
- The lateral part of the body is 2 parts.
- The lower body 2 parts.
- The intermediate part of the head is 1 part.
- Foule ears 2 parts and + from satin 2 parts.
- The tail of the tail is one half, and when cutting, a full tail will turn out.
- One detail: an insert on the muzzle of satin, the part of the nose from a piece of leather, tongue.
When the pattern is ready and you cut out all the details, continue:
- It is necessary to cut the parts on the fabric.
- Turn the fur inside out, while the pile should remain in one direction so that the toy looks neat.
- Be sure to cut out with a suture allowance.
- Stop the seams of the details.
- Cut the rounded places with cuts, for convenience in turning the product.
- Gently sew satin and fur ears.
- Details of the lower part must be tied to the seam of the abdomen, and then symmetrically and the second part.
- Symmetrically stitch small details.
- You need to make a small incision for the muzzle and steal the tongue.
- The intermediate part of the head is flowing, and the tail is sewn through it.
- Turn out the product outward.
- Using a hidden seam, sew a tummy.
- Sew the eyes and ears, glue the nose. Ready.
This is how easy and simply you can make a soft toy-bacon from fur with your own hands. Below you will find another pattern of a cute dog with big eyes, as well as a video video with a master class on sewing.
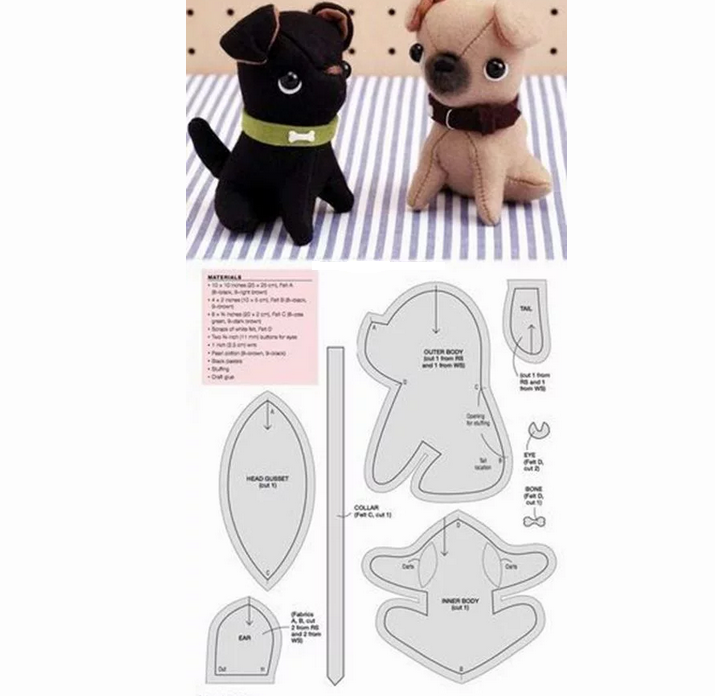
Video: How to sew a dog?
How to sew a soft toy pig from fleece: a pattern with a description

Soft toys are very fond of kids. They return adults to early childhood. Below we will tell you how to sew a soft toy pig with your own hands from fleece, which will become a wonderful and bright element of decor for your home.
Materials for work:
- Fleece of the main color for the body and head
- White fleece for a heel
- Eye and nose beads
- Contrast threads for embroidery of the mouth and other decor elements
To begin with, print a pig pattern or draw on the required scale on cardboard. After that, cut out the necessary parts.
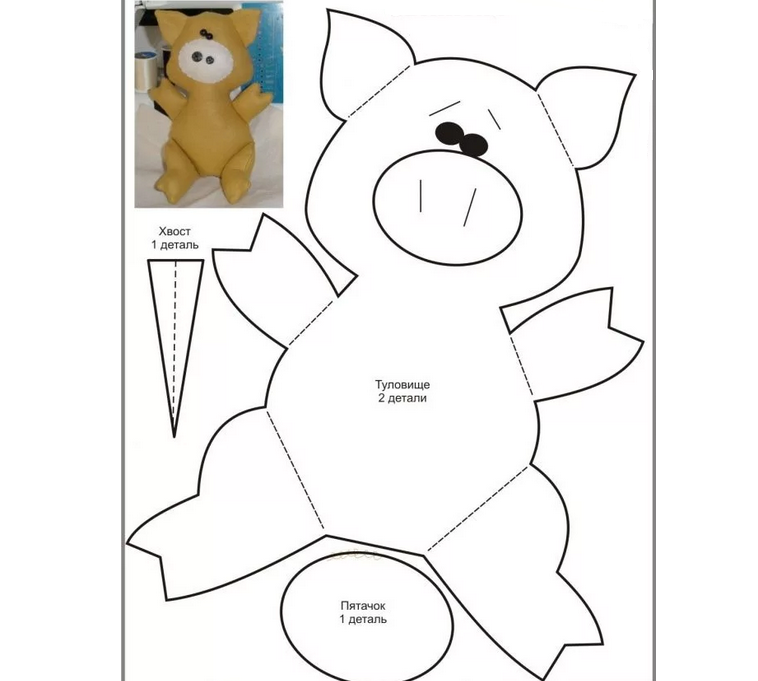
Here is a subsequent description of the work:
- Prepare about two body patterns and four legs from an ordinary fleece.
- The white fleece is useful for the eyes, and from fabric or skin you can make the nose.
- We attach the eyes to the pigtail body and fix it with pins or buttons. Next, sew them to the body with a sewing machine.
- We connect the paws together. They must be flashed along the contour, leaving not stitched. We turn the finished parts of the body.
- We combine parts of the future pig with facade parts inside. Next, we fix the blanks with a pin.
- We sew the product, retreating from the edges of 0.5 cm at the bottom. We leave the hole for the convenience of twisting. We turn out a half -finished toy.
- We stuff the future pig with the filler. We sew up below with a secret seam. It turned out a very interesting and beautiful toy, it remains only to make a mouth with a black thread.
- We sew a nickle to the muzzle. We sew the beads to the eyes, which will be in the role of pupils.
- You can tie a bow to the toy or sew a flower in the ear made in advance from the remains of any bright fabric. The pig is ready.
According to this algorithm, you can easily make a whole team of animals who will delight your child.
Video: Piglets from felt. How to sew a pig? Pattern
Video: Master class-Peppe pig with your own hands
How to sew a soft toy rat from flaps of fabric: a pattern with a description
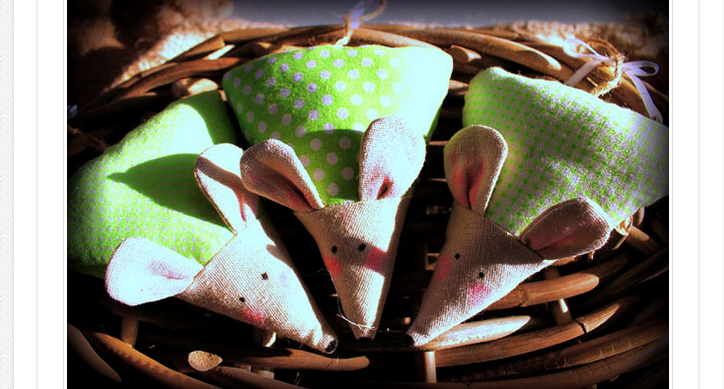
You can sew a rat with your own hands of different types and many ways. Everything will depend on what you need this toy and what are your sewing skills. Consider a simpler version of the soft toy of the “triangular rat”. You can hang this rat on a Christmas tree if it is a symbol of the year or give a child to play.
For such a product, you do not need to buy special details, it will not have mobile elements. The fabric is easily found in every house - these are any shreds of fabric and different scraps. The main thing is that they will be bright then your product will look more interesting.
For one such soft toy you will need:
- Material (20x30 cm)
- Flax fabric for muzzle with ears (8x8)
- Stuffing
- Ribbon (length 10 cm)
- Muline
Description for the manufacture of toys:
- Draw a template or to facilitate the work you can print it.
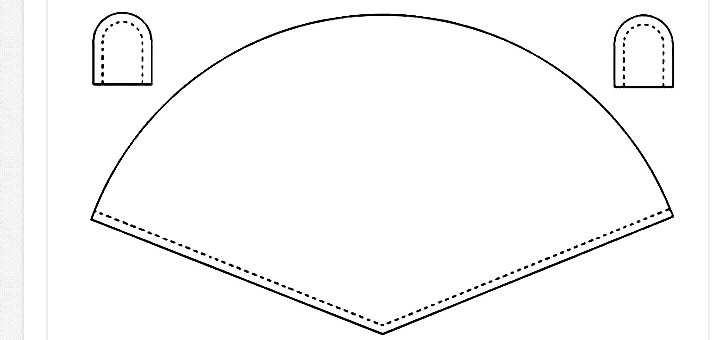
- We cut out the drawn parts and attach to the fabric, after which we circle our small template. You will need 4 parts for the ears, 1 for the body and 1 for the head.
- Sew the ears carefully around the office of all parts except that which will be attached to the toy itself. Then turn the ears to the wrong side. So you will hide your seams.
- Combine the part of the head and body, do not forget to put the ears when stitching. Parts must be sewn from the wrong side.
- Turn our work in half, the ears should be inside. Spend this product from the side, turn out and make up to the middle of the secret seam on the back side. In the middle, put the tail and go a little more.
- Fill the mouse with a filler, for example, with a synthetic winterizer, and complete the seam.
- Draw a toy nose and eyes.
- The finished product can be decorated as you want, add a bow and paint rosy cheeks for example.
You can make several such rats of different shreds of fabric and put together in one basket. This will be a great addition to the interior, for example, in a rustic style or Provence style.
Video: How to make a rat? DIY toys
The best New Year's soft toys with your own hands: photo
When approaching the New Year, I want to make gifts with my own hands to all loved ones and relatives, as well as new toys on the Christmas tree to decorate it in the same style. This will help New Year's soft toys made independently. Here are a photo of the best such products:
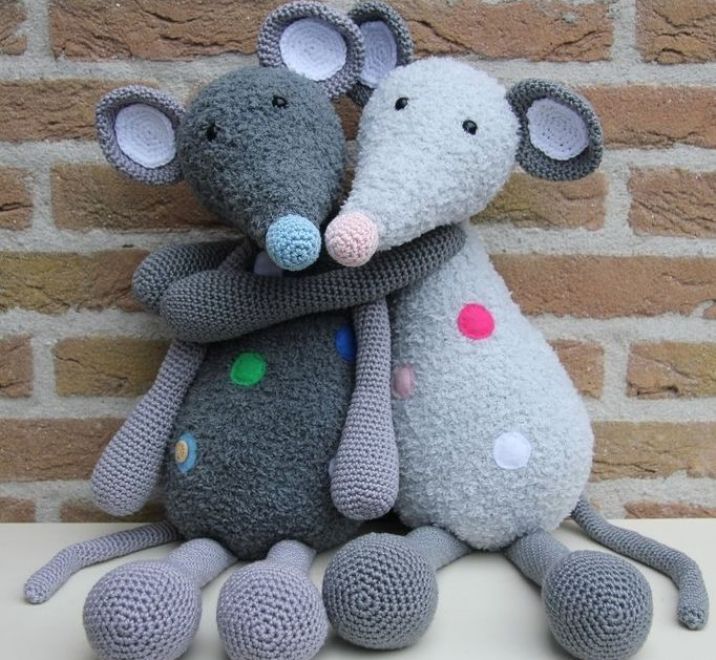
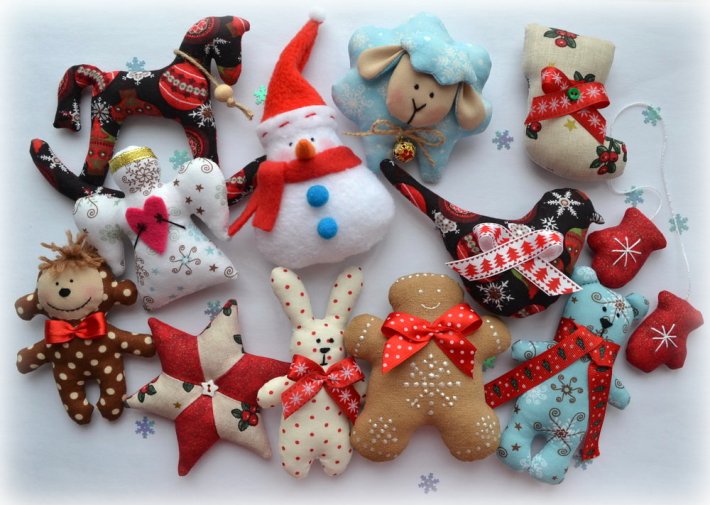
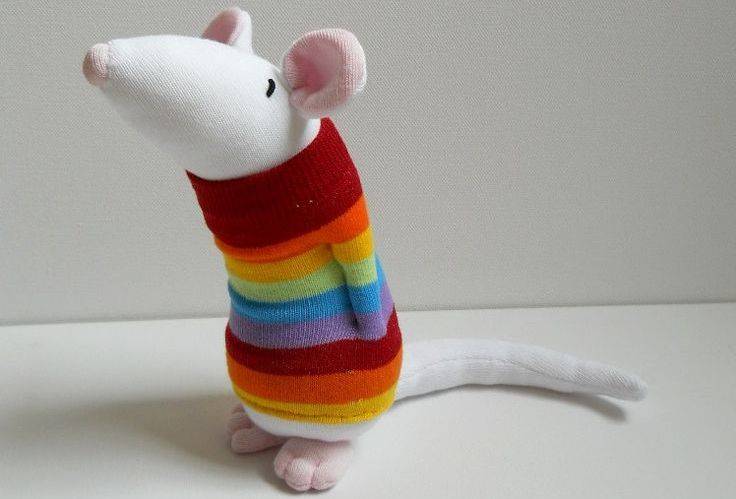

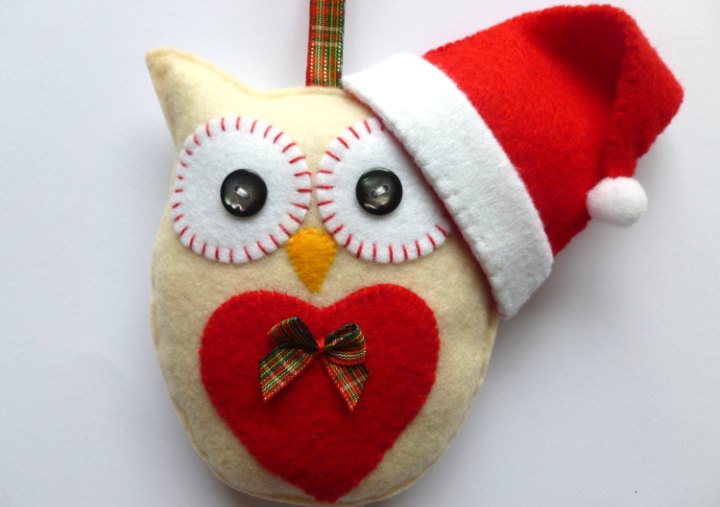
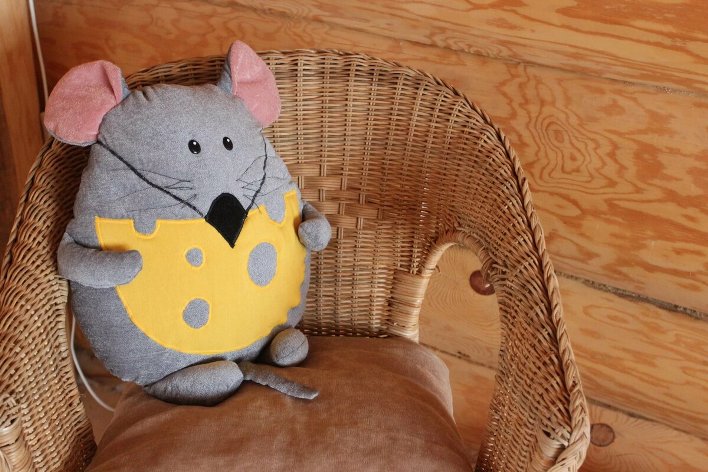
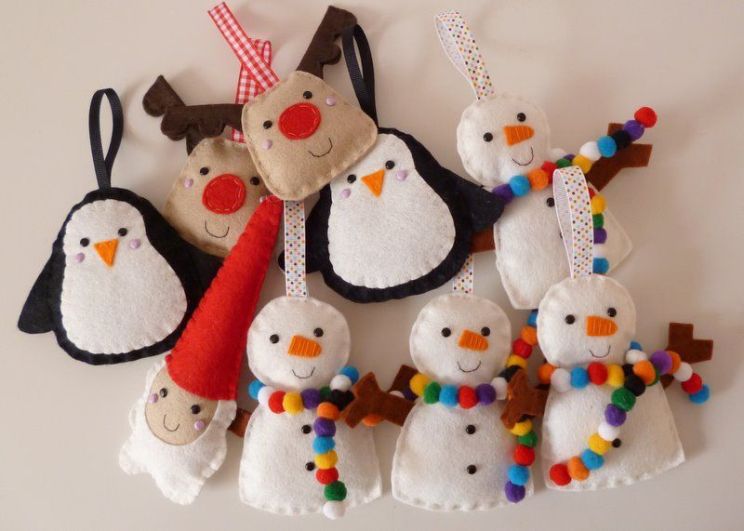
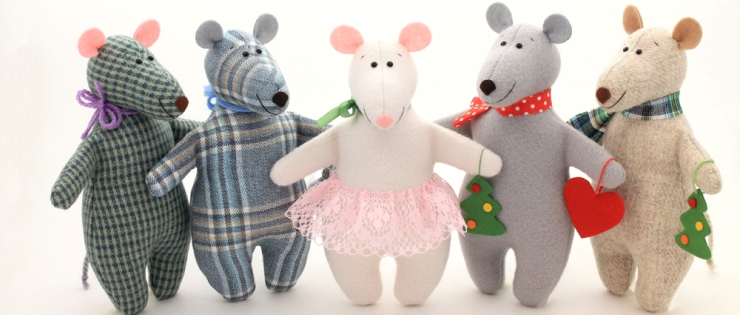
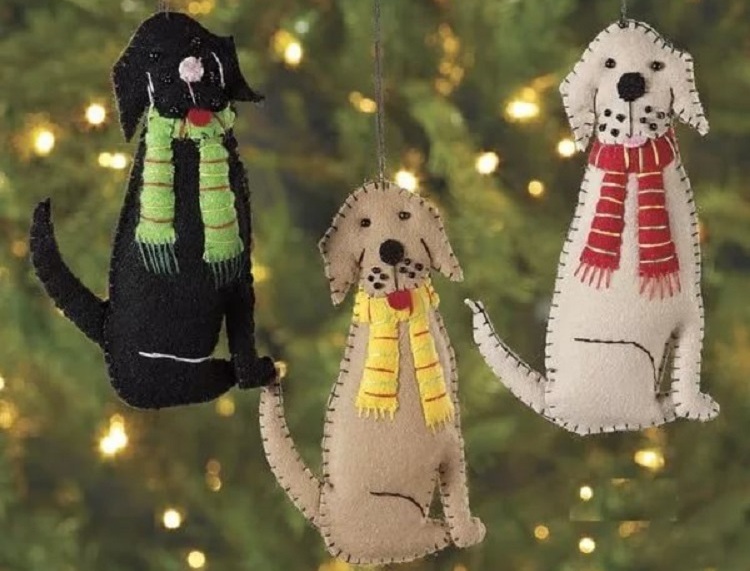
If you want to sew any of these toys, draw a pattern on paper, cut and transfer to the fabric. Another option: take any of those presented above in the text, slightly change according to your imagination and create a unique masterpiece. Good luck!

